Acer Scanner 1240UT
Review date: 29 June 2000. Last modified 03-Dec-2011.
Want a cheap PC flatbed scanner?
Hey, no problem. There are plenty of 'em out there, and they start from little more than $AU100.
The cheapest ones, though, connect to the PC's parallel port. This is good, because every IBM compatible has a parallel port, and every operating system knows how to use it.
But it's bad, because pumping tons of data over a parallel connection paralyses the computer while the scanner's in use. And parallel scanner driver software can be flaky. And if you already have a printer connected to your parallel port, you need to use a switchbox.
If you're running a Universal Serial Bus (USB) compatible operating system (Windows 95 Release B, Windows 98, Windows 2000...) and have the right hardware, USB scanners bypass all of the parallel port problems. They're more expensive - $AU200 or so at least - but they're still cheap, and there's still a lot of options.
What if you want to be able to scan transparencies, though?
For scanning slides or other see-through items, you need a scanner that can shine a light through the subject. Ordinary, low cost flatbed scanners just have a white inlay on the underside of the lid. To get useable results from transparencies, they need a special adaptor that replaces the plain lid with one containing a separate illuminator, that moves in sync with the scan head to shine through the subject.
All professional flatbed scanners have a transparency adaptor option, or come with one as standard. But practically none of the cheap ones even have the option.
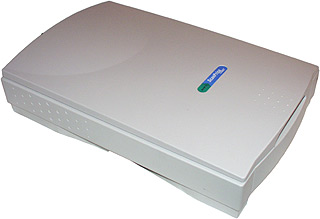
Well, here's one that does. Acer's 1240UT is a USB-interface flatbed that comes with a transparency adaptor as standard, delivers decent image quality, and doesn't break the bank - it's Australian retail price is $AU349.
Meaningful numbers
Scanner purchasers often seem to be moved by resolution and bit depth numbers, without really knowing what they mean and what else you should look for in a scanner. The 1240UT does well in both departments, but for many users it won't matter at all. Here's the low-down.
First, resolution. The concept's simple enough - it's the maximum pixel density, in dots per inch (dpi), that a scanner can record. A 600dpi scanner can turn a three by three inch area of its scan bed into an 1800 by 1800 pixel image. Simple enough. Well, until the marketing people get to it, anyway.
There are lots of cheap scanners these days that quote "1200dpi" resolution, but at the bottom end of the price range that usually means 1200dpi optical resolution and only 600dpi mechanical.
Optical resolution is the pickup density of the scan head. If it records, say, 600 pixels per inch, then you've got 600 dot per inch optical resolution. It's the resolution across the scan bed - the short axis.
Mechanical resolution is determined by the scan head moving apparatus; the smaller the steps the head can be moved in, the higher the mechanical resolution. This is the resolution down the scan bed - the long axis.
The 1240UT has true 1200 by 1200 resolution - 1200 dots per inch, both ways. And, as far as I can tell, it's not even cheating to get it.
Some scanners with "1200dpi" optical resolution get the higher resolution out of a standard 600dpi scan head, by doing two passes over the subject. On the second pass, a tilted glass refractor shifts the image one twelve-hundredth of an inch sideways on the scan head.
Some others do a similar dodge by using a pair of 600dpi sensors, offset by a half pixel from each other - the effect's the same, but you only need one pass.
The result from these sorts of scanners is better than 600dpi, but not as good as a true 1200dpi scanner will manage. The half-pixel offset they use means that each sensor element on the head sees half of what its next-door neighbour sees, as well as the little stripe of the subject that it's supposed to be looking at.
Other 1200dpi scanners have 1200dpi optical resolution (one way or another...) and 600dpi mechanical, or maybe even vice versa. Not so, with the 1240UT. Genuine 1200 by 1200, no tricks.
Acer quote the "maximum resolution" of the 1240UT as 19200 by 19200dpi, but this number's meaningless. It's how many dots per inch the scanner driver can deliver, but it's not how many dots per inch the scanner itself can manage; the driver just fills in the gaps between real pixels with "interpolated" pixels, making a bigger image with no more detail.
Bit depth
"Bit depth" is the number of bits a scanner assigns to each pixel it captures. The more bits, split among red, green and blue, the more colours are possible.
Canonically, 256 intensity levels is as much as the human eye can discern in any given colour. This includes greyscale; 256 grey shades is enough for photo-quality reproduction of a black and white image.
Nobody did scientific research and established that precisely 256 levels is the magic number, though. 256 is two to the power of eight; if you assign eight bits per pixel to a monochrome image, you can have 256 possible shades for each pixel. And a 256 shade image doesn't have noticeable differences between the shades.
If you assign only seven bits per pixel, you can have only 128 possible shades, and that's not enough; most people can see the difference between the shades.
When you're working in colour, with red, green and blue channels, you assign eight bits to each channel to get "24 bit colour". This gives you two to the power of 24, which is 16,777,216, possible colours for any pixel.
If you stick to one hue, anywhere on the spectrum, and only change the brightness (also known as "luminance"), you've got exactly 256 possibilities.
And, as this would suggest, 24 bit colour is, canonically, real-world quality; you can add more bits per pixel if you like and the eye can't tell the difference.
The 1240UT can deliver 48 bit colour data - 16 bits per channel - to applications that support it. It's not really a 48 bit scanner, though - it's only 42 bit, 14 bits per channel. There's no standard for 42 bit colour data, though, so the scanner driver just delivers 48 bit data to the computer, with only 1/64th of the possible intensity values actually used.
1/64th of full 48 bit colour is still, however, a rather imposing 4,398,046,511,104 possible colours. What on earth are they all good for?
Well, for home users, not a lot, really. But for more serious applications, extra bit depth - a wider "colour gamut" - lets you do more involved image fiddling before you lose detail.
Any image manipulation which takes some section of the total intensity range and stretches it out to cover the whole thing will benefit from greater bit depth. This range-stretching is what you're doing, for instance, if you're playing with image contrast and brightness.
Punch up the brightness, and you're just adding whatever amount you set to the brightness of every pixel, making the darkest pixel in the image as bright as black plus the punch-up value.
Punch up the contrast and you're taking the middle range of brightness values and stretching them to cover the entire image; any pixels brighter than that range of values become white, any pixels darker than the range become black.
Let's say you've got an eight bit greyscale image and you make a fairly extreme contrast or brightness adjustment, stretching half of the original intensity range out to cover the whole range. You've still got an eight bit image, with 256 possible shades of grey for any pixel, but you've stretched out only seven bits worth of data into that eight bit range, and every second intensity value won't be used.
So there's a chance that you'll see "banding" effects - obvious transitions between levels in areas where there's meant to be a smooth gradient. The more manipulations you do, and the more of the intensity data you throw away, the worse the banding effects will get.
But not if you've got excess bits. If you've got 12 bits of data instead of eight, then you've got 16 times as many intensity values; one-sixteenth of the total range will contain enough intensity values to make an eight bit image where every value in the eight bit intensity range can be used.
Most image manipulations don't throw away much of the colour gamut, anyway. Dumb contrast and brightness adjustments are old hat; every half-decent image editor these days can do the better version, gamma adjustment.
Let's say you want to brighten up an image, but without turning all of the lighter shades to flat white. The way you do this is by applying "gamma correction", which brightens (or, if reversed, darkens) pixels by different amounts depending on how bright they are to start with.
A simple "gamma curve" will do nothing at all to pixels that are already black or white, will slightly brighten very dark and very light pixels, and will brighten pixels more and more the closer they are to 50% brightness.
When you do this, the midtone sections of the image will be pushed up into the upper brightness settings. This is what you want, of course, but there are only so many possible brightness levels a pixel can have. For 24 bit colour or eight bit greyscale, there are only 256.
If a chunk of the image that previously occupied the middle 64 brightness levels is bunched up by the gamma curve into, say, only 30 or so levels higher up the chart, you lose some precision.
You won't see banding in areas of the image that get bunched up, though; the distinctions between colours are still just as small as they were, you're just making more pixels that occupy that particular range of colours. You'll see banding, if there is any, in any ranges of values that get spread out by the gamma correction.
In higher-than-eight-bit-per-channel modes, you've got a lot more intensity values to play with in the first place. You lose precision just the same as you do in lower bit depths, but the loss won't be visible until you've done quite a lot of processing.
In the real world, image tweaking is seldom severe enough that eight bit grey or 24 bit colour is inadequate. Comparing a 42-bit-scanned version with a 24-bit-scanned one may show you a slight difference, but you've got to look closely. It's not worth getting excited about.
Big bit depths are also handy when you're blending images together, but that's not something scanners have to do.
But it certainly doesn't hurt to have extra bit depth, especially when you're not paying a big premium for the privilege. There are plenty of cheap scanners with 30 or 36 bit output, but 42 bit is unusually good at this price point.
The driver
The driver is the most important piece of software that comes with a scanner. Dud bundled-in image editing software can be replaced with the package of your choice, but you're almost definitely stuck with the driver the manufacturer provides.

The 1240UT's "MiraScan" TWAIN (TWAIN, in case you're wondering, officially does not stand for anything) driver is pretty close to perfect. There's no separate image acquisition program; you use the driver for everything. All half-decent graphics software understands TWAIN, so this is not a problem. The driver's really only got one flaw.
A full-bed preview scan - which you do to set your scan areas and other setting properly - on the 1240UT takes about 17 seconds. This isn't particularly fast, but neither is it slow. Unfortunately, MiraScan doesn't let you interrupt the pre-scan when you've seen all you need to see. It doesn't actually show you the preview in real time at all - it does its 17 second thing, and then shows you what it saw. And if you hit the abort button before the preview's finished, you don't get to see a thing.
You don't need to do a full-bed scan if you've just put a photo at the top of the scan bed, and you don't need to do a full-bed preview scan either. But MiraScan disagrees. Many other cheap scanners have drivers that display the preview progressively as it's done, and let you stop it at any point without losing the preview image.
If you're doing a lot of scanning of less-than-full-page items, this simple feature can save quite a bit of time. Not with the 1240UT, though.
Apart from the pre-scan annoyance, the Acer scanner driver is excellent. It's got a full set of automatic features, but it doesn't insist on using them for everything. Some cheap scanners come with annoying "training wheels" software, but not this one.
MiraScan lets you tweak your gamma curves, do hue and tone balancing and hue rotation (to shift the image's colours one way or the other), and automatically or manually apply descreening filters to reduce moire distortion of halftone images. You can apply other sharpening or blurring filters to things as you scan them, too, and there are even compensation curves for different kinds of transparency film.
The driver also lets you set multiple "frames" on the image, each of which will be scanned separately and sent to whatever program called the TWAIN driver as a separate file.
MiraScan's not too smart about how it uses the scanner, in this mode - the scan head returns to the top of the bed between frames, rather than just moving to the next start point and going again. But it still lets you easily scan just the blocks of text you want from a complex document, for instance, or separately grab the ornate borders around a picture at high resolution without scanning the whole picture that way and making The File That Ate Tokyo.
Other software
As well as the MiraScan driver, my review scanner came with Acer's standard scanner software bundle. It includes Ulead's Photo Express 2.0SE, a vaguely Print Shop-ish image fiddling package that lets you adorn your scans with various decorations and do similar Happy Little Home User things with them. Doing anything vaguely serious with Photo Express is like trying to build a house out of Lego.
Photo Express 2.0 doesn't understand 48 bit input, either; v3.0 apparently does. No matter; if you're happy with Photo Express, the extra bits will be wasted on you anyway.
The standard bundle also contains Xerox's ubiquitous TextBridge Optical Character Recognition (OCR) package, for turning scanned documents into text. TextBridge is rather long in the tooth, now, but it does its job quite well and is easy enough to use. There's also a copier application for easy one-step scan-to-print photocopier emulation.
I suspect that 1240UTs sold in Australia will come with the superior software bundle mentioned on Acer Peripherals' page for the scanner here. That bundle gives you Photo Express 3, the quite useful Kai's Photo Soap 2 for image touch-up, a different OCR package, and Photogenetics, an interesting image enhancement package that uses a genetic algorithm system to pick the right settings - it shows you a different version of the image, asks you how much better (or worse) than the original it is, and uses any "better" image as the base for future modifications.
My review scanner had MiraScan on a CD-R, so I wouldn't be surprised if you got the other bundle with the retail version. The US bundle package is pretty darn good for a low cost scanner.
Quality
It's hard to show proper quality samples for scanners, because anybody with a modicum of image editing skill can turn the output from all but the most awful scanners into something that's fit for human consumption. Play with the levels a bit, maybe punch up the colour saturation, apply a little sharpening, presto.
Raw images therefore don't really tell you a lot about the results you can get from a scanner, unless you're showing off the self-adjustment features of pro models, which remove the need for image tweaking entirely in many cases. Nonetheless, here are a couple of samples.
The shiny coin is the lousy scanner's nemesis. Cheap flatbeds of yore couldn't deal with highly reflective subjects at all; you'd get results that were far too bright or far too dark, with very little detail, or you'd get nasty coloured fringes because the scanner had three significantly angled sensors for red, green and blue and they were calibrated to look at dead flat subjects, not 3D objects like a coin.
Pretty much everything on the market these days can at least make a reasonable effort in the shiny-coin test, but the 1240UT does better than most.
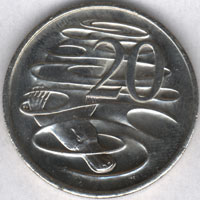
Here's the 1240UT's opinion of a 20 cent piece. This is a massively scaled down version of a 1200dpi scan.
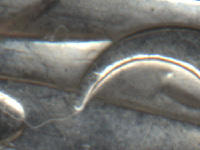
Here's a full-resolution section.
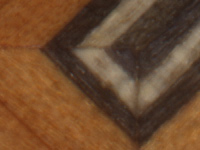
And here's a similar 1200dpi sample, of the marquetry on the bottom of a Japanese puzzle box. These 200 by 150 images cover an area only about 4.23 millimetres wide.
Overall, the 1240UT's scan quality is significantly better than the results you'll get from cheaper USB models. Its 1200dpi output is much sharper than the results from pseudo-1200dpi scanners and the various ones with 1200dpi optical and 600dpi mechanical resolution. And when you're using more sensible resolutions, its high bit depth and quality driver software mean the 1240UT is likely to give you a nicer looking picture before you start with the post-scan tweaking.
Speed
A full-bed 300dpi colour scan - not something you're likely to do too often, as it generates more than 25 megabytes of image data in 24 bit colour, and twice that in 48 bit - takes the 1240UT more than five and a half minutes. That includes the time it takes for the scanner to squirt data over to the driver; the scan pauses while this happens. The scanner only seems to have about three and a half megabytes of internal memory free, so there are plenty of pauses.
Five and a half minutes is slow. There are plenty of cheap USB scanners that can do the same job in well under a minute. Then again, they give crummier results.
At 100dpi, 24 bit colour, you'll only be waiting about 30 seconds for a full bed scan from the 1240UT. In this lower resolution mode, the Acer's still slow, but only by a factor of about two compared with the cheaper opposition. Give the 1240UT less to think about, by dropping to greyscale or line art ("one bit") mode, and the 100dpi full bed time drops to about 16 seconds. This is quite on par with other cheap scanners.
So if you need a pump-em-through document scanner, the 1240UT won't serve you any worse than any other low cost USB unit. But if you're making use of its high resolution, you'd better be prepared to wait. USB scanners at least let you get on with something else while the scan progresses, and for most people the speed issue isn't an important one. Compared with old three-pass scanners, which are what you used to have to buy if you wanted quality on a budget, the 1240UT's quite speedy.
Interestingly, the "High Speed" (as opposed to "High Quality") mode selectable in MiraScan doesn't actually seem to be any faster. Then again, it doesn't look any worse, either. I would surmise that this scanner doesn't actually have a high speed mode, but the one-size-fits-all driver doesn't know that.
Transparency scanning
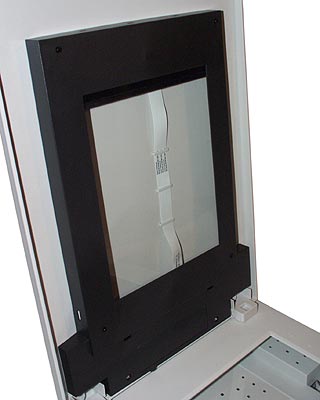
If you've seen one transparency-scan lid, you've seen 'em all.
You get transparency templates with the scanner, which you pop onto the scan bed to make it easy to align mounted slides or larger film items without messing around trying to line them up with the edges of the scan bed. The transparency-scan lid only lets you scan a five by seven inch area of the standard 8.5 by 11 inch bed, but that's plenty.
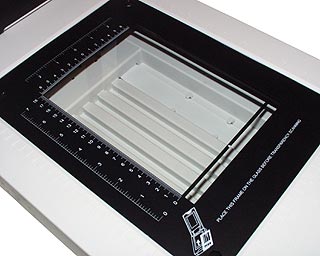
The large transparency template's for big things and film strips...
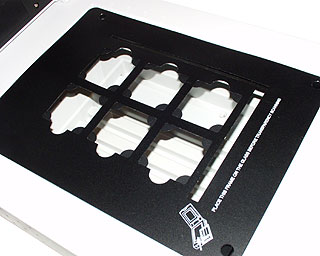
...and the small one lets you scan six slides at a time, if you like. This is one place where the multiple-job feature of MiraScan comes in handy; you can set up your six slides, make a separate job for each one (with completely different resolution and enhancement settings, if you like), then go about your business while the scanner does its thing automatically and the driver dumps one image after another into whatever package it was that called the driver.
Problems
One serious count against the 1240UT for professional graphics work is that, like all cheap scanners, you can't remove the glass. That means that if you scratch it, you... well, you'd better do your high resolution scanning on some other piece of the glass now. And if there's dust on the underside of the glass, you can't clean it without dismantling the whole scanner.
How would dust get in there, you ask? Through the holes. There are various small vent holes on the bottom of the 1240UT - not that it really needs them; I think you could tape them over and not run any risk of overheating the scanner. The 1240UT I got for review had already been used a bit, which meant it already had dust on the inside of the glass.
For non-critical purposes, this is no big deal. And any somewhat experienced image fiddler can easily rubber-stamp dust specks out of existence on the final scan. But for professional, high-throughput purposes, a dusty scanner is a big time waster, and time is money.
Overall
Ultra-monster-resolution isn't useful for most purposes. And neither is 42 bit colour. And most users don't scan transparencies. If you don't need any of these features, you don't need the 1240UT.
Sure, it delivers crisp, clear results at any resolution and has a nice driver, but you won't get much worse quality for a hundred dollars less.
If one or more of the 1240UT's special features does interest you, though, it's a bargain.
Huge resolution is handy if for some reason you need super-magnification. You can get nice big useful images of small objects, like jewellery. They won't win any photographic awards, mainly because the lighting's not going to be very exciting, but if you're looking for a microscope with an A4-sized stage then a high resolution flatbed can do a surprisingly good job.
And high bit depth and the transparency adaptor, between them, mean that people trying to break into pro imaging on the cheap should seriously consider this scanner. Giant drum scanners and purpose-built slide scanners and other serious pro kit, of course, are far better. But for $AU349, the 1240UT's stunningly good.
As an all-round unit that can turn its hand to anything from decently fast low-res fax-copy-and-OCR work to good quality slide scanning, the 1240UT's a stand-out product. Recommended.
Pros: |
Cons: |
|
|
Review 1240UT scanner kindly provided by Acer Peripherals, a division of Acer Computers Australia

