Kodak digital camera comparison: DC220 versus DC120
Review date: 27 March 1999.Last modified 03-Dec-2011.
I take quite a lot of digital photographs, for this site and for more frivolous purposes. I do this with a Kodak DC120, a highly capable camera with some excellent features but some annoying flaws. So I was interested to find out what the DC220, one of the lower cost models in Kodak's current 200-series range, has over its older sibling. How much difference does that extra 100 in the model number signify?
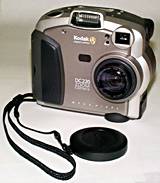
The lens cap isn't part of the standard package. Fortunately, there are various bundles that include it.
What you get
The DC120 is a "binocular" shaped camera - it's much longer than it is tall. It measures 5.7 by 4.3 by 2.2 inches (146 by 108 by 55mm). The DC220 is shaped more like a regular film camera, roughly square in frontal cross-section and not very deep - 4.6 by 2.2 by 4.2 inches (118 by 57 by 106mm). This makes it a bit smaller overall than the DC120, but it's still not at all a pocket camera. The DC220 weighs 1.2 pounds (525 grams) without batteries, a scant 5 grams more than the DC120.
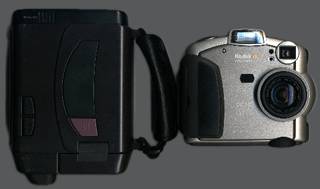
The DC220 has two dimensions that are roughly the same as the older DC120, but it's about an inch less tall than the 120 is long. If you prefer a more conventional camera shape to the "binocular" design of the 120, you'll like the 200-series cameras.
Both cameras have a flash, both have a zoom lens, both use CompactFlash cards for picture storage, both run from four AA cells or an AC adaptor.
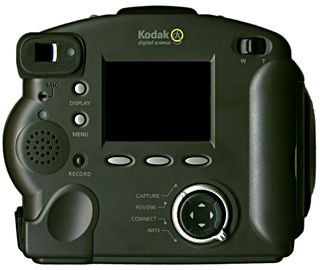
The much bigger back panel offered by the DC220's upright design makes room for a bigger LCD, and far better controls than the DC120.
The basic DC220 can be had here in Australia for $1200 (Australian dollars), which includes an 8Mb memory card, connection cables, the driver software, Adobe PageMill and PhotoDeluxe, a set of batteries, and, in a pleasing departure from Kodak's previous sell-the-car-without-the-tyres approach, an AC power adaptor, which can run from 100 to 240 volts and includes plug adaptors for various countries. There are also bundle deals with more or bigger memory cards, rechargeable batteries and a CompactFlash card reader of some kind. The package I checked out only included a parallel port card reader.
A few sets of rechargeable batteries and a charger are not a bad idea, if you don't want the hassle of a custom battery pack. Click here for my page on More Power for digital cameras!
The basic DC120 package, which is just as Spartan, is still for sale new from a few retailers; at the time of writing it costs less than $US400. Second hand, you could easily pay less than half the price of a new DC220 for a 120 with extra memory and other add-ons.
Larger capacity CompactFlash cards - 24 to 48 megabyte capacity - cost about $US4 per megabyte at the time of writing. Smaller capacity cards, like the 8Mb one that comes with Kodak's current consumer cameras, are much worse value for money.
Both the 120 and 220 have a standard tripod mount hole on their bottom panel, so you can use them with pretty much any tripod from a little plastic cheapie on up. This is handy, because both cameras can do long exposure images, which come out hopelessly blurry if you don't keep the camera very still.
Booting up
The DC220 camera takes about seven seconds to become operational after you press the power button, with the current 1.0.6 firmware. It defaults to fully zoomed-out mode, which is good because it means the lens extends and automatically pushes off the lens cap, if you've got one. The less brainy DC120 takes less than three seconds to become ready to take pictures.
The numbers
In the resolution department, the older DC120 seems to beat the 220 handily. The DC120 outputs 1280 by 960 images, while the DC220 is only 1152 by 864 (both of these resolutions are about right for near-photo-quality 5 by 7 inch printing). The DC220 also supports a 640 by 480 pixel "standard" resolution in addition to its "high" setting.
The DC120, however, cheats. It does 2:3 horizontal interpolation from a CCD with rectangular pixels, whose real resolution is only 850 by 984 pixels. The genuine CCD resolution of the DC220 is 1174 by 884. So while the DC120 might seem to be 23% ahead in the pixel race, it's actually 16% behind in real resolution. On the other hand, the DC120's better lens often allows it to make better pictures with its fewer pixels, which is something I'll discuss shortly.
Both cameras use the popular CompactFlash memory system, so you can swap memory cards between them. The DC120 has 2Mb of on-board memory, but it can only use it when there's no memory card installed - if you fill your last card, you can pop it out and grab a few more shots in the onboard storage.
The DC220 has no onboard memory; without a memory card, you can't take any pictures at all. The standard package comes with an 8Mb memory card, which is a decent size to start with, but getting another card when you get the camera is still a very good idea.
Kodak describe their levels of compression in their consumer cameras as "Good", "Better" and "Best", although it's more fair to call them Lousy, Passable and Good. The Good setting is OK if you're intending to shrink your images into weeny little Web page pictures, or just don't care at all about making pretty photos and want to squeeze as many shots in as possible.
The DC220's two resolutions make this sort of picture-packing easier. The stock 8Mb memory card will hold at least 18 Best quality, High resolution images, or 30 at Better quality, or 48 at Good quality. Drop to Standard resolution and you can fit at least 51 Best quality, 76 Better quality or 105 Good images. The DC120 can't make pictures this small, because of its single output resolution; it tops out at 84 images on an 8Mb card in Good mode, or 54 Better quality, or 31 Best quality, or exactly 9 uncompressed images. If you pop the card out, you can fit another 2Mb worth in the on-board RAM.
The actual number of pictures either camera can fit onto a card depends on how compressible the pictures turn out to be - images with large areas of solid colour, for instance, will compress into smaller files than more complex pictures. The cameras re-estimate the number of images remaining on the fly. I commonly fit more than 10% more images onto a DC120 card than the camera estimates will fit when the card's empty.
The DC120's uncompressed images are very nearly indistinguishable from Best mode; Best quality on the DC220 is noticeably more heavily compressed, but not enough to be offensive.
The DC220 can save its images to the CompactFlash card as either universally compatible JFIF (JPEG) format images, or the lesser known FlashPix (I mention both formats on my Graphics Formats Explained page, here). This is a considerable advance over the DC120 and other pre-200 series Kodak consumer cameras. These all used Kodak's proprietary KDC format, which few programs can read. This meant you had to change the image format when you transferred the images, losing detail if you translated them to another compressed format, or using tons of disk space if you translated them into an uncompressed format like TIFF.
Lens info
Both the DC120 and DC220 are zoom cameras, but their lenses have quite different specifications. The DC120 has an autofocus 3X zoom lens, which can go from 38 to 114mm (35mm equivalent; for more information about photographic terms like these, see my page on the subject here). The DC220's lens, however, is a fixed-focus 2X zoom, with a range from 29 to 58mm (35mm equivalent). This means that when they're both zoomed out all the way, the DC220 has a field of view roughly a third wider than the DC120. This is unusually wide-angle, and makes it more suitable for most interior shots, where you're not far from the action and want to get as much of it into the frame as possible. For outdoor shots, the wide angle lens makes the DC220 a bit more susceptible to lens flare.
When they're both zoomed in all the way, though, the DC120 wins by a mile, with almost twice the magnification. The DC220's 58mm really isn't enough for a lot of middle-to-long distance shots; sweeping vistas are all very well, but you often want to see things more closely.
The DC220 tries to make up the difference with an extra 2X "digital zoom". Digital zoom is no substitute for optical zoom; instead of using a lens that can actually magnify the scene better, it takes only the middle portion of the image on the CCD and blows it up to full image size, filling in the lost detail with interpolation.
The results from this are hopelessly fuzzy - see the picture samples here. Some digital cameras implement digital zoom by just cropping out the "zoomed" section from the regular image, which at least means the images come out small. Because the DC220 blows digi-zoomed images up to full size, they don't end up much smaller than any other pictures.
If you don't want to do any image manipulation and just want a picture framed exactly the way you want it, the DC220's digital zoom may fit the bill. But it's a waste of storage space and good for very little.
Fortunately, you won't find yourself accidentally slipping into digital zoom while using the DC220; the extra zoom only works when the LCD display is turned on, and there's a little icon in the top right of the display to tell you when it's in use.
Another advantage of the DC120 lens is that it's got a 37mm screw thread on the front of it. This means you can attach standard camcorder filters and extra telephoto or wide-angle lenses. The DC220 has no such thread.
This was a necessary exclusion, because the smaller form factor of the more "camera shaped" DC220 means its zoom lens has to protrude from the camera body, and you can't hang anything much from an extendable zoom lens without damaging it. Even a basic filter would stop the lens from retracting properly without unsightly styling changes, and if you provide a filter thread, somebody's going to stick a telephoto lens on it, bust the mechanism and complain.
The DC220 supports shutter speeds of 1/360 to 16 seconds, although you can only select the speeds slower than 1/2 second by activating the Long Exposure mode. The DC120 works the same way, and supports 1/500 to 16 seconds. Incidentally, the fact that the DC220 will autoexpose up to half a second in sufficiently dark conditions means taking quite good non-flash pictures at night is possible - as long as you keep the camera still!
Both cameras let you change their exposure setting up or down by up to two F-stops, in increments of half a stop.
Image quality
How good the photos look is the bottom line for any digital camera review, and in this department the DC220 does quite well.
 DC120 - no zoom |
 DC220 - no zoom |
| The DC220's 30% wider field of view is clear in these two shots. | |
 DC120 - zoom |
 DC220 - zoom |
 DC120 - zoom |
 DC220 - zoom |
| With a 30% wider initial field of view and only 2/3rds as much zoom as the DC120, the DC220 has a hard time getting in close. The DC120 has roughly twice as much magnification in full telephoto mode. | |
Other than its not-so-good telephoto performance, the DC220's only real limitations come from its fixed-focus lens, which makes distant detail noticeably fuzzier than the results from an autofocus camera like the DC120.
Kodak describe the DC220's lens as "focus-free". This is kind of like calling an unfurnished apartment "refreshingly uncluttered". A fixed-focus lens is, as they say, simple to use, but if it were really possible to be perfectly in focus at all distances, everyone would be using them. What a fixed-focus lens really does is focus at a medium distance - not close up, and not infinity. This means that most pictures taken with the DC220 will be slightly fuzzier than the output resolution would suggest.
In the real world, fixed-focus lenses are a compromise, that do pretty well at any distance. A digital camera, even a relatively high resolution one like the DC220, can get away with less than perfect focus because its resolving power is still crummy compared with that of even a modest film camera. An ordinary frame of unremarkable general purpose 35mm film can resolve easily as much data as a 3600 by 2400 pixel digital camera, and probably a fair bit more.
|
Image sharpness These two little picture snippets clearly show the inadequacies of the DC220's fixed-focus lens. Both are 60 by 45 pixels, and shown three times actual size. The DC120 zooms in further than the DC220, so for ease of comparison I've scaled the DC120 sample down to the same 60 by 45 pixel size as the DC220 one. The DC220's blurriness on distant subjects is obvious. |
|
|
DC120 |
DC220 |


The DC220 lens produces (comparatively) sharp results on objects as close as one metre when it's zoomed in, or 50cm when it's zoomed out.
The wide depth of field a fixed-focus lens has to have also means it'll have a smaller aperture, and hence less sensitivity, which could explain the fact that the DC220 isn't as sensitive as the DC120.
Sensitivity
The DC120 is rated at an ISO sensitivity of 160, while the DC220 rates only 140. This means that if you point both cameras at the same scene and set them to the same shutter speed, the DC120 will produce a brighter image.
The DC220 compensates for its slight sensitivity deficit by using slower shutter speeds. This only starts to hurt it when you start shooting in poor light, especially in middle-range shots where the flash helps little or long-range ones where it doesn't help at all.
You can clearly see the gain difference between the DC220 and the DC120 in these two 16 second exposures, shot on an overcast night. Both cameras can see better than a human when you set them to long exposure - they can pull colour out of a scene that's too dim for the colour-sensing cone cells on your retina to fire at all - but the DC120 is obviously superior.
|
|
|
|
The DC220 has a wider field of view (both cameras are zoomed out all the way) but can pull practically no detail out of the darkened garden, even with 16 seconds to try. On the other hand, its exposure is practically free of "hot pixels" - slightly over-responsive cells on the CCD which, over a long exposure, come up as bright dots. |
The DC120 produces a nasty sprinkling of hot pixels, but at least it sees some more detail than the 220. As well as the hot pixels, the "warm corner" at the top left of the image is more prominent. The warm corner is caused by excitation of the CCD cells by heat from its connecting wires. |


Generally speaking, the DC220's pictures are both acceptably sharp and pleasingly noise-free. The DC120 might be more sensitive, but it's also noisier; a photo of a clear blue sky taken with a DC120 will have clearly visible grain, which is much less obvious in a DC220 shot.
|
|
|
|
A 40 by 40 sample of a plain white surface shot with each camera, shown 4X actual size. The beige colouration comes from yellowish indoor lighting and inaccurate white balance settings, a common problem on unusual subjects like this which throw off the cameras' automatic exposure and white balance settings. There is no "real" detail in this surface, so focus and resolution are irrelevant - all of the unevenness you see is camera noise. The DC220's attempt is definitely smoother. And darker, perhaps because of its lower sensitivity. Setting its exposure adjustment up by about one stop would have made it the same shade. |
|


Viewfinders
Both the DC120 and the DC220 have "coaxial" viewfinders, located about 4cm from the lens on the DC220 and a bit more than 3cm away on the DC120. Coaxial viewfinders are fine unless you're shooting things really close to the camera, in which case the offset viewfinder will give you an inaccurate idea of the shot framing. The DC120 viewfinder has two aiming circles and a couple of offset corner markers to help you guess framing for close-ups; the DC220 viewfinder has no such adornments.
The rubber surround on the DC120 viewfinder conspires with its slightly narrower acceptable viewing angle to make it a little touchy to use and somewhat annoying for glasses-wearers - since neither camera has dioptre adjustment for the viewfinder, you'll need to keep your specs on. The DC220 viewfinder is more accommodating for four-eyed users. Neither optical viewfinder is placed so that you'll rub your nose all over the back of the camera, unless you decide to peer through the finder with your left eye. Both optical viewfinders show you a bit less than the whole image area.
Of course, you don't have to use the optical viewfinder. Both cameras also offer a power-sucking Liquid Crystal Display (LCD) screen.
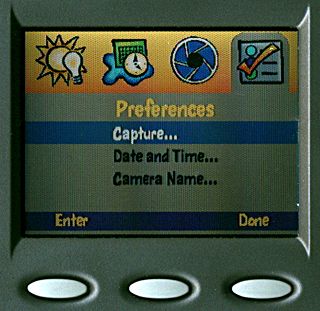
The DC120 has a 1.6 inch LCD screen. The DC220 has a 2 inch, and can update it much faster when you're using it to frame a shot. Both cameras can also use the LCD for displaying interface menus, but the DC220 menu system, and user interface in general, is far more powerful than the very basic DC120 setup.
The DC120 LCD, like its optical viewfinder, shows you a slightly zoomed version of what the camera's really going to capture, though the difference is not as large. The DC220 LCD preview appears to be 100% accurate. The DC220 LCD also has a lot more pixels than the DC120's, so you can get a better idea of what the picture really looks like. When you're reviewing pictures in full-screen mode (as opposed to the DC120's four-or-nine-pictures-at-a-time tiled mode or the DC220's more sophisticated picture selection mode), both cameras draw a low resolution version quickly first, then fill it in from top to bottom with a more detailed view over a period of some seconds. If you wait for the high-res version to display, the DC220 then lets you zoom in and see the image in 1:1 pixel mode, which is a very useful feature and removes a lot of uncertainty about what you've actually just captured.
The DC220's user interface makes turning the LCD display on for shot framing very simple - one button does it. The DC120 makes you press two buttons at once, and still doesn't always seem to hear you. This is a continuing theme - the DC120 can do a lot of things the 220 can do, but the user interface makes it more annoying.
The LCD displays on both the DC120 and DC220, and on any other digital camera you care to name, are practically illegible in bright sunlight. The DC220's menus are drawn in high-contrast colours and so you can still read them, but reviewing pictures is close to impossible.
Power consumption
Digital cameras are known for their hunger for batteries, and the current Kodaks are no exception. The DC120's current draw varies from 200mA (milliamps; 1000 milliamps are one amp) when it’s turned on but not doing anything to about 1.2A when its LCD screen is in full power-vampire mode. It can peak at about 2A right after taking a picture.
By comparison, the DC220 is a bit more efficient, despite its fancier features. Its quiescent current draw is only 80mA and it never seems to draw much more than an amp. This is still a heavy load for conventional alkaline or lithium cells, though, and you can't expect them to last for more than about 100 flash pictures. If you leave the LCD panel turned on, both cameras can use a set of regular alkalines in less than 30 minutes. Incidentally, alkalines "flattened" by a digital camera probably actually have a fair bit of life left in them for less demanding applications.
As with all digital cameras, rechargeable batteries are the way to go, and the bigger the better. I've got a big article on the subject, which also explains the oddities of non-rechargeable cell behaviour, here.
If you're considering plugging a big fat battery pack into the DC220 via its AC adaptor socket, you'll face two problems. The first is that the socket is less conveniently placed, due to the shape of the camera, than the DC120's, so it's trickier to hold the camera while something's connected there. You could at least partly get around this by using a right-angle plug, but you could have difficulty finding such an animal, because of the second problem.
The 200-series cameras use an unusual size of barrel plug on their AC adaptor lead, presumably to discourage people from using cheap plugpacks with unknown current capacity, voltage and polarity, which could blow up the camera.
I'm about 95% sure that Australian readers can get the correct plug from Jaycar Electronics, which has it as a separate item with a standard two pin connector, as used by lots of AC adaptors (most of which don't have the current capacity to power a digital camera). The Jaycar part number of the probably-correct plug is PA-3692, and it costs a big $AU1.75. Their site is here.
If you live somewhere where no electronics stores stock the right kind of plug (yellow plastic insert in the end, 1.75mm inside diameter, 4.75mm outside diameter), you'll have to hack the lead off a plugpack. This is not as lousy an idea as it sounds; if you solder a connector in the middle of the AC adaptor lead, you can plug it into the adaptor or into a battery pack.
The DC220 ran perfectly from my big 6 volt NiCd pack (its AC adaptor, like the DC120's, is rated at 7 to 8 volts), when I plugged it in via a disconnected adapter lead. A superficially similar barrel plug worked not at all. I'm not sure why the DC220 is so fussy about the connector you use - most barrel plug connections are just unreliable, not stone dead, if you use a slightly-wrong plug.
User interface
The DC220 is a pretty user-friendly camera.
The DC120 isn't.
With the DC220, everything can be configured from a series of colourful, easy to follow menus displayed on the LCD screen, and basic features can be quickly set with the three buttons on the top and displayed on the subsidiary display there. The DC120 keeps its LCD screen and its plain black and white LCD display both on the back panel.
All up, the DC220 has 19 controls, counting the two-way zoom lever as two and the four-way joypad with its encircling selector switch as five. The less featureful DC120 has 11 controls, counting the slide-open front-of-camera power switch arrangement as one, so you might think it'd be not much more annoying to use.
You'd be wrong.
All of the DC220 buttons are quite solid and definite in operation, and it has different ones for different functions, so to change common features generally requires just a couple of presses. On the DC120, however, most of the functions are set with only two buttons, TAB and SELECT, which like all of the other back-panel buttons are nasty little membrane affairs. It's hard to tell whether you've pressed them properly or not.
To turn the DC120 flash off, as an example, you have to push TAB-TAB-TAB-TAB-SELECT-SELECT. And since there's no back-tab or back-select button, changing many settings can be like setting a non-reversible clock for the end of daylight saving time - you have to go forward and forward and forward until you're just behind where you started. So to change the manual exposure setting one notch faster, you have to press TAB three times and then SELECT no fewer than 19 times! The camera advances the setting by itself if you just hold the button down, but woe betide you if you overshoot and have to go around again.
Another of the DC120's annoying features is the way its 10-second timer shot feature works. To turn the timer on you have to press the TAB key no fewer than seven times to hop through all of the other features, then the SELECT key once, and the Enter or shutter button to get out of the menu mode if you're not in the mood to wait a few seconds for it to time out. When you press the shutter button, a red light on the front of the camera glows for a while, then flashes for a while, then the picture's taken. If you want to take another timer picture, though, you now have to turn timer mode on again with the same eight keystrokes, which is a pain.
The DC220 works almost exactly the same way - the only substantial difference is that you can turn timer mode on with just one button push, on the timer/macro button to the right of the top LCD display. This button activates timer mode with one push, macro with two and both with three. One push instead of eight is a very nice change.
While the DC120 has buttons you barely ever use - I don't think anybody's ever going to wear out their DC120's INFO button - the DC220 has three multi-function buttons under the LCD screen, whose function changes depending on what you're doing and indicated by text at the bottom of the display. Often only one or two of them do anything, but they're still streets ahead of the DC120's overworked pair.
I'm used to the pain of the DC120's interface, and can make it do what I want easily enough. But I sure wouldn't mind something better, and that is exactly what the DC220 offers. The DC220 interface is much easier to learn and far faster to use.
Both cameras, like pretty much every other consumer digicam, suffer somewhat from delayed response - lots of things don't happen exactly when you press the button. Both offer instant response for simple changes like disabling the flash, but both also have a lot of one-second pauses when the LCD screen is on. The DC220 suffers more from this, because its menu system will have you peering at the LCD a lot more often. The pauses are a small price to pay.
Both cameras, again like lots of other cheaper digitals, also have a small delay between when you press the shutter button and when the picture actually gets taken. You can reduce the delay by "preparing" the camera, by half-pressing the shutter button. This lets the camera set its exposure and autofocus (DC120 only). If you don't, the delay from button-press to picture for the DC120 is about 1.3 seconds. The non-autofocus DC220 takes maybe 0.7 seconds. Both cameras will take a picture in about 0.3 seconds if allowed to prepare, or given fixed settings manually, but even this is a bit disconcerting when you're used to the immediate click of a film camera.
The only clumsy feature of the DC220 interface is how it deals with large numbers of images in Review mode. Review mode can show either a full-screen image of the picture, or a "film strip" of little thumbnails at the top of the screen, with a larger view and more information at the bottom. You can mark and unmark images as you view them in this way, which lets you mark and delete several images easily. If you hold the Delete button down it'll switch to a Delete All mode, to easily clear a memory card of pictures.
But when you've got lots and lots of images, the three-at-a-time view is inadequate. Holding the joypad right or left will bring up a "Faster" annotation over one of the multi-function buttons, letting you press it to whisk through the images really quickly, but it still takes time to marshal your images, especially since the DC220 can't automatically dump a sequence of shots into a particular "album" separate from other pictures, as can higher models in the 200 series.
The DC120 doesn't have the same sophistication, but it can at least show nine tiled thumbnails at a time. And it supports albums, although they're basically just numbered drawers.
Despite the general awfulness of its interface, the DC120 is still fine for plain point-and-shoot happy snaps. I regularly take it to (sedate) parties and let people hand it around and shoot whatever they want, and nobody has any trouble figuring out the basic features. The more convenient location of the DC120 AC adaptor socket also helps, here, as my big NiCd pack is essential for party use, which involves lots and lots of flash photos and quite a bit of immediate reviewing on the LCD.
Macro mode
The DC120's macro mode is annoying. It can macro focus on things from 20 to 50 centimetres (7.9 to 19 inches) away, but its autofocus doesn't work in macro mode. To get the focus right you have to measure the distance-to-target, and use the zoom buttons to tell the camera where to focus. The LCD's resolution is too low to tell whether you've got it right, and you can't zoom in on the picture in playback mode, so you have to do a lot of focus bracketing - if the target's about 31 centimetres away, you do a shot at 29, a shot at 30, a shot at 31 and so on.
The fixed-focus lens in the DC220 solves that problem, though not in a very pleasing way. Since it can't change focus, macro mode for the DC220 works at 20 centimetres (7.9 inches) only. You still need a ruler, but it only has to be eight inches long.
The higher resolution LCD screen on the DC220 makes judging macro focus by eye considerably easier. But if the thing you want to take a shot of is too big for the frame at eight inches - tough. Maximum size is about 4 by 5.5 inches (105 by 140mm).
Flash modes
Both the DC220 and the DC120 default to "automatic" flash, where the camera pops the flash whenever it thinks the scene is too dark. Both of them also let you turn the flash off, or force it to fire for every shot, and both of them are quite good at reducing the flash brightness when you're doing macro shots, so as not to overexpose the picture. The DC220 also has a red-eye reduction double-flash mode.
Moving data
There are only two ways to get your pictures out of a DC120 - a serial link, and a CompactFlash card reader of some kind. CompactFlash cards can be read in regular PCMCIA slots (such as most laptops have) by plugging them into an inexpensive adaptor, and you can also get dedicated CompactFlash readers with various interfaces - parallel port, SCSI, EIDE and USB.
If you're stuck with serial, though - and many people are - the fastest speed you can use is 115,200 bits per second, giving you a throughput of not much more than 10 kilobytes per second, or only a bit more than 7kb/S when you include the time the transfer software takes to set up the transfer of each image. This adds up to more than two minutes per megabyte of data.
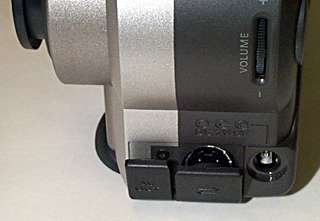
Hinging rubber covers protect the DC220's delicate A/V out and serial/USB cable connectors. They fit the ports firmly and shouldn't pop open by accident.
The DC220 has a serial interface just like the DC220, but the same socket on the camera also accepts a USB cable. The USB interface works with USB-enabled PCs and Macintoshes. If you've got a PC, you need USB ports on your motherboard or an expansion card, and Windows 98.
The DC220 USB interface appears to move data at about a megabyte every 30 seconds - 6.75 megabytes of data, comprising 52 separate files, took three minutes and 53 seconds, including the little pauses at the beginning of each file copy. USB is capable of either 1.5 or 12 megabits per second depending on what mode it's using, so I'm not sure why the DC220 doesn't transfer data a great deal faster. Still, it's more than four times faster than serial, and quite acceptable for pretty much everyone.
For real speed, you still need a dedicated CompactFlash card reader, or a PCMCIA socket (and a PCMCIA adaptor for your CompactFlash cards). My parallel port CompactFlash reader can write a 7Mb file to a CompactFlash card in about 30 seconds and, more importantly, read files about twice as fast. This is approaching hard disk speed, and lets you dump a full 24Mb picture card to hard disk in about a minute, versus around 12 minutes for USB and something like 50 minutes for serial. Like all high transfer rate parallel devices under Windows, the reader practically freezes the system while the data's being moved, but the time saving is worth it.
I have a parallel port CompactFlash reader, but when I've only taken a few shots with the DC120 I often don't bother to use it. This is because, as with many parallel devices, its drivers are flaky. Often I need to reboot a couple of times before the drivers deign to let Windows start up properly, and it regularly causes bizarre Blue Screens Of Death when the reader's accessed, which don't seem to actually hurt anything but sure are annoying. So I've got the reader sitting on a parallel switch-box, and need to switch to it and reboot in order to activate it.
Perhaps there are better parallel port card readers than the Simple Technology PC PhotoReader I use or the DataFab Parallel Port Mobile Disk that came with the DC220 package I reviewed. So far as I can tell, these two readers are the exact same unit rebadged, as are the drivers, and they have exactly the same problems.
An IDE or SCSI card reader doesn't have the go-anywhere, work-with-any-PC portability of a parallel unit, but also won't have these problems and will be just as fast or faster.
If you've got a DC120 and a card reader and you've filled your card and the internal memory, you can copy the files off the card, delete them, pop the card back into the camera and copy the internal memory contents to the card. Given how long this fiddling takes, you might as well plug in the serial cable for the last two megabytes. No such folderol is needed with the DC220, because it's got no internal memory.
The DC220 also supports IrDA infrared data transfer, with a little send-receive window in the middle of its front panel. The IrDA transfer speed is only 115200 bits per second, no faster than serial, but it doesn't need any cables. You can transfer files to a PC with an IrDA port (most current motherboards have an IrDA connector, but you have to buy the cable and module separately) or any IrDA-equipped laptop, and two DC220s can even transfer images to each other this way, if you like.
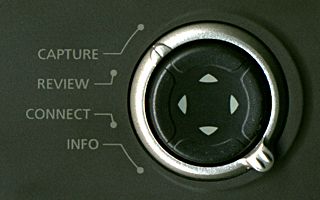
The DC220 has a specific Connect mode selected with the rotary switch on the back. If it's not in that mode, it won't connect to anything. This is necessary, I think, mainly because of the cable-less IrDA port. Since the DC120 only uses serial connections, it just goes into connect mode when you plug the cable in.
Kodak's Mounter software lets you access the DC220 as if it were a drive on your computer. Well, sort of. It does have an icon in My Computer, which you can make shortcuts to as usual, and it does open a window that looks like a regular Explorer window. But it isn't really Explorer - it's Kodak transfer software pretending to be Explorer. You can't copy files to the camera, only from, and various Explorer operations don't work quite as you'd expect.. You can delete files, though.
Since the the DC220 stores its images as standard JFIF (JPG) or FlashPix files, its images don't need to be translated before your favourite program can understand them.
Software
The DC120 software bundle shows its age somewhat. The picture transfer software works fine, as does the TWAIN driver. For some reason, the TWAIN driver seems to like delivering images as a negative version, so you have to perform an invert operation in whatever image editing program you're using. The plain picture transfer software doesn't do this. For image editing, the DC120 comes with PictureWorks' rather long in the tooth Photoenhancer, which is OK if you've got nothing better but pales into insignificance compared with real image editing packages like the excellent Paint Shop Pro, Micrografx's Picture Publisher or the daddy of 'em all, Adobe Photoshop.
The DC220 can be controlled completely from the PC when it's connected, which makes it easy to change some of the more fiddly settings.
The DC220 doesn't come with Photoshop, but you do get PhotoDeluxe, another Adobe product which uses chunks of Photoshop code to do various highly automated consumer imaging tasks. For domestic purposes, PhotoDeluxe is fast and useful, but not particularly flexible. You also get Adobe PageMill, which creates Web pages. PageMill isn't particularly relevant to a digital camera, per se, but it's a handy inclusion. The DC220 also comes with Kodak's own PictureEasy, which is now up to its third version and aims to be the one program you need to transfer and tweak and sort and print and, if you want, e-mail your pictures.
PictureEasy's image manipulation features are weak compared with PhotoDeluxe, but since most people don't actually need to twiddle their shots very much, it lives up to its promise of being a one stop imaging shop for the undemanding user. PictureEasy is no speed demon, though; it's OK on a 450MHz PC like mine, but owners of slower computers may find themselves wondering what the heck it's doing as they wait for operations to finish. But it's easy to learn and use - Photoshop may finish a sharpening operation a lot faster, but a novice will take a lot longer to find out how to start it.
Burst mode
One of the biggest problems with digital cameras is that they take time to store their pictures. If you take the picture slightly too early, tough; you'll be looking at a little flashing light for some seconds. Most of the wait is compression time.

Burst mode is a more recent innovation that lets you take a series of pictures, much as you can with a motor-drive film camera, and store them uncompressed, in on-board RAM. When the RAM is full, all of the pictures get compressed and dumped to the memory card, which takes as long as it would for that many individual pictures.
If you use High resolution, the DC220 can only capture two pictures in burst mode. But if you drop to Standard, you can store up to eight. How many shots you actually take depends on how long you hold the button down, and what capture rate you set - from 0.1 to 3 frames per second for High resolution, from 0.1 to 12 frames per second in Standard mode. The flash doesn't work in burst mode, so you'll only get good looking pictures from it in brightly lit situations.
If you do an eight-shot Standard resolution burst, you'll be unable to take any more pictures for for more than 40 seconds while the camera squishes the images down. You can, however, go to Review mode and check out your pictures even while the compression's taking place. So if your baby stands on his head, you'll probably be able to capture the magic moment perfectly. But if he then starts juggling, you'd better hope he keeps it up for a while.
When you transfer images from the camera, burst series show up as folders named after the first file in them. The picture review mode also defaults to "collapsing" burst series into only the first image. If you want to see them all, one button expands them.
Time lapse
The complement of burst mode is time lapse photography, where the camera automatically pictures at set intervals. I don't think many DC220 users actually need this feature, but it's nonetheless cool; you can set the camera to take a picture at one of 16 frequencies from every minute to every day, and you can set the number of pictures to take from 2 to 1000 - assuming you've got enough storage. A thousand images, even at Standard resolution and maximum compression, would take up more than 70Mb.
If you're setting Time Lapse mode up from the camera menus, though, you can only change the pictures-to-take in increments of one picture more or less, so setting the camera to take 500 pictures would take, oh, roughly the rest of your life. Fortunately, when the camera's connected to the computer via USB or serial cable, you can set the number the easy way from the Camera Properties window.
Like burst mode pictures, time lapse images collapse into one thumbnail or folder when reviewing or transferring your photos.
Further fancy features
The DC220 has several other selling points the DC120 can't match. Chief among them is scripting, using the "Digita" language, an open standard currently being used by Kodak and Minolta digital cameras. This is a very powerful feature, which takes advantage of the fact that the DC220 has a lot more brainpower than the DC120. Digita scripts can do all sorts of things, from changing default camera behaviour to generating HTML files right there in the camera with links to all of your images in them. Check the digitacamera.com list here for a selection of scripts.
The most obvious extra DC220 feature is sound. The DC120 is silent except for its rather noisy focus and zoom drive system, but the DC220 has a speaker, and a microphone. By default, it makes pops and clicks when you select menu items and a rather cheesy motor-drive sound when you take a picture, but you can turn all of this down with the volume control wheel on the side or off completely from the setup menus.
The microphone lets you record up to about 45 seconds of sound, which is 244 kilobytes of data, to accompany any picture; after taking the shot, you just hold the little RECORD button down and talk to the camera. You can review your audio clip and delete it or replace it if you like, and the clip can be copied to the computer along with the image with which it's associated.
There's something funny about the sound feature, though. The camera seems to build the sound file into its associated picture file. A regular Best quality 640 by 480 picture will be something like 150 kilobytes, but if you record 45 seconds of sound along with it it'll blow out to 400kb. Delete the sound for that picture and the file size drops again.
Now, this is perfectly sensible while the images are stored in the camera, but the sound data still seems to get copied as part of the image when you move the image to the computer. Telling the transfer software never to transfer audio makes no difference; you still get big fat images. The images themselves work just fine, but there's a whole lot of extra data in there doing nothing. Somebody's probably going to write a utility that can extract the audio from such images, which could lead to embarrassment if you didn't delete the witty commentary you put on the pictures of the boss for the benefit of your co-workers. It could also be an amusing way to send secret messages, though.
Along with sound, there's video. The DC220 has an "AV out" socket into which plugs an adaptor cable that terminates in two standard RCA plugs, one for composite video, such as is used by any VCR or TV with a "video in" connector, and one for mono audio. While the cable's plugged in, the LCD panel is disabled and everything that would normally appear on it goes down the video cable.
Well, almost everything. The DC220 supports both NTSC and PAL video modes, so you can use it anywhere in the world. But if you switch the camera to PAL mode, you can still review pictures on a PAL TV or monitor, but for some reason can no longer use the monitor for live previewing. The Display button just does nothing when the camera's set to PAL and you're in Capture mode. Fortunately, you can still show off your pictures to lots of people when there's no computer handy, and you can even do it "hands free" by using the camera's slide show feature.
Another nifty little feature - the DC220 has a position sensor, that tells it when you're holding the camera vertically and automatically rotates the picture you take appropriately. The sensor gets confused when the camera's pointing more or less straight up or down, but you can disable it.
You can set the DC220's white balance to compensate for daylight, fluorescent or tungsten illumination, although there's no option to point the camera at a white object and set the white balance accordingly - a standard feature of all good video cameras. The default white balance mode tries to automatically remove colour casts from the image, which means pictures dominated by one shade can come out greyish. If you prefer to do your own colour correction in an image manipulation package - or not do any at all - you can turn white balance off completely.
The 220 can also do "watermarks", automatically overlaying all pictures with the date and time, or a particular text string. You can change the colour of the text and its background, or set the background to transparent.
Overall
The DC220's limitations make it less than ideal for outdoor shots, and not very useful for macro photography. For everyday picture-taking, though, its quite sensible interface, good layout and generally very good picture quality make it a fine choice in its price bracket. If you're after autofocus and more resolution, you might do well to check out the DC260 instead, whose basic package sells for $1650 (Australian dollars), against the $1200 of the DC220.
If I were forced to give up my DC120 and use a 220 instead, I wouldn't be very annoyed. The extra features in the 220 - better screen, much better interface, USB transfer - make up for its shortcomings, even for my specialised purposes. But if I were buying a digital camera today and had the choice of the DC220 at $1200 or a used DC120 in good condition for less than $500, I'd go for the older camera.


