The Wind-Tunnel PC
(How to add a big fat mains fan to your computer and banish your cooling problems forever!)
Publication date: 1 March 1999Last modified 03-Dec-2011.
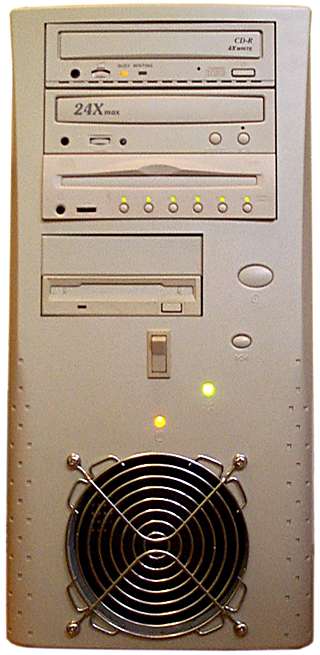
Beautiful, ain't it?
It has been suggested to me that I could have put
the fan grille on the inside of the front panel for a more streamlined look.
The heck with that, I say.
I lug my computer around a fair bit, occasionally for work but mainly for frivolity. LAN gaming is a ton of fun, but kicking the snot out of your friends on a marvellous lag-free Local Area Network does require you to all have your computers in one place.
For elegant LAN gaming, you therefore need a high powered PC in as small and neat a package as you can manage. If you're a big husky person then carting a full tower case around shouldn't bother you, but this does not describe the average gamer. So a little case is a good idea. Smaller cases also have a lower centre of gravity, so they're less likely to tumble around in the back of a car as you head off to Frag Central. It is a basic tenet of moving machinery that you should never restrain anything so poorly that you have to drive more carefully to avoid tumbling the cargo, but gamers violate that rule every day.
Unfortunately, most little cases suck. Especially for a high powered computer. They're generally badly made, with lots of sharp pressed metal and poor rigidity. Their weedy power supplies can be upgraded, but they often don't have enough drive bays for a powerful system. And, more importantly, they've got lousy cooling. A computer with an overclocked Celeron, a pile of drives and a steaming 3D video card in it runs hot, and needs a heck of a lot more cooling than the poor little power supply fan in a cable-packed mini-tower case can supply.
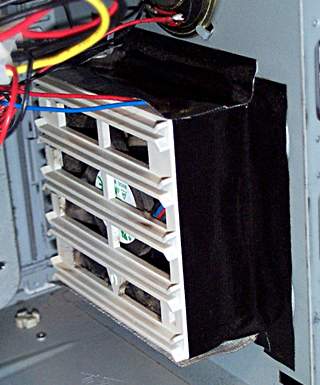
The traditional solution to this problem is to buy a bigger case and fill it with fans. In my previous case I had a PSU fan, an 80mm fan in the standard auxiliary mounting cradle at the front, the fan on the Celeron heatsink, two more 60mm fans blowing down onto the processor, another 80mm fan between the hard drives, and a little slot fan sitting next to my video card and blowing warm air out of the back of the computer. Oh, and the teeny 25mm fan in my CD writer.
I've now transplanted all of my hardware into a new case, and banished five of those dinky extra fans. The PSU, standard CPU and CD writer fans are still there, because they're standard equipment, but everything else has been supplanted by one, single, 120mm mains powered fan mounted where the front fan is meant to be. I did this modification to AOpen's neat little HX 45 midi-tower case...
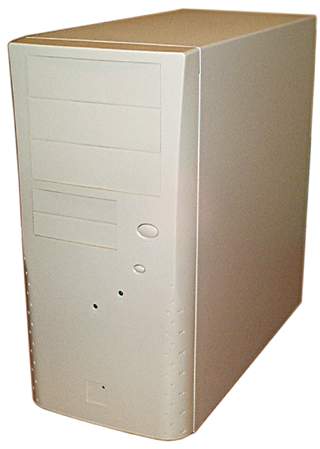
...which I've reviewed here. But the techniques involved should be applicable to just about any case on the market today. Ready to build a big butch gaming box? Then let's begin!
Pick your fan
I picked a 120mm mains fan for this project, primarily because I got a dozen of them for four bucks each from Oatley Electronics here in Sydney.
WARNING |
|
If you choose a mains powered fan for your computer, do NOT attempt to install it yourself if you are not experienced at working with mains powered apparatus. Even if you manage to get it to work, you may wire it unsafely and kill or injure someone later on. 12 volt fans are safe to work with; the worst injury they can inflict is a bruised fingernail, and the worst mistake you can make will probably just pop a fuse in your power supply. But mains electricity is not to be trifled with. |
When choosing your fan, bear in mind that the amount of air a fan moves varies markedly with its size. Roughly speaking, the airflow of similarly shaped fans varies with the square of the fan diameter, so a fan double the size moves something like four times as much air. Often more, in fact, because the motor assembly in a larger fan is smaller in comparison to the blade length. Mains powered fans have much larger motor assemblies, which in 80mm mains fans leave precious little room for the blades. The mains motors are much more powerful, though, so 120mm and 150mm mains fans can move far more air than a 12 volt model with low enough current consumption to run in a PC without overtaxing the computer's PSU. A 120mm fan is more than adequate for even the hottest games box; it moves roughly three times as much air as the average 80mm PSU fan. Here's a table of the likely performance of several popular PC fan sizes.
Check the sidebar to the right for more information about fan performance.
What else you'll need
- A case to chop up. The HX 45 is an excellent candidate, but pretty much anything will do. It doesn't need to have a standard space for a front-of-case fan, but it does need to have enough room for whatever fan you choose to put in it. Installing the fan will probably make it impossible to install full length expansion cards. I can't remember the last time I even saw a full length PC expansion card.
- A finger guard to match your fan. This is optional, but a really good idea. Poking a finger into an 80mm 12V fan stings a bit. Poking it into a 120mm mains fan stings a lot more. Wire finger guards in the standard sizes are available from any electronics store for a few bucks. Needless to say, I got cheap ones with my cheap fans!
- Some basic geometry tools - a compass, a ruler, a pencil, a protractor - for marking out your cuts. You can do it freehand, if you like that "I do my metalwork in the dark" look. Don't come crying to me if you have to extend your screw holes into three inch slots to get it all to fit.
- A soldering iron and solder. Not a big fat plumber's iron, a low powered electronics iron. A 25 watt cheapie will be fine.
- Heatshrink tubing for insulating soldered wires. Vinyl electrical tape will do in a pinch, but heatshrink is so much more elegant. When exposed to heat from hair dryer temperatures up, it shrinks to half of its previous diameter, moulding itself neatly to the wire join.
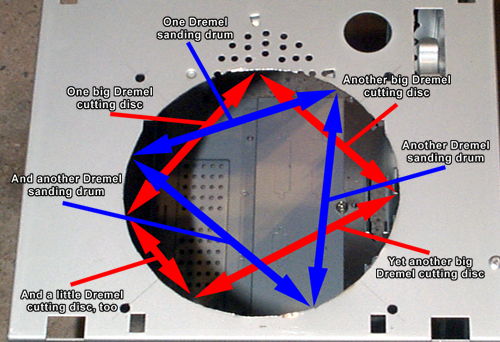
- Something for cutting case metalwork. A jigsaw is excellent, good curved tinsnips will do, an angle grinder is brutal but effective, a coping saw with a metal-cutting blade will give you an excellent workout and a wiggly circle, a cold chisel will give you a broken case, an oxyacetylene torch will be magnificent overkill. I used a Dremel Moto-Tool. I do not recommend you do this; 1mm steel is more than a little Dremel wants to deal with.
- Something for cutting the plastic front panel. All sorts of tools will do fine for this less demanding job; the Dremel was perfect. I suggest you not use the oxy torch for this.
- Something for cleaning up and rounding out your holes. A file, an angle grinder wielded with a delicate hand, or a Dremel with sanding drums, if you don't mind going through a few sanding drums. If you don't care about having a fan hole with 13 sides all of different lengths, you may omit this requirement.
- A drill. A power drill makes putting fan corner screw holes through 1mm steel easier, but a hand drill will do. Um, you'll also need a set of bits for the drill. If you didn't know that, I suggest you stop now.
- Some cable suitable for wiring the fan. If it's a mains fan, cable with sturdy, mains-rated insulation is necessary, to avoid destructive mishaps if the cable gets pinched. Using fairly chunky cable for a 12V fan is also a good idea, because blown power supply fuses are annoying, and a dangling severed 12V lead can fry motherboard components almost as effectively as mains, if you're unlucky.
- A switch or a relay to activate the fan, if you're using a mains powered unit. If you're chopping up an old AT case, you may have a nice manual power supply switch you can use to power a mains fan. If you're using an ATX case, though, there's no switched AC power available anywhere (ATX power supplies are normally left turned on all the time; "off" is really just "standby"), so you'll need to switch the fan manually or via a relay - an electrically operated switch. A relay is more complex but more elegant; it can be energised by the 12V line from the power supply.
- Various nuts and bolts and other bits of hardware, depending on the oddities of your situation and what embroideries on the concept you come up with. I came up with a couple myself, as you'll see.
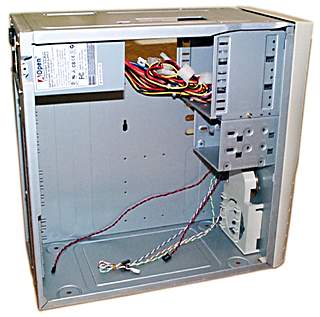
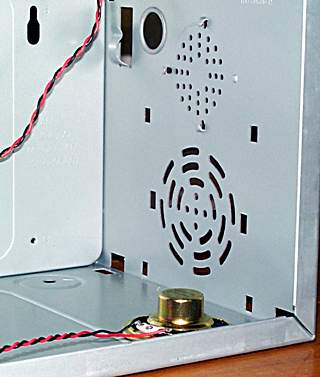
The inside of the HX 45, with the fan-location-to-be...
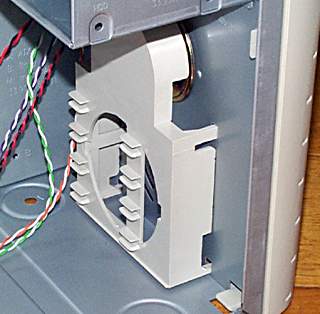
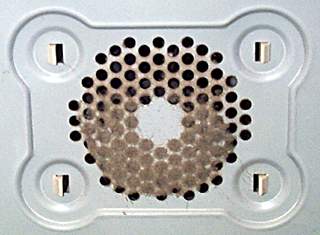
...at the bottom right. The stock fan cradle...
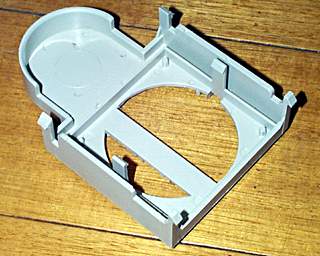
...is as crummy as these things usually are. It holds the fan too far away from the panel, so lots of air can leak around the sides, and the holes in the panel themselves...
...are pretty small. But we can fix that.
The first step after removing the fan cradle is to remove the case's plastic front panel as well (which, on the HX 45, means undoing a couple of screws before unclipping the panel). If you can, remove the reset switch and LEDs from the front panel to avoid damaging them or the cables. They're easy to remove from the HX 45 front panel.
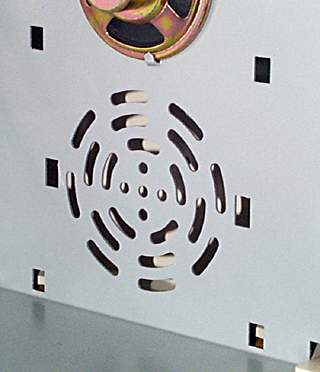
Removing the PC speaker. It's clipped on three sides and held in by a nub of metal on the fourth; it's easy to slide it out. Many cases use this mounting method. The big hole I'm going to cut will take half of the PC speaker spot with it, so a new position will have to be found for the speaker. No problem. Unscrew the power supply as well, to avoid metal shavings falling into it.
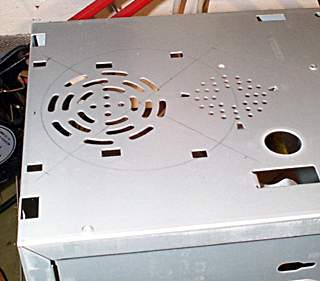
Marking out the front of the chassis. You don't even have to have paid attention in high school metalwork to be able to do this. Be accurate, though, if you care at all what your computer ends up looking like.
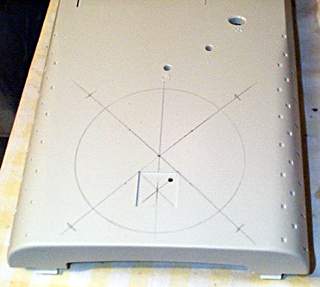
A similar marking-out job on the plastic front panel. Note the screw hole marks; the fan will screw to the front of the steel chassis, but the finger guard will screw to the front of the plastic panel. You could just as easily have the finger guard screwed to the chassis, but I wanted the shiny thing visible!
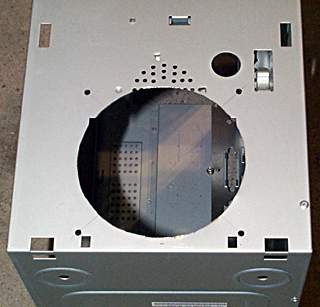
The fan and screw holes, all done. It took me about an hour to cut and clean up, using the Dremel. In case you're wondering why you shouldn't use a Dremel to cut a largish hole like this, click here.
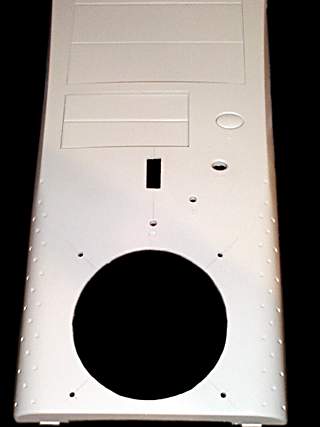
The matching holes in the front panel. A much easier job; a Dremel goes through plastic like butter. The only problem is easing off so you don't foul the cut with mounds of molten plastic.
Note also the rectangular hole for the fan switch. I didn't have a spare relay sitting around, but I did have spare switches. So a switch it was.
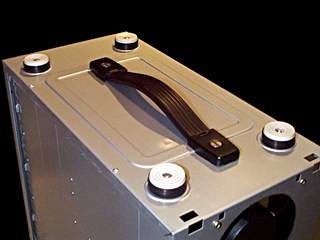
An optional modification - a carry handle! I chose a steel reinforced pop-flat rubber strap handle, as used on various heavy pro audio gear. I chose it because (wait for it) I had it sitting around.
Putting a handle on the top of your PC is tricky. If your case has a permanent top panel, go ahead and bolt the handle of your choice onto it, with some nice big washers under the mounting bolts to spread the strain. The HX 45, however, has the standard mini-tower type U-shaped case, which is too flush to the chassis for mounting bolts to stick out under it, and isn't really firmly enough attached to the chassis to carry the computer's weight anyway. To affix a handle to the top, I'd have to cut a big rectangular slot in the top of the lid and bolt the handle to the top of the chassis, where its bolts might well foul the power supply and 5.25" bays. So I put the handle on the bottom.
The strap handle is quite low profile, but it's still taller when pushed flat than the standard HX 45 feet. So I built the feet up with some rubber discs I, ahem, had sitting around, and replaced the standard mounting pins with longer bolts.
I had to mount the handle a bit towards the front of the box in order to avoid fouling the rectangular reinforcing ridge in the bottom case panel. As it turned out, this also gave it near-perfect balance. The strap handle end caps had little spikes on the end apparently meant to bite into a wooden speaker box; a kiss from the bench grinder solved that problem.
Carrying your computer around upside down isn't actually as nutty as it sounds. A fully loaded PC like mine with three CD-ROM drives (one standard, one changer reviewed here, one writer) is distinctly top-heavy; if you're slinging it behind the seat of a car and driving somewhere, it's more stable if it's upside down. I'm considering putting feet on the top of the box to avoid scuffing.
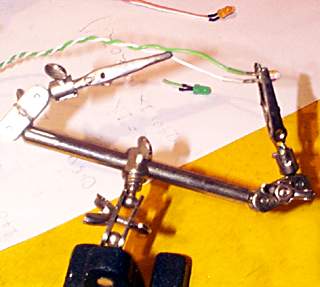
Because I had a lot of high intensity amber and green LEDs, um, sitting around (I'm serious! I did!), I decided to replace the standard low intensity power and hard disk lights. It was the work of a few minutes, but it was nonetheless silly and pointless and utterly not worth doing unless you, like me, derive excitement from owning a computer that casts ghostly circles of coloured light on the far wall when the lights are off. Remember, the long lead of an LED is the positive, as is the coloured wire of the cable. The negative wire of the cable should be either black or white - in this case, white.
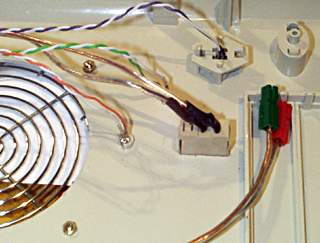
The front panel ready to go. The finger guard is bolted on, the upgraded LEDs and the reset switch popped back into their holes in the front panel, and the switch wired up and installed. In order to make it possible to remove the front panel without the fan lead being yanked, I installed Anderson connectors on the switch leads. Anderson connectors are also sold under the Sermos and other brand names, with slightly different specifications, but they're all made by Anderson and are perfectly adequate for this job. Any mains rated connector with shrouded terminals will do. Unshrouded terminals on live connectors have a tendency to fire people across rooms.
The neutral lead from the power supply goes straight to one of the fan leads. The active lead goes, via a connector, to one of the switch leads, and the other switch lead goes, via a connector, to the other fan lead. If you only use a single-throw switch (as I did), putting the switch in the active lead makes sure the fan wiring isn't energised when the power is on but the switch is turned off. Many amateur mains wiring jobs incorrectly switch the neutral lead only, and thus have a far higher likelihood of encouraging lethal interpretive dance.
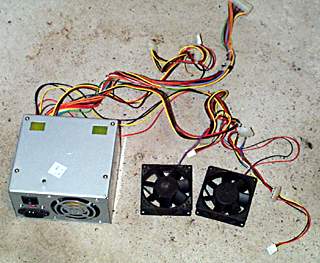
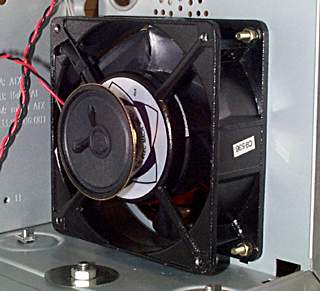
The source of all the risk - the 300 watt power supply out of my old PC. It still has two 80mm fans hanging off its 12V supply. I chopped them off and checked them out; one had developed a dry bearing, but a few drops of oil (peel back the fan label to reveal the end of the shaft, where the oil goes) killed the vibration. It'll live to cool something else, though I wouldn't trust it anywhere critical.
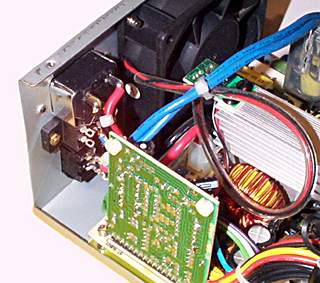
Inside the power supply. Again, WARNING - do NOT fool around with PC power supplies if you don't know what you're doing. Electrocution has been experimentally proved to significantly reduce your Quake 2 skills.
At the left you can see the back of the IEC plug receptacle, with under it the back of the 110/230V selector switch and, under that, the back of the power switch. Some ATX powers supplies have no physical power switch; in that case, you'll have to hook the fan cable straight to the IEC socket.
Wiring your fan power lead to the switched side of the power switch at least makes it impossible for the fan to run, or any of the leads be energised, when the ATX supply is physically turned off. I used medium duty speaker cable for my fan cabling; it's got tough enough insulation that I'm not worried about something pinching it and zapping my motherboard.
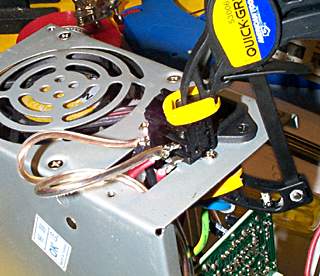
Note, by the way, the nifty little baby Quick Grip clamp I've got holding the switch in place while I solder. I think it's cute as a button.
If you want to be safe, wire an appropriate slow-blow fuse, in a holder, in series with the fan. For a 40 watt fan running from Australian 240 volts, a 500mA fuse should give you plenty of headroom, but still blow if the fan motor melts down or something pinches the conductors together. For the same power from U.S. 110 volts, a 1A fuse gives the same headroom.
Before reinstalling components in the case, brush it out thoroughly to get rid of all of the little metal shavings. They're all itching for the chance to cost you money.
With the fan screwed in place, it came time to find somewhere to mount the PC speaker the fan displaces. I found somewhere, courtesy of some double-sided tape. The speaker is distinctly quieter when it's pointing back into the case, but boy, is it well cooled.
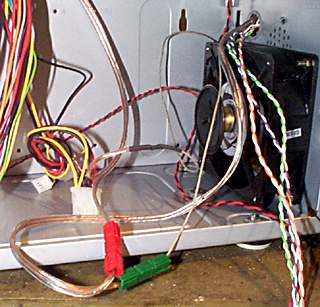
The switch wiring all hooked up to the power supply and ready to test. It worked!
The whole PC, built up and ready to roll. If you feel confident after putting a lot of gear into a new case, screw the lid back on. This will guarantee that you've plugged your hard disk leads in backwards and got at least one of your LED cables wrong.
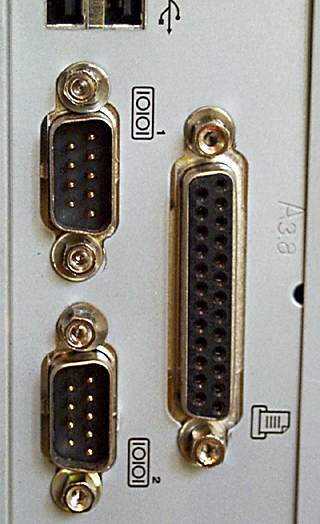
On the back of the PC, I put little washers underneath the thumbscrew receivers on either side of the parallel and serial ports. The washers get all squished, but they significantly reinforce the port assembly which, after many many cable insertions, was starting to list backwards a bit. The motherboard is probably glad of the reinforcement.
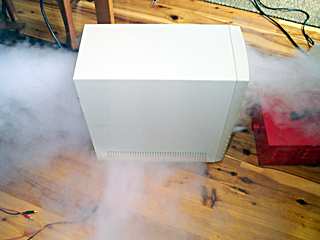
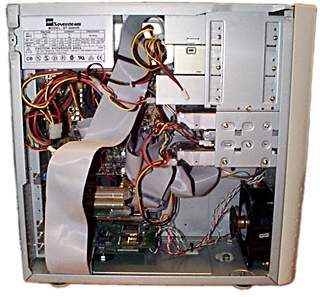
The smoke test! Traditionally, this involves turning the device on and seeing if it smokes; in this case, it involves blowing smoke into the device and seeing where it comes out. The red thing on the right is my smoke machine (doesn't everyone have one?). As you can see, a lot of smoke comes out of the power supply vent, a fair amount out of the vents at the back left of the computer, and a bit more out of the side vents (there are no matching vents on the other side). Surprisingly, a reasonable amount of smoke also exited between the three CD-ROM drives, indicating that they, too, are benefiting from the significant positive case pressure.
Conclusions
I'm very pleased with how well this project turned out. The new fan is no louder than the fan-farm I had in the old case, and seems to keep everything cool just as effectively. And I've got a svelte, well made, easy to work on new case for my PC, which is easy to shift around and yet still possesses a not insignificant amount of game-room cred.
What are you waiting for? Grab the saw and start hacking!

