People keep asking me if I'll make them a bulbulator. Do it yourself, you lazy buggers, it's easy.
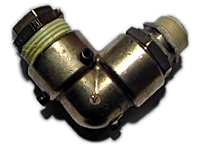
If the Class will observe the above illustration, they will note that the device in question is constructed from common or garden brass plumbing fittings, available from any hardware store. In order from the cap at the left to the nozzle at the right, the components are:
One 3/4" thread end cap, which screws into:
One 3/4" to 1" converter, which screws into:
One 1" to 1" 90 degree elbow piece, into the other end of which screws:
Another 3/4" to 1" converter, into which screws:
One 3/4" to 3/4" joiner, the other end of which is the nozzle over which one puts one's balloons.
The protrusions on the left hand collar of the elbow piece are the heads of 6-32 socket head cap screws (hex drive screws which are Better Than Phillips Head, which in turn are Better Than Slotted Head, which are Crap. Woodworkers persist in using slotted head screws, and should all therefore be executed). Three of these screws are evenly spaced around the collar to keep the bulbs centred. A bulb fits neatly into the depression in the end cap, and the three positioning screws make sure the other end of the bulb lines up with the firing pin. I went all anal and perfectionist when lining the screws up, but a piece of bent wire would do the job.
The firing pin is another 6-32 cap screw, and its head is the other protrusion, casting a shadow at the bottom. The end of the firing pin has been ground to a point, the angle of which is about 30 degrees. This sort of pin works by tightening the bulb down onto the pin, puncturing the seal, then backing off a little to let the gas out in a rush.
All of the component threads are wrapped with a few layers of thick, high quality yellow Teflon gas seal tape. This includes the nozzle threads, which are sharp enough to cut balloon necks if not covered with something. A ring of thick silicone rubber tubing has been added to the nozzle lately, and helps further.
The total parts cost for this gadget was about $AUD25. The only remotely challenging part of the project was getting the three locator screws evenly spaced around the collar, and drilling and tapping (cutting threads into) the four screw holes. Tapping small holes in brass is piss-easy, but not if you don't have a tap set. The only part that really needs the security of a tapped hole is the firing pin; bulb crackers MUST have a VERY FIRMLY ATTACHED firing pin, because it comes under considerable strain and bulb pressure is probably enough to fire a poorly fixed pin into your leg.
This bulbulator's chief design flaw is its total lack of insulation. After a few bulbs on a chilly day, the bulbulator starts to accumulate a layer of frost, and the head of the firing pin gets cold enough to inflict a freeze burn from the very first bulb. It's easy, with a little practice, to hold the bulbulator so that it doesn't become a part of you, but it's still not user-friendly.
A cracker made from plastic tubing would be less likely to bite you, and easier to make with the crappy tools most people have. Allow me to repeat, though - GET THE FIRING PIN RIGHT.
A bulbulator is not a knock-it-together-in-ten-minutes device, like those funny little plastic bottle water pipes one finds abandoned all over the place. But a bulbulator is a great deal easier to make than, say, a still. Ask for help from the friendly staff at the hardware store. Even if you don't really need help, it's good for a laugh.