Upgrading your hard drive
Originally published in Australian Personal Computer magazine long, long ago. Last modified 03-Dec-2011.
OK, so you've got a new hard drive. It's big, it's shiny, and you can't wait to set it up as your new system drive. You don't want to just plug it in as a secondary drive, as D to your current drive's C; you'd rather not keep booting your computer from your dodgy old drive. The old drive will become D, used for data or whatever. Or it'll just be completely surplus to requirements.
This is a basic piece of PC service work, it's easy enough to do, but it's sufficiently non-obvious - and the down side of maybe trashing a pair of hard drives and all of your no doubt un-backed-up data is frightening enough - that lots of people don't want to try it.
The job seems simple enough. Just install the new drive as well as the old one, copy the entire contents of the old drive to the new one, then swap 'em over and Bob's your uncle, right?
Well, yes, with any luck. But there are a few nasty surprises that might spoil your smooth swap operation, and DOS and Windows by themselves are insufficient to do the job properly.
Plugs and cables
The most daunting part of the job for the beginner is the hardware fiddling. It's not as hard as it looks.
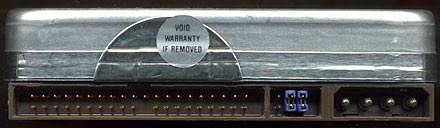
Your hard drive, if you're using an ordinary PC, is probably an "IDE" unit. IDE is a generic term used to refer to everything from the original AT Attachment (ATA) to the latest Ultra DMA (UDMA) 100 units. All current IDE drives, though, can be dealt with in the same way; you have to use an 80 wire cable instead of the coarser 40 wire ones if you want UDMA/66 and UDMA/100 drives to run at full speed, but the connectors are still the same.
Current motherboards have two...
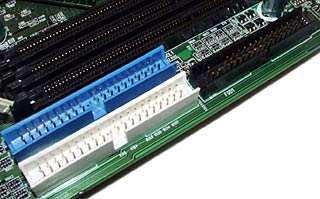
...or sometimes four...
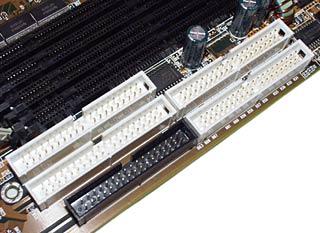
...IDE sockets. Each 40 pin connector corresponds to one IDE channel, and the connectors are next to the single 34 pin floppy cable socket.
Each IDE channel can have two IDE devices on it, be they hard, CD-ROM, removable or even tape drives. Only one controller can be active on each channel, though; all IDE devices have a controller built in. If there are two devices, the controller on one of them handles both.
To determine which controller works and which stands idle, you set one drive to "Master" and one to "Slave", with little plastic jumper blocks that slide onto pins on the back of the drive. It's possible for that setting to be determined by "cable select", but you need a special cable to do that which practically nobody bothers to use, and you still need to change the jumper settings - the setting marked as "CS" is cable select mode.
Hard drives normally come pre-set to Master. Other devices are usually Slaves by default. These days, though, pretty much any IDE device will work as Master with pretty much any other device as Slave. As a general rule of thumb, you should make the fastest device the Master, on the assumption that it'll have the better controller.

Drive plugged into the middle connector of a 40 wire cable
For speeds up to UDMA/33 - everything that uses a 40 wire cable - it doesn't matter in what order the drives are plugged into the connectors on the IDE cable. Either drive can use the middle or the end connector (the connector on the other end of the cable's for the motherboard socket). Use whatever's physically convenient.
For 80 wire cables, the Master should be on the end connector, and the Slave, if there is one, on the middle connector.
Current drives and motherboards can deal with a single Slave device on a channel; they just make it the Master anyway. Two Masters or two Slaves on a channel, though, causes problems.
Because of the twin IDE channels in current PCs, two-drive systems (like the usual one hard drive, one CD-ROM setup) can have both devices set to Master, and set up each with a channel to itself. This gives marginally quicker drive performance, but is very unlikely to make any practical difference. Some system assemblers, like my sponsors Aus PC Market, build machines with twin cables as a matter of course. But that's just a convenience feature - it means people who want to add another drive won't need to get another cable to go with it.
The less common SCSI interface is no better for most systems with one to four drives than IDE, but it makes multi-drive setup simpler. You can connect up to 7 or up to 15 devices to one SCSI cable (depending on what kind of SCSI you have), and they all just need a different address. The address is set either with more jumpers on the back of the drive, or automatically, for the niftier models.
The devices on each end of a SCSI chain must be "terminated"; for an ordinary internal-drives setup, this can require special resistor packs to be plugged into the last drive (and removed, if they're present, from the other drives). Or it may, again, be automatic. Current consumer SCSI controllers all do automatic termination, so you don't have to worry about their end of the chain.
However you set your drives up, the idea when duplicating the contents of an old drive to a new one is to connect the new drive with the old one still in place, do the copy, then have the new drive usurp the old one's position. In a simple IDE system, this means plugging in the new drive on one IDE channel or the other, set to Master or Slave according to what's already on the channel you pick, doing the copy and then putting it where the old one was - probably Master, on the first IDE channel. If you're keeping the old drive, you then set it up as a Slave, and probably re-format it.
PC BIOSes have for some time been smart enough to auto-detect attached drives on the fly. With your computer set up this way, it's trivial to shuffle devices as you like on startup without ever touching the BIOS config utility (typically accessed by pressing Delete during system startup, though some big names like to be different and use other keys, like F2).
Older BIOSes can't autodetect on boot. They can auto-detect drive settings - only very old PCs need you to manually enter your drive specs - but they can only auto-detect from the BIOS config utility itself, and they then save these detected settings to use every time.
Your computer may be set to work this way even if it doesn't have to, because it makes startup a few seconds faster. Switching to on-the-fly detection makes drive upgrading a lot simpler, and there's no reason not to leave the computer that way if you don't mind startup taking marginally longer.
Some computers are set to auto-detect only the drives they've got connected. If they've got a hard drive and CD-ROM on the first IDE channel, for instance, auto-detection will be on for the Primary Master and Primary Slave, and off for the second IDE channel.
If you plug in a new drive and it's not detected, go to the BIOS setup and see what's up.
Once you've got your new drive plugged in and detected, though, you're ready for the software side of the operation.
The software side
The straightforward, nothing-more-to-buy way to get data onto a new drive plugged into a Win95 or Win98 system is to partition and format it, then just click-and-drag whatever you want onto it. You can't put files on a drive until it's partitioned and formatted.
Windows 2000 makes partitioning and formatting easy; with a fresh-from the-anti-static-bag hard drive plugged in, you just boot Windows and then, in Win2000, use Disk Management to turn it into the kind of volume you want it to be. Partitioning and formatting, all point-and-click.
Win95-series operating systems, though (Win95, Win98 and WinME) have a utility called FDISK that partitions a drive, whereupon you can format it in Windows like any other device. FDISK will run in a DOS window from Windows 95 or 98, but WinME hides the DOS prompt from you by default. FDISK is still on the Windows Startup floppy disk that's made during the WinME setup process, though; boot from the floppy and you can run the utility.
Most people only want one partition on their drive, so it appears as one logical device - one single drive as far as the operating system's concerned. You can't make single partitions bigger than 2Gb if you're using the old FAT16 file system that's all that the original version of Win95 understands, but Win95 OSR2 and later 95-series OSes understand FAT32, which can handle partitions far larger than any current hard drive.
When you run FDISK, say yes to its do-you-want-to-enable-large-disk-support question; that means you're using FAT32. Use the last option in the main menu to select your new drive (that part's important, since FDISK by default does things to the first drive in the system...), and make one partition on it. This is what FDISK does by default. After doing that you'll have to reboot to make the new partition accessible; then you can format it, from Windows if you like.
Yes, FDISK is one of those scary DOS programs in which you make menu selections using, gasp, the keyboard. Yes, you can thork your system drive if you tell FDISK to do so. But the standard DOS/Windows FDISK is actually a quite simple program, and the menus are not particularly cryptic, and making a single partition on a new hard drive really is easy.
Even if you've got a drive that's already partitioned with some other filesystem - WinNT's NTFS, say, or Linux EXT3 - FDISK can easily be used to delete these partitions and create new FAT32 ones. It's simple.
When you've got yourself a partitioned and formatted drive, though, you can't just select the entire contents of your system drive and drag it to a freshly formatted one. This'll work if the drive you're copying from contains only data files and directories, but a system drive contains files and directories on which the operating system maintains a "lock", preventing you from doing anything with them while Windows or their associated applications are running. Including copying them. And plain old Windows provides no way to say "OK, don't copy that file, just get on with copying all of the others"; the copy operation will fail, and finding out exactly where is annoying.
The solution to this problem chosen by a lot of upgraders is to use XCOPY.
XCOPY is the DOS command that copies recursively - in other words, you can use it to copy all of the files and directories from one place to another, including from one hard disk to another, recreating the directory structure on the destination. XCOPY32 is the Windows version of the same thing; it runs the same program with more options, and handles Windows long filenames, which is essential.
You get XCOPY32 when you run XCOPY in a DOS window while running Windows 95/98. You get the original, short-filenames only XCOPY when you boot the computer in DOS mode.
It is, indeed, possible to use XCOPY to copy all of the important files from one drive to another in Windows. But this doesn't mean the new drive will work.
Things copied from one place to another by XCOPY32 will seem to have the same name, at least in Windows, that they did before. If you copy a whole drive, Windows may even work just fine on the copied drive.
But it might not.
This is because of the way Windows handles long filenames. It's still hamstrung by the old DOS "8.3" name format, where every file (or directory - there's no difference between them as far as names go, which is why you can't have a file and a directory in the same place with the same name) can have a name no longer than eight characters, with an optional full stop and up-to-three-character suffix. All Windows files that seem to be called something like "October report.txt" are actually called something like OCTOBE~1.TXT, if you look at them in plain DOS.
The problem arises because Windows has no way to make sure that when you copy a batch of files whose short names are all the same but for their number extension - say, OCTOBE~1.TXT, OCTOBE~2.TXT, OCTOBE~3.TXT and so on - the same short names still end up attached to the same long names. The file system gives files names in the order in which they're copied to the disk; if the ~3 file is the first one to be copied, it becomes ~1 on the new drive. Files are not copied in alphabetical order.
The unreliability of short filenames is actually a rather serious issue, because Windows doesn't provide any way for ordinary file-handling applications to get the names right. This means that putting long-filenamed files in a Zip archive and extracting them somewhere else, or sticking them on a writable CD, or even backing them up with a big-name backup program, will only coincidentally copy the long-to-short associations correctly. Copy the files back and the associations can be quite different.
None of this matters, from the point of view of applications that use the long filenames, not the short ones. Most applications don't care at all about the short filename. But Windows, at its lower levels, certainly does.
The Registry, which is the very complex repository of pretty much every little detail about your system, is rotten with truncated short filenames.
When any given Registry-linked file changes its name or gets replaced by another, it's likely that nothing very dramatic will happen. Some application, or some feature within an application, will probably stop working. Conceivably, it'll stop working in a nasty way that destroys data, or keep working but give you subtly incorrect results that cause you to make terribly wrong decisions. But you're more likely to just have to uninstall and reinstall the application.
If no Registry-linked files have names that clash with other filenames, and therefore require the ~2, ~3 and so on extensions, then the problem cannot arise. But some pretty much always do, due in no small part to Microsoft's mania for calling program directories things like "Microsoft Office".
Because the damage done by XCOPY can be subtle - and because it's perfectly possible that it'll do no damage at all - there are lots of people who swear by XCOPY as the nothing-more-to-buy way to duplicate your hard drive. Much nonsense is also spoken about XCOPY's multitudinous command line options, with failed duplications attributed, only sometimes correctly, to the use of the wrong set of options.
Doing drive copies, even innocuous data-drive ones, with XCOPY also takes rather a while, because of the separate partition-and-format stage. There is a better way.
The solution
The way to get around all of this awkwardness is simple enough; use dedicated disk duplication software. The two front-runners in this area are Norton Ghost and PowerQuest Drive Image, which in their current versions are both excellent applications with similar basic feature sets.
They can both save a drive's contents into a single compressed image file, for later copying onto different computer or for simple backup purposes. They can also both do copies over a network, to lots and lots of computers at once if you like.
More useful for domestic purposes is their ability to partition and format drives as they go. This means a brand new blank hard drive fresh out of the anti-static bag can be plugged in, the duplicator app started, and a copy made from the old drive. It's all done in one go, including partitioning and formatting. It still takes a while, but it's faster than a separate partition, format and copy routine, and you don't have to be there until it finishes.
You used to be able to download a free functional trial version of Ghost, but Symantec don't link to it any more. There's still a free-download version on the Symantec FTP servers, though; pages like this one have the link.
You can get a free 30 day evaluation version of Drive Image Pro from PowerQuest's page here.
There are already quite enough things you can do wrong when upgrading your computer. Don't let Windows' questionable filename handling cause you unnecessary grief.

