The Art Of Senfu
(water cooling an Athlon, and why you should care)
Review date: 9 May 2000. Last modified 03-Dec-2011.
It's a PC, Jim, but not as we know it.
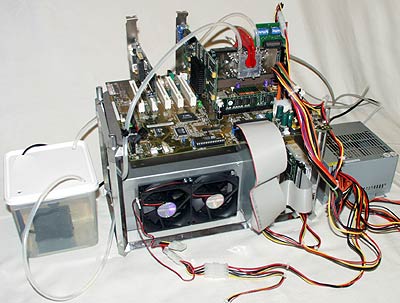
What you're looking at is, essentially, what's lurking inside the beige boxes on and under a million desks. A motherboard, a video card, a processor, some drives - the usual. They're just getting some air, because they're sitting in a simple frame which glories in the name "DIY Overclocking House."
What? You want to know about the pipes?
What pipes?
Oh, those pipes.
Well, they're for the water.
The processor cooling water.
See - there in the reservoir. With the pump in it. Next to the radiator.
Honestly, it's all perfectly logical if you just think about it.
Liquid cooling has always been the simplest way to go when you want to extract heat from somewhere, and don't mind putting a radiator somewhere else to get rid of it. If it works in cars, it can work in PCs. And the principle is exactly the same - tubing, pump, radiator. Indeed, some intrepid users have employed automotive cooling componentry - witness this effort, employing a Holden transmission cooler!
This particular bizarre, bolt-through-its-neck creation comes to you thanks to equipment made by Senfu, a Taiwanese company that's doing a reasonable job of bringing the esoteric technology of CPU water cooling to the masses. Or, at least, to anybody who wants to crank their processor's speed up well beyond the point where conventional fan-and-heatsink cooling systems just don't cut it any more.
Water cooling may make your computer look thoroughly extraordinary - even with a PC built in a conventional case, you still need to put the reservoir and radiator somewhere, and they're likely to attract comment - but, done properly, it's a reliable, inexpensive way to get substantially more speed from a CPU.
Many modern processors, even running at stock speed, pump out rather a lot of heat - 50 watts, for instance, for a standard 850MHz Athlon. If you leave any current PC processor running without some sort of cooling device attached, it'll be too hot to touch in a few seconds, and shut down to protect itself (crashing the computer) a few seconds later. Intel's current processors run rather cooler than AMD's Athlons, but older Intel P-IIIs and P-IIs were hot little numbers, too.
Since practically all of the heat from a CPU comes from a very small area on top of the CPU - roughly a centimetre square, for current models - getting rid of it can be a bit tricky. Big chunky heatsinks with more than one fan on them are favourite.
But then, there's overclocking.
Overclocking a CPU - running it faster than its rated speed - always makes it run hotter. If you have to increase the CPU voltage to get it to run reliably, the chip may run a lot hotter.
So the heatsink-fan combinations (collectively called "CPU coolers") get bigger and bigger, as do the fans used to draw cool air into the case for the coolers to work with. Many overclocked computers don't have a case at all, for maximum ventilation.
The upper end of the overclocking market has always been, well, debatably sane. There's a certain, ah, perception, associated with the activity. But compared with the truly humungous air coolers that super-hot CPUs need, water cooling is actually a perfectly practical proposition.
The reason why most people back away slowly and don't make eye contact when you mention computer water cooling is obvious. Running a water tube into your computer seems to be, at first glance, the sort of thing that people only do because the voices in their head command it.
Indeed, if the hose pops off the water jacket, the computer will stop working; depending on where the water goes, it may just hang harmlessly, or something quite dramatic may happen.
But if you think a drowned computer's dramatic, you should see what happens when an automobile cooling system fails in a similar way. Water cooling works fine for cars, because the systems used are highly reliable. All you need is to get a similarly reliable system for a computer.
Pretty much all CPU water cooling systems, at the moment, are to some extent do-it-yourself. Nobody sells a water cooled PC over the counter. Well, CoolWhip apparently do, but only within Denmark; perhaps there are other dealers I've not heard of, too. But, generally, you stick it together yourself.
Some of the solutions are magnificently engineered highly effective labours of love. Many are amusingly gimcrack, but work. You can get quite effective CPU cooling, for instance, by simply sealing a little plastic box with a couple of hose fittings on top of your CPU, so the water flow directly contacts the top of the chip. There aren't any contacts there; the chip doesn't care. As long as the seal holds, all is well.
But some water coolers are, as you'd expect, utter disasters.
To avoid the last situation, the way for less adventurous overclockers to get into the field is, obviously, to buy a pre-made kit.
Which is where Senfu comes in. They sell various water cooling gadgets separately, but you can also get the whole lot in one package. Pump, radiator, water jacket, mounting hardware, pipes, screws. And it's this kit that I checked out. It's sold in Australia by Cool PC, for $AU279 for the whole kit. I got the very latest version of the kit, direct from Senfu.
I built the beast on Senfu's DIY Overclocking House, a fancy name for a quite nice looking, not very expensive frame for computer fiddling and techno-toy display purposes. It's not part of the water cooling kit, but it goes quite well with it, or with any other off-the-wall computer project for which you'd like to have easy access to every part of the machine, and for which you don't mind sacrificing rather a lot of mechanical stability.
So the first job was to build the Overclocking House.
Housing project

In the Overclocking House kit you get the shiny square-tube rails, a collection of cast aluminium corner pieces, a couple of thin but tough clear plastic shelves, a foam pad to put your motherboard on, a plethora of stick-on rubber feet to stop drives and power supplies and suchlike sliding off the shelves, and a bag containing the solution to a problem.
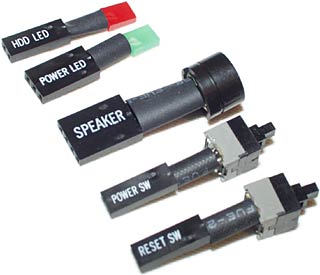
The problem with running a motherboard outside a case is that you need to connect the power and reset switches. It also helps to have a speaker connection and drive and power lights, though you can run without them.
There's nothing magic about the switches and LEDs that come built into a case; any hobbyist can hook up momentary switches and ordinary LEDs to the pins on the motherboard. With the Overclocking House, though, you get simple plug-in versions of all these case gizmoes. They're all just on a short stalk, with the connector on the bottom. There's even a little speaker on a stalk.

You need an adjustable spanner to assemble the Overclocking House, but it's easy enough to do. Pop a corner piece into a pipe, hold the pipe with the spanner, use another pipe to turn the corner piece 45 degrees, and it locks in place. It's a simple but secure construction method, and the result is a quite square frame. If it's not quite square, you can just push and shove it to shape; the corners are very solid.

The top corner pieces also have another post, pointing upwards; the Overclocking House is modular, and you can buy kits with another shelf level. The only limit to how high you can build the thing is your common sense.
The DIY Overclocking House is just meant to be a funky looking, compact test frame for fiddling with hardware. Installing a motherboard and its drives in a case takes time, and rabid tweakers swap gear in and out all of the time; it's faster and easier if nothing's screwed to anything, and there's no metalwork in the way.
But, of course, a computer that's held together by nothing but gravity, connector friction and happy thoughts is not a machine you're going to want to use for mission-critical applications. The world's well stocked with PCs that run with their lids off and various components just sitting there, not screwed in, but the Overclocking House takes it to a whole other level.
That said, as long as nobody leans on a card or tries to put a monitor on it, an Overclocking House PC that can sit peacefully on a desk should be as reliable as any other machine. And you can't say it doesn't make a statement. Like a fat-tyred sports bike balanced precariously on its side stand, a DIY House computer says both "I am more brutally fast than your underpants can stand" and "touch me, and something very expensive will happen to you."
Time to build that very computer.
Getting wet

The heart of the Senfu water cooling kit is the water jacket itself. You don't just get the water cooler in the water jacket box, though. There's a pile of mounting hardware, a little pot of thermal transfer compound ("heatsink grease"), a couple of metres of quality quarter inch silicone rubber hose, tons of stick-on foam for condensation-proofing if you're using refrigerated cooling, a spare sealing O-ring, and a small screwdriver of very little utility.

There's also an instruction sheet, which is very nearly useless. It's poorly printed, it refers to an earlier revision of the kit with less mounting hardware, and it's seriously deficient when it comes to the important business of actually attaching the jacket to a processor. This isn't as bad as it sounds, for many users, but it turned out to be quite bad for me, as you'll see shortly.
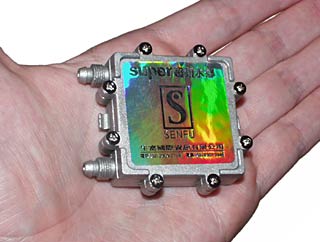
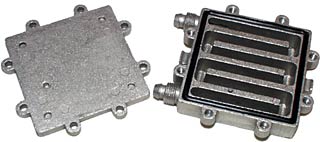
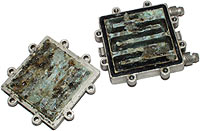
The water jacket itself is an elegant little cast-aluminium item. The instructions tell you that you need to open it to install the (provided) O-ring seal, but if you do open it...
...you'll find that there's already an O-ring installed; the one in the bits bag is a spare.
The channels inside the water jacket have ridges on the bottom, to encourage turbulence and maximise the heat transfer. There are many larger water jackets on the market, but this is nonetheless a good one.
Water storage
You don't get a reservoir with the Senfu kit. This is a B-Y-O-Bucket affair.
Any Tupperware-ish container big enough to hold the pump is adequate, though; the reservoir doesn't need to be big, because how much water's sitting in it has nothing much to do with the actual cooling process. If you want to run extra cooling coils through the reservoir, suspend Peltier-pumped gizmoes (of which more shortly) in it, pack it with ice or what have you, then there's nothing stopping you using any container from a bucket to a 44 gallon drum.
You want a lid on your reservoir, though, to reduce the chance of alarming spills, and to minimise evaporation of the coolant. The little generic food container I got for a couple of bucks from the supermarket did the job nicely. I drilled four quarter inch holes in the corners of the lid for the two hoses, the pump power cable and a temperature probe lead from my handy-dandy dual probe digital thermometer, with a couple of cuts out from one of the holes to let the pump's plug through.

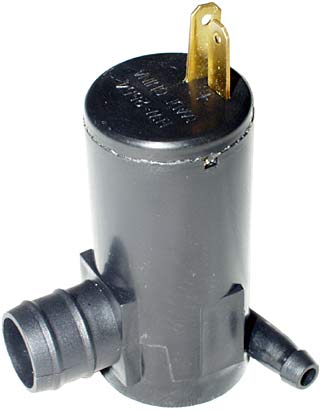
Speaking of the pump, here it is. It's just a simple little immersion pump, as used in aquaria. Note, also, the US-style power plug; this is the 110 volt pump, as not provided to Australia.
So I could use the 110 volt pump here in 220/240 volt Australia, I picked up a 100 watt autotransformer from Jaycar for less than $AU50.
Don't do this, don't do that...
Autotransformers always come with dire warnings all over them. They're not to be used continuously, they're not to be used with handheld devices, they're not to be used with power tools; actually, they're apparently pretty much not to be used at all.
Needless to say, in among all the other warnings is one that says autotransformers aren't to be used with anything that's meant to be immersed in water. Apparently, that warning's there just for me, and for globetrotting fish-fanciers.
The reason the warning's there, though, is because an autotransformer doesn't provide line isolation - if there's a fault in a device connected to one that lets you touch something live, and you're connected by some not-too-high-impedance means to earth, current can flow and your life may be in peril. This is exactly the situation when a Residual Current Detector (RCD) "safety switch" can save your bacon.
But the little submersible pump isn't _expected_ to be isolated from ground; it's just double insulated (I hope). Use it in a country with 110V mains and it's certainly not isolated; smash the pump and stick in your finger, or even stick that same finger in the water the thing's sitting in if there are enough impurities in said water to make it a bit conductive, and you'll feel a thrilling tingle, if you're not earthed. If you are earthed - if, for instance, your other hand is resting on the metal chassis of your plugged-in computer - then the thrill will be a great deal more dramatic.
So using the pump with an autotransformer is no more dangerous than using it from wall current. Non-earthed things that sit underwater are, fundamentally, more dangerous than non-earthed things that don't. This is not big news. As long as the pump's case remains intact, there's no risk to speak of.
There's nothing particularly amazing about the Senfu-supplied pump; any plain aquarium pump with decent power will do. That last bit could be a catch, though.
Cheap aquarium and pond pumps like this one are commonly described with only one flow figure. For the Senfu one, it's "50 to 200" litres per hour. This is how much water the pump can deliver to a given height - often only one foot - through just enough tubing to achieve that height. Add more tubing and the extra friction slows the flow, even if the pump doesn't have to push water uphill.
In this case, the little pump had to work quite hard. And here's why.
Cool customer
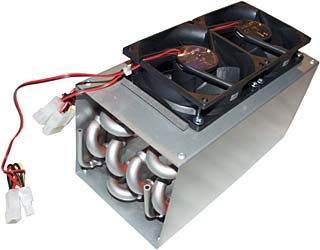
Senfu's radiator is an excellent piece of gear. They make a short version with only one fan; I checked out the longer twin-fan model. Reasonably priced radiators for water cooling have been hard to find. Cannibalised ones, from cars or refrigerators, are generally far too big and awkward, though they certainly work.

The Senfu radiator's only 21.5 by 10.6 by 13 centimetres in size (8.5 by 4.2 by 5.1 inches), but its twin fans, pulling air through the grille, give it plenty of cooling power. The fans are normal 12 volt computer fans, and each have separate standard Molex four pin pass-through power connectors.
With the components for the cooling system ready, all I needed was something to cool.
Processor power
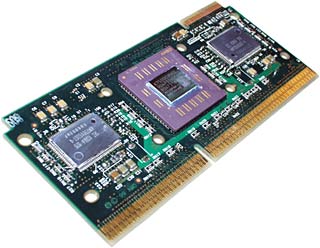
This is an Athlon CPU, on its Slot A circuit board. It normally lurks inside a metal and plastic Single Edge Contact Cartridge (SECC) enclosure, but I'd already busted it out for my last Athlon overclocking experiment (described here). It's an absolute base model Athlon - 500MHz stock speed, 0.25 micron die. It had previously proven itself to be a singularly unexciting overclocking candidate; it made it reasonably stably to 650MHz with lots of air cooling, but that was it.
Getting Athlons out of their cases is not very hard, and makes it easier to cool them properly. When the cartridge is in one piece, heat is conducted out from the CPU and separate Level 2 cache RAM chips by a "thermal plate" - the metal side of the cartridge.
The thermal plate on a SECC cartridge is not a good thing, if you want to get your processor really cool. It adds another junction to the heat path - instead of your cooling gadget just strapping straight onto the processor, the CPU instead contacts the thermal plate, and the thermal plate contacts the cooler.
On the plus side, it's easy and non-alarming to clip or screw a cooler onto a thermal plate, and the plate itself is generally pinned fairly tightly against the CPU, so it's not that awful a problem.
But it can still be a bit annoying, if you're using a poorly designed mounting device. Of which more in a moment.
Power board

The motherboard I chose for the monster-machine is ASUS' excellent K7V, which sells for $AU349. The K7V is a second-generation Athlon motherboard, using VIA Technologies' KX133 chipset, instead of the AMD Irongate chipset in the better earlier boards. Later model Irongate boards - like the current version of ASUS' own K7M, for instance - have reduced the quirk count somewhat. But the KX133's still a better solution for current model Athlons.

There appears to be a Motherboard Reviewer's Union rule that says that whenever a board has an imposing assortment of voltage-smoothing capacitors around the processor slot, you should take a picture of them. So here's the K7V's cap collection.

The K7V has an AGP Pro slot, which is the longer version of the standard AGP slot, with an extra bit at one end that suitable cards plug into for power. Any AGP card will work in an AGP Pro slot, but you can't use AGP Pro cards (of which there aren't many, yet) in plain AGP slots.

You also get on-board audio with this version of the K7V. This picture shows the three on-board sound sockets for CD-ROM, modem, DVD playback board or other inputs. The standard 1/8 inch inputs and outputs are on the back panel.
As long as you're satisfied with plain stereo sound and don't want fancy 3D positional audio, you don't need to shell out for a separate sound card.

Here are the Overclocking House switches, lights and speaker plugged into the K7V. If you're prone to stab the reset button in disgust when your computer crashes, this is not the system for you. If you can restrain yourself, though, they work very well.
Other bits
I ran the test machine from an Aopen 300 watt Power Supply Unit. Athlon systems are known for power problems, particularly when using the not-so-great 235 and 250 watt PSUs that come in many cases. AMD have a hardware guide that tells you what they reckon will definitely work here, but there aren't many problems with proper 300 watt PSUs, even if they're not on the AMD approved list.
The video card was my old Diamond Viper V770 TNT2 board (reviewed, some time ago, here). TNT2s, and the lower-spec TNT2 M64 and even slower Vanta version, are still deservedly popular; they're not too far behind the cutting edge in 3D speed, and they're cheap as chips.
For storage, the test machine got a yum cha IDE CD-ROM drive, and an old 2Gb Quantum hard drive I had sitting on the bench.
You don't need a floppy drive to boot a new system from, these days. You can do it from CD. All PC motherboards for a while now have supported bootable CDs. A plain Windows 98 disc, or any number of other operating system install CDs, will do.
You may have to change the BIOS settings so the CD-ROM is listed in the boot order above the hard drive; you will have to change the BIOS settings to tell the computer that it's got no floppy drive, or software that can't handle an absent drive (like, for example, the Windows setup program) will become very upset.
One 64Mb SDRAM memory module made up the component count, and it was time to get rolling.
Shining up

As supplied, the processor side of the water jacket is somewhat roughly machined flat.
Overclockers have something of a fetish for flatness; the flatter two mating surfaces are, the better the physical and hence thermal contact between them will be.
So 'twas off to the workshop, a sheet of glass and three grades of silicon carbide sandpaper, used wet to stop the aluminium particles gumming it up.

The jacket turned out to be significantly higher on two sides than in the middle. That would mean that when you assembled it, coating the interface with heatsink grease, there'd be a blob of grease in the middle instead of the more or less constant direct contact that's needed for good heat transfer.
Hose fittings
The obvious point of failure for water cooling systems is the hose connections. If they're loose, anywhere, you'll make a puddle and eventually run the system dry. If they're loose in just the right place, you'll irrigate your PC.

Thankfully, all of the Senfu hose connections work very well. On the pump and the water jacket, you push the hose onto a spigot and then tighten a clamping collar down over the joint. A drop of oil on the threads makes it an easy enough job, and the resultant seal is excellent.
The radiator fittings are less funky; you just slide the hose over the output pipes and secure it with a nylon cable tie. Anybody with experience with nylon cable ties, though, will recognise that this is a darn solid mounting method, for all its simplicity.
If you want to use different diameter tubing - the quarter inch tubing Senfu provide is a bit narrow - things become more complex. There are various water jackets with bigger input tubes than the Senfu model, and you could, I think, cut the thin output tubes off the radiator to attach fatter pipes. The radiator also comes with a spool of standard thin white plumber's Teflon tape, which can be used to swaddle less than perfect joints. With Teflon tape and a Jubilee clip or two, you could attach just about anything to the Senfu gear, though it wouldn't be pretty.
I stuck with the default hardware, though.
Clip conundrums

This, gentle reader, is the CPU connection hardware you get with the Senfu water jacket. Since the instructions are so poor, attaching the device to some processors is a bit challenging.
If you've got a Socket 370 type processor - any remotely recent Intel Celeron, for instance, or one of the late model Flip Chip Pin Grid Array (FC-PGA) Pentium IIIs, or even a VIA Cyrix III - mounting the Senfu water jacket is trivial. They include a clip that fits Socket 370 quite well, even if it doesn't clamp down terribly hard on the jacket.
Tight clamping is important for good heat transfer. There's a limit to how hard a clip can hold a cooler onto a Socket 370 processor, because the clip engages two little moulded hooks that stick out of the side of the processor socket. But the limit is rather higher than you might expect; the socket plastic is very tough indeed, and the CPU can tolerate considerable pressure.
The tighter the fit, the better the cooling. But the Senfu clip's still not too bad, and it's certainly easy to apply.
If you've got a SECC2-type processor with no separate cache RAM - in other words, a Slot 1 "Coppermine" P-IIIs - it's also easy enough to mount the Senfu gear. SECC2 is similar to SECC but there's no thermal plate - just a plastic backplate with four holes in it for cooler mounting purposes. Removing your original cooler, if you've not bought a cooler-free OEM CPU, may be challenging. But mounting the Senfu cooler won't be.
There are a couple of straps with slots in the end and a retaining bulge in the middle in among the mounting hardware; you take a couple of the long screws, pop a washer over the end, thread them through the processor board's mounting holes, and tighten the straps down with a nut over the other end of the screw. You can remove the back of the SECC2 cartridge if you like; if you do, you end up with the equivalent of the "SEPP" bare-board package that was only used for the early Slot 1 Celerons. Which can also be easily accommodated with the slotted retaining straps.
If you've got a SECC2 processor with separate-chip Level 2 cache RAM (pre-Coppermine P-IIIs, late model P-IIs), or you rip the thermal plate off a separate-cache SECC CPU, things are more difficult.
You can still mount the cooler with the straps, or with a multi-drilled steel plate that also comes with the kit, but there's no provision for cooling the cache RAM.
Cache RAM needs cooling, when you're overclocking. It might not need a whole lot of cooling, but you can't leave it just sitting there in the air, or you're asking for crashes.
Senfu don't seem to know this. They say that their water cooler kit's suitable for "naked" Athlons and separate-cache SECC2 processors, but, as standard, it isn't.
Just leaving your SECC Athlon or P-II "clothed" with its thermal plate isn't a great solution, either.
Senfu provide a couple of clips for attaching the water jacket to a SECC thermal plate, but they're lousy. They don't hold the jacket firmly at all; you have to shim the clips out with something. Even then, they want to pop off. The thermal plate reduces heat transfer in the first place; the last thing you need is a loose cooler retainer on top of it.
Fortunately, at least for Athlon owners, there's a solution.
The multi-drilled retaining plate that comes with the water jacket actually neatly fits the relative heights of an Athlon's CPU and cache chips. Well, it did with mine, anyway. You can just pop it straight on the CPU board, and it touches all three chips. Basically, it serves as an ersatz thermal plate, but it's better. Standard Athlon thermal plates make poor contact with the cache RAM, and just have a big blob of heatsink grease bridging the gap between the plate and the cache chips.
Oddly, the top side of the retaining plate turned out to be very flat just as it was; I gave it a quick spin on the lapping paper after I'd got the water jacket tolerably smooth, and it seemed to be abrading perfectly evenly all over, so I stopped.

In this picture, the only thing holding the plate onto the jacket is one drop of water. OK, so the plate fell off right after I took the picture, but it's the principle of the thing.
I finished off the job by putting a few droplets of metal polish between the jacket and the plate, and rubbing them together. This is the slow, but perfect, way to make things flatter. After that, just snatching the jacket off the table suddenly would bring the plate up a few millimetres, too. Optically flat, it wasn't; as much effort as I cared to expend, it was.
Greasing and assembling the CPU/plate/cooler collection was no big deal. Dip finger in pot of heatsink grease, apply very sparingly to surface of thing that will contact other thing, press things together, peel things apart, add more grease where none has stamped across, remove grease from obviously over-supplied areas with tissue. The aim of the exercise is to just fill the many tiny air gaps between the mating surfaces, not to lubricate the joint.
Of course, if you put the retaining plate straight on top of the board, you have to put the water jacket on top of the plate. And then you need to hold it down with something.
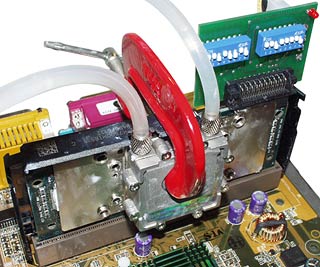
It took me a few attempts to get the cooler clamped onto the Athlon properly, but I eventually came up with this less than perfectly elegant arrangement, using a common or garden hardware store G-clamp.
I thought I'd need to give the ends of the plate a kiss from the bench grinder to make some clearance. But, as it turned out, the connector on the FreeSpeed Pro is actually slim enough that the side of it perfectly fits between the plate and the processor board. It touches the plate, but it doesn't jam. It's as if it were made for the purpose. Nifty.
With the cooler assembled and all of the components plugged in, it was time to get the water flowin'.
Powering up
The 16 tubes through the Senfu radiator add up to more than three metres of pipe. And it's rather larger diameter pipe than the quarter inch stuff that's feeding it, too. For that reason, when I hooked the system together and turned on the pump, I watched the water go into the water jacket, out of the water jacket, into the radiator - and then the thing just sat there, with the exhaust tube cheerfully blowing bubbles into the reservoir, for about a minute, before the first water came out of the radiator again and made it back to the reservoir.
Why'd it take so long?
Because the pump's weedy, that's why.

When the pump's just squirting water into the air, it can move quite a lot of it, as this sitting-in-the-sink picture shows. Its real world performance, though, turned out to be a lot less exciting.
In fountain mode like this, the pump is quite quiet enough. When it's got back pressure to deal with - in other words, when it's pushing water through metres of hose, water jacket and radiator - it makes a noise that suggests it is not so much pumping water as it is grinding coffee. It's still not loud - the two fans on the radiator are much noisier - but it's nonetheless a funny sounding thing.
In one minute, the pump managed to move a shade under 250 millilitres (about one Imperial cup) of water through the cooling system in a minute. That's only about 15 litres per hour. The "50 to 200" litre per hour figure on the back of the box therefore strikes me as purest fantasy.
The little Senfu pump's moving water through more than four metres of tube, including the big radiator; hence, the crummy performance. You can get far more powerful pumps than the one Senfu sells from aquarium or landscaping suppliers, or some electronics stores.
The gruntier the pump, though, the more pressure your hose connections have to deal with. The Senfu connections are perfect with the ultra-low-power stock pump; switch to a super-powered aftermarket unit and, well, I'd test it out on the workbench before I put it in a computer, OK?
Running the beast
Once the water had started circulating, I fired up the computer.
With an ambient temperature of 17 degrees Centigrade and the 500MHz Athlon running at its stock speed and voltage, the water made it to 21 degrees Centigrade, and stayed there, while I installed Windows 98 and various other bits and bobs.
After I did the basic Windows setup, I stuck an old network card in the machine, and hooked it up to my LAN. It's a weird feeling to have a buzzing, bubbling pile of Mad Max-esque components click into a network like any unassuming PC, and share the Internet connection along with everyone else.
This base model 0.25 micron Athlon has a rated maximum thermal power of 42 watts; when you're flogging away installing things and restarting Windows often, the CPU will be working fairly hard and pumping out something approaching that maximum. Some of the heat leaves via the back of the processor package, but there's not much of this convection cooling; most of the energy leaves via the front, and almost all of that heat goes into the CPU cooler.
If the Senfu rig was dealing with, say, only 30 watts, then it was displaying a thermal resistance of 0.13 degrees Centigrade per watt. Which is superb.
The most gigantic passive coolers, like Alpha's monumental P7125M60 (one of which I've currently got strapped to the 750MHz Athlon in the computer on which I'm typing this), have thermal resistances of more than 0.21 degrees per watt. This is pretty much the limit for such coolers. The P7125 is far larger than any Slot 1 cooler was ever intended to be, and its size and weight can cause installation problems, and over-strain the CPU slot if the computer gets knocked around.
If you've got a 0.13 degree per watt cooler, then you can be using a steaming hundred watt processor and keep your cooler only 13 degrees above ambient.
Once I'd finished setting up the system, I installed Mad Onion's 3DMark 2000, a Direct3D benchmark that provides an excellent processor workout, not to mention impressing the heck out of anyone who hasn't kept up with the state of the art in PC 3D game graphics. I set my Ninja Micros FreeSpeed Pro Athlon overclock card for 1.85 volts (0.25V higher than normal) and 700MHz, which was 50MHz higher than this processor had ever managed to stably achieve before - and fired the machine up.
It ran the 3DMark 2000 benchmark happily for hours on end. And the water was never more than five degrees warmer than ambient.
A real 700MHz 0.25 micron Athlon only emits 50 watts of heat, at most - but it runs at 1.6 volts. At 1.85 volts, my test processor is capable of pumping out almost 80 watts. How much it actually emits still depends on what it's doing, of course, but I think it's plausible that the Senfu rig was, here, displaying about a 0.1 degree Centigrade per watt thermal resistance.
Spiffy.
At 750MHz, 1.85 volts, the CPU made it past the Power On Self Test (POST), but hung starting Windows; it improved somewhat as I wound up the voltage, but even at the frankly-outrageous 2.05 volt setting, it couldn't boot properly.
So I packed the reservoir with ice. Drop your CPU temperature enough, and higher speeds become accessible. An ice bath is hardly a long term solution, but it lets you know whether a more sophisticated system to do the same thing would be worthwhile.
When the water temperature had made it down to three degrees Centigrade, I fired up the pump for a little while to pre-chill the processor, and hit the power button again - now at a more reasonable 1.9 volts. And lo, 750MHz was a happening thing.
Condensation - which can be a serious problem for sub-ambient cooling systems - frosted the water pipes, but the system ran the 3DMark 2000 loop perfectly happily for, oh, nearly seven minutes before it crashed.
Oh, well.
Taking it further
The absolute minimum temperature a plain, un-iced water cooling system can possibly achieve is, of course, room temperature. That's the temperature of the air the radiator uses to cool the water.
If you want to chill your processor further, you need some sort of refrigeration gear. And the most popular such devices are Peltiers.

Peltier devices, also known as "thermoelectric coolers", take advantage of the fact that semiconductor junctions get cooler on one side, and hotter on the other, when you pass current through them. Arrange in parallel a ton of junctions that do this particularly well, stick a thermally conductive ceramic plate on either side, and you have a square white magic thing that gets very cold on one side and very hot on the other when you feed it some amps.
Peltiers are even reversible - the hot and cold sides swap, if you reverse the supply voltage polarity. Those little "car fridge" gizmoes that plug into the cigarette lighter socket use Peltiers, which is why you only have to flick a switch to turn them from a cooler into a warmer.
By putting a Peltier element between any kind of cooler and a CPU and running the current in the right direction, you can make the CPU colder than ambient - at the price of sending quite a lot more heat to the cooler than would otherwise be the case.
With water cooling and a decent Peltier between the processor and the water jacket, you can get your CPU temperature below freezing point. If you run a water/Peltier combination with nothing but a thermometer on the cool side of the Peltier you'll commonly see readings lower than -20 degrees Centigrade; even after adding the heat from a processor, you may still be below zero.
But you've got to choose your Peltier wisely. Senfu sell a Peltier element themselves (page here), meant to be put between the water jacket and the CPU. But it's only rated at 54.9 watts. That's how much energy it can take out of whatever's on its cold side; Peltiers are far from 100% efficient, so the amount of heat that comes out of the hot side is close to 100 watts, if it's running at full load.
But, like many Peltiers, the one Senfu sell delivers its full performance only from a 15 volt - or, to be exact, 15.4 volt - supply. Plug it into a computer's 12 volt line and it'll be able to move only about 43 watts. Some Peltiers even have their maximum power specified for a 16 volt, or higher, supply; 12 volts will only give three-quarters of the performance.
If a processor produces more heat than a given Peltier can move, you're in for serious problems. The CPU will just get hotter and hotter. Lower-rated Peltiers like this are OK for cooler-running CPUs, but a poor choice for Athlon overclocking.
You may actually damage hardware if you've got an under-rated Peltier. The CPU will just overheat and shut down as usual, and probably be fine. But Peltiers themselves can't stand to have their hot side much warmer than boiling point. If the CPU makes it to, say, 75 degrees Centigrade before spitting the dummy - which is perfectly possible - it's likely the Peltier will silently fail.
A failed, or unpowered, Peltier is a fairly good thermal insulator. Why it's a bad thing to have a thermal insulator between your CPU and your CPU cooler, I leave as an exercise for the reader.
Underpowered Peltiers aren't necessarily useless, though. You can stick a normal chunky CPU cooler on the hot side, a big heatsink on the cold side, and dangle the heatsink in your water cooling reservoir. That way the radiator and Peltier together get to suck heat out of the CPU - a parallel arrangement, instead of the serial one where all of the heat has to pass through the Peltier before the water can take it away to the radiator.
With this situation, you lose some efficiency as your probably-below-room-temperature water warms up on its way to the CPU. And, obviously, you're not going to be able to cool the CPU below freezing (well, not without replacing your water with alcohol, or something). But it's still a decent solution.
Mind you, if you turn off the computer and water pump but don't deactivate the Peltier, it'll probably freeze the reservoir solid.
The high current draw of Peltiers, even from 12 volts, is another reason why they're a bad idea for many users. Most PC power supplies, even the 300 watt ones you should use in Athlon computers, only have a 12 volt rail current capacity of ten amps or less. A single Peltier can eat more than half of that, and you'll end up with precious little left for the other things in your computer that need 12 volts. Overload the 12 volt rail and its voltage will sag. And, probably, so will the voltages of the other rails (5V, 3.3V...) as well. Overloaded power supplies can cause pretty much every PC problem under the sun.
Here in Australia, Oatley Electronics sell 75 watt rated Peltiers for a mere $AU30 plus postage. I bought a couple a while ago; they're fascinating toys. Again, they're only 75-watt-capable from 15 volts; fortunately, I have a big fat bench power supply that can deliver the 15 volts at 8 amps they want without breaking a sweat. Heck, it could run three of them at once.
Even at 700MHz, though, the Athlon in my test machine ought to be good for more than 75 watts of heat output. It's the elevated supply voltage that's the culprit; at the stock 1.6 volts, a "real" 700MHz Athlon emits less than 59 watts. Perhaps I could use a single Peltier to freeze my way to higher performance, but it'd be a close-run thing, and the ice experiment did not make me hopeful.
Peltier device technology's improving apace, and much more capable models will be coming Real Soon Now. For the time being, though, Peltier cooling hotter processors really requires you to sandwich at least a pair of high-rated Peltiers between a couple of copper "cold plates", and use that between your cooler and your CPU.
You will definitely need an outboard power supply, and preferably a variable-supply-voltage temperature control system as well (Oatley Electronics sell these, too, in kit form), so the Peltiers don't create a block of frost if your computer crashes, or the processor's just standing idle, and the heat source goes away. Some overclockers have encased their processors in foam and silicone sealant and who knows what else to solve ice-and-condensation problems. Well, they're welcome to.
Yet more tweaks
Having verified that this poor old CPU didn't want to do 750MHz by normal means, I went back down to 700MHz. Because the K7V uses VIA Technologies' KX133 chipset, you can set the RAM speed to be 4/3 of the Front Side Bus speed; I had PC133 RAM in it, so I did that. This gives you a bit more memory bandwidth - not 4/3rds of what you had before, because the CPU bus speed hasn't changed, but a little more. RAM bandwidth has little impact on most desktop computer tasks, though; the performance difference is trivial. But it doesn't hurt to do it if your RAM can handle 133MHz.
Then I used ASUS' nifty BIOS-setup-program CPU configuration options to wind up the FSB to 105MHz, for CPU speed of 735MHz. 110MHz was too much, but 105MHz seemed OK.
For five minutes.
As is the case with many Athlon systems, this one didn't seem to tolerate any significant FSB increase. Not that 5% really qualifies as "significant", anyway.
I wasn't beaten yet, though. I could still fool with the Level 2 cache timing.
The L2 cache chips are those separate RAM chips on the Athlon board that caused me such trouble by needing to be cooled.
The four nanosecond L2 cache memory on this old Athlon is rated to run at no more than 250MHz. Its default speed multiplier is 1/2 of the processor core speed, so the cache RAM is running at its full rated speed when the processor's not overclocked at all.
The fact that the CPU runs stably at 700MHz, though, means that the cache memory can handle at least 350MHz. If a CPU, like this one, does 700MHz but goes flaky at 750MHz, it means that either the core can't handle any more, or the cache memory can't do 375MHz.
If, and only if, it's the cache that's the limiting factor, then changing the cache speed multiplier to 2/5 will raise the CPU speed limit to 875MHz. An Athlon running 2/5 speed L2 cache won't be as fast at a given clock speed as one running 1/2 speed cache, but for many tasks the difference isn't very large. If you can get a decent core speed increase by dropping the cache multiplier, it's worth doing.
Changing the cache timing on an Athlon is one of those things which, like changing the multiplier, originally required nerves of steel and a fine-tipped soldering iron. Japanese CPU guru H. Oda made a program that'll let you change the timing once Windows is running. But this is, to some extent, like putting the corkscrew inside the bottle. Trying to start Windows is, in fact, the de facto standard way of finding out whether your overclocked processor has been wound up too far or not; if your cache is over-stressed, you're not likely to make it far enough to run H. Oda's tweak utility.
But then, quite recently, the Dark Lord Oda figured out how to do the same trick more elegantly. You can change the L2 cache timing by changing the BIOS data; you just have to make a new, hacked BIOS, and flash it to the motherboard using the appropriate program (ASUS' BIOS update software page is here).
Making the hacked BIOS by hand is Heavy Mojo - until someone makes a tool to do it, that is. FixL2Cache from WDSoft is just such a program. It takes Athlon system BIOS files and changes the few characters in them that set the cache speed.
You can even download pre-rolled BIOS images for different boards, like the K7V, from places like Insane Hardware's page here. So I did.
With the L2 cache timing set to the most conservative 1/3 setting, I managed to get the test machine to run at 750MHz - at 1.95 volts. It's more than a hundred watt processor at that speed and voltage, but the Senfu rig took the extra heat in its stride. The system was the most stable it had ever been at that speed, but it still ate its own brain after half an hour.
Defeated, I reset the overclock card for 700MHz, re-flashed the stock BIOS, and finally left the poor tortured monster alone. It's been buzzing away running distributed.net's RC5 encryption cracker for, as I write this, more than two days. The d-net cracker isn't a total CPU workout, but it's close; this strange computer isn't the most impressively overclocked Athlon in history, but it seems as reliable as any other Windows 98 box.
Is it worth it?
Now, getting 700MHz out of a 500MHz CPU is a very worthwhile speed improvement. 40% more CPU speed is a quite noticeable difference. When people get this kind of boost out of 500MHz FC-PGA Pentium IIIs, using nothing but a decent motherboard and, perhaps, a bigger CPU cooler, they get great value for money.
Doing the same thing with an Athlon, where you have to shell out for a $AU100 overclock card and a good-sized cooler, is less appealing. If you have to use water cooling to get past 650MHz, as with this crummy processor, the economics become ridiculous.
Many people, though, score much better results with Athlons than I did. Systems that tolerate 110MHz and faster FSB speeds are common enough; 500 and 550MHz CPUs that do better than 750MHz with air cooling are far from unknown; people who can, with water and/or Peltier cooling, get almost the magic 1000MHz out of 750MHz and slower Athlons have also been seen in the wild. Frankly, the odds are good that you'll get a better result than I did.
But that still doesn't mean you'll get value for money.
Many extreme overclockers are in it, at least partly, for the fiddle value. It's fun to overclock, just as it's fun to hot-rod a car, even if it barely ever makes it onto the road.
Now, fiddling isn't the only point of the exercise; get it right, and you've got a hellacious game computer. But people who like tweaking their computers, or their cars, don't pay too much attention to the actual value for money they're getting. Putting aside the idea that you might just be paying for geekly entertainment, is there any point to spending big bucks on cooling?
The Senfu kit, here in Australia, will set you back $AU279 from Cool PC.
For $AU260, you can at the moment buy a 500MHz Celeron, on a "slotket" adaptor that'll let you use it on an ordinary Slot 1 motherboard.
It'll work on pretty much any old P-II board, it'll give you full 500MHz Pentium II performance (not that they ever made a 500MHz P-II, but if they had, that's how fast it'd be), and it'll run right through summer in a sunny room with the dinky little stock Intel cooler on it.
If you've got a motherboard that supports faster Front Side Bus speeds, there's a rather good chance you'll be able to run that 500MHz CPU at 75MHz FSB, for better than 560MHz core speed.
If you've got a Super7 motherboard (the most modern version of the smaller Pentium-type socket connector), you can upgrade to a 550MHz AMD K6-II, with similar performance to the Celeron, for a couple of hundred bucks. Settle for a 500MHz K6-2 and you'll get away for $AU155.
If you've got an older motherboard, with a Pentium or K6 or something on it, there's no way you're going to be able to wind your processor up anywhere near the speed that these entry-level Celerons and K6-2s give you, out of the box. So you should just save up a bit more for a new motherboard, as well as a new processor.
So, if you don't just want to tweak for its own sake, you shouldn't even consider the Senfu kit unless you're starting with something faster than a 500MHz Celeron.
Even then, though, it's important to remember that just because a processor's much more expensive, that doesn't mean it's much faster.
Pushing your CPU up one speed grade may give you the feeling that you've got a bargain, but you may not have actually got a very exciting one.
Consider. A 600MHz Slot 1 Coppermine P-III costs about $AU535 at the moment. A 700MHz one costs about $AU790. So if you spend $AU279 on Senfu gear and wind your 600MHz processor up to 700, you've more or less broken even. There's a good chance you'd be able to go further than that, though; make it to 800MHz and you're running as fast as a substantially more expensive CPU.
But the actual difference between 700Mhz and 800MHz is still only 14%. You may notice it, but it's really no big deal. I certainly wouldn't say it's worth the huge price premium "genuine" 800MHz P-IIIs command.
The same applies to Athlons. A 900MHz Athlon costs a mere $AU1450. A 1GHz one costs $AU2500. Spend $279 on cooling gear, get a 900MHz chip to the big 1000, and you're almost $AU800 ahead!
But you're only 11% faster.
Frankly, you're not likely to even be able to tell the difference. And you're not at all likely to beat a gigahertz; even the dangers-to-themselves-and-others at Kryotech haven't managed to make a saleable machine faster than 1GHz, although they got there a fair while before AMD had room temperature processors running that fast.
In case you're wondering, Kryotech's "thermally accelerated" 1GHz Athlon machines, with the processor refrigerated to 40 degrees below zero (Centigrade or Fahrenheit - that's where the scales cross over!), still cost $US1800 for nothing more than the case, CPU and motherboard.
Which makes them nothing more than a 32 kilogram curiosity, these days.
By the time you've turned that bare bones system into a computer, you've spent enough that you could have built a really stacked 900MHz air cooled Athlon machine. I, for one, don't feel like spending hundreds and hundreds of dollars for 11% more CPU speed, and a hernia.
What happened later...
Want to see what the Senfu rig looked like some months after the events described herein?
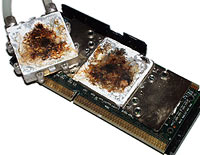
Here's a hint.
Here's another one.
Click here to get the full story.
Overall
So what's the upshot of this saga?
Well, water cooling can be worthwhile.
You do not need to be a raving propeller-headed lunatic to do it.
Anyone who can assemble their own computer - and, if you're even slightly handy, you'll find it's really not that hard to do - can get into water cooled overclocking as well.
Whether it's economically sensible depends on the processor you choose, and how desperately you want to get to a higher speed. Heck, people pay the huge premium for genuine 1GHz air-cooled processors every day; speed clearly matters, and this is a much cheaper route to it.
Senfu's gear is a mixed bag.
The DIY Overclocking House is a really handy thing, which I will get a lot of use out of when reviewing motherboards. For ordinary folks, it's less exciting, and I don't think anyone's currently selling it here in Australia.
The Senfu radiator is excellent. High performance, decent price, good size. Lovely.
The Senfu water jacket kit is good, but its poor instructions and dodgy mounting hardware - I still have no idea what some of the metalwork's for - let it down.
The Senfu water pump is not good. I don't know what their 220 volt pump is like; if it's as bad as this one, you won't want it. The low output pump actually worked quite well, but a much higher capacity one would cost little more, and might help cooling performance considerably. But the pump's a minor detail; it's easy to change.
Overall, though, I like this gear a lot, and will continue to fiddle with it for some time. If you can use a screwdriver and feel the need for a project computer that will impress your friends, this is not at all a bad way to go.
This sort of thing certainly isn't for everyone, but I'm happy to say that it is, definitely, for me.
Buy some bits!
Readers from Australia or New Zealand can purchase all sorts of computer components from
Aus PC Market.
Click here!
(if you're NOT from Australia or New Zealand, Aus PC Market won't deliver to you.
If you're in the USA, try a price search at
DealTime!)
Senfu gear is sold in Australia by Cool PC.
If you want a FreeSpeed Pro card in Australasia, try PC Index.

