Tamiya Ferrari 360 Modena Challenge
Review date: 26 February 2001. Last modified 03-Dec-2011.
Want to drive a Ferrari?
Want to build it yourself over the weekend?
Want to pick up hot chicks/guys with your stylin' ride?
Well, two out of three ain't bad.
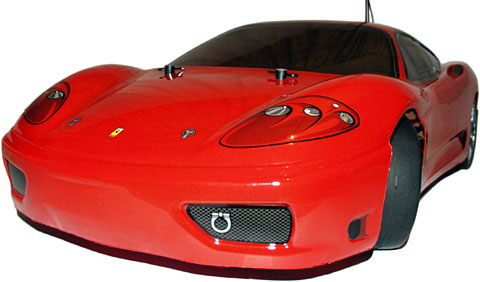
Tamiya's Ferrari 360 Modena Challenge is a semi-serious radio controlled 1/10th scale racing car that you build from a kit. It's fun to build, it's fun to drive, it's hugely modifiable, and it's a heck of a lot faster and more nimble than any K-Mart R/C toy. Built, it's 433mm long by 192mm wide by 111mm high (17 by 7.6 by 4.4 inches). And, unlike the real Ferrari it resembles, it has four wheel drive.
If you want to know just how different "proper" radio controlled cars are from "toy" ones, though, you'll need a complete explanation of what you get when you buy one of these things, what you need to do to make it into a working car, and what you can do to it to make it work better.
I warn you: The following may leave you filled with a burning urge to buy one of these things.
So let's begin, shall we?
In the box

Like practically all cars in this category, the Tamiya Ferrari comes as a box of bits.
Most of the plastic parts are moulded onto the frames of "sprue" familiar to builders of static models; you clip them off with side cutters as you need them.
Unlike static models, though, R/C toys need a lot of parts to be pretty darn strong. And so the different Tamiya mouldings are made of plastic with quite different properties, from the soft bendy stuff used for the body mounts and front bumper, to the super-tough fibre-filled material used for the suspension arms, which crunches when it's cut.
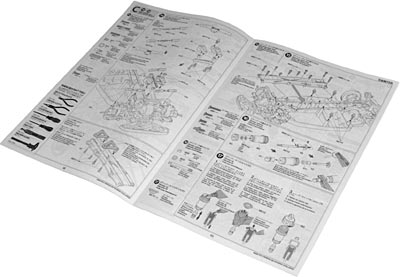
Tamiya's instructions are very good, with few English translation errors, none of which impede understanding. The diagrams are very clear, the steps are sensibly laid out, and the whole kit design's highly optimised to make it easy to put together.
If a part looks symmetrical, it is. If you've got a non-symmetrical part the wrong way around, it won't fit. There are places where you can put a screw in the wrong hole, but it's hard to do any permanent harm that way.
On the mechanical assembly side of things, building a Tamiya car is not a huge step up from building a Lego model.
It's not, however, something that a little kid will necessarily be able to do.
Not because of complexity - any primary-school kid that wants to build this car should have no trouble grasping what needs to be done and when - but because there are lots of places where self-tapping screws thread into very tough plastic, and you need to crank them suckers down.
This, of course, is a golden opportunity for Dad (or Mum, but it's practically always Dad) to buy the kit for their child, and then rob said child of the fun of building it.
Stuff you'll need
A model car kit doesn't come with all of the stuff you'll need to run it, or even to build it.
You get a few tools - in the Tamiya kit's case, a little hex cross wrench and a couple of Allen keys - and you also get a couple of little containers of grease for lubricating various spinning things. But you'll need to supply a Phillips-head screwdriver, a hobby knife (X-Acto type) and some sturdy scissors, at least. There are also some more specialised tools that it helps to have, which I'll get to in due course.
You also need paint, if you want the car's body to be anything but clear. A couple of little spraycans, to do the standard paint job. I'll deal with that in more detail as well, but this is an apposite moment to mention that Wings 'N' Things Hobbyworld here in Sydney Australia, who supplied the review kit, will give anybody who buys one of these kits and mentions Dan's Data one free can of paint. Don't spray it all in one place.
You'll also need some threadlock - screw glue. The kit instructions say it needs no threadlock. This is not entirely true, as we'll see.
Control hardware
The Tamiya kit also doesn't come with a radio. You'll need a standard terrestrial-frequency two-channel radio set to control the car.
All regular radio sets include a transmitter, a receiver and a couple of standard-sized servos, and a basic 29MHz-band AM radio set like the Sanwa Dash Saber I installed in the review kit will only set you back $AU94, plus the price of eight AA batteries for the transmitter.
Most people use "wheel radios", with a side-mounted wheel for steering and a trigger for throttle/brake, to control cars. I happen to prefer stick radios; they're also a little cheaper.
It's possible to control an R/C car with any hobby radio set, but using one on R/C aircraft frequencies (36MHz band, here in Australia) is a big no-no. It's very impolite, not to mention illegal.
If you control a model car with a 36MHz transmitter that has line of sight to some poor blighter's plane or helicopter on the same frequency - and they can be miles away, given the altitudes at which model aircraft can fly - then your signal can interfere with theirs sufficiently to "shoot them down".
Terrestrial-radio interference isn't such a big deal, because cars are on the ground and thus don't have a very long line of sight to possible interference sources. And also because cars don't have nearly so far to fall, and usually aren't made of balsa wood.
Power
Want more hidden costs? Can do. You don't get a battery or charger, either.
A pre-assembled 1.7-amp-hour six-cell nickel-cadmium (NiCd) pack will set you back less than $AU50 and give you about 15 minutes of run time on a charge; you can get higher-capacity packs, but lower-capacity ones cost less per amp-hour and are more tolerant of rapid charge/discharge cycles.
A perfectly all right automatic charger that runs from a car battery (or from a car battery charger, for home use) will cost you less than $AU100, and will throw a full charge into a 1.7Ah pack in half an hour to an hour, depending on the model.
You can get much cheaper mains and 12V-powered "timer" chargers, and they'll give you a perfectly good charge as long as you touch the battery now and then, and take it off charge when it's getting warm. Undercharging does no harm, but overcharging shortens battery life, and few timer chargers will fully charge a modern high-capacity pack with just one wind of their timer dial.
That's it for the stuff that doesn't show on the price sticker - well, not unless you're buying an everything-included package deal, anyway. We'll get to the nasty dollar details at the end. Let's play.
Putting it together
Herewith, the highlights of the construction process.
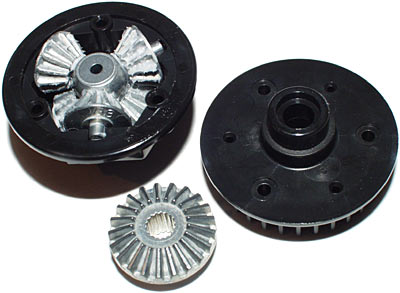
The first thing you do is put together the front and rear differentials, which are planetary-gear units, conceptually the same as the basic kind of differential in a full-sized car.
Tamiya aficionados are familiar with these gear diffs; they're standard equipment, in one form or another, in all sorts of Tamiya kits, including this latest "TA04" chassis.
You can make basic diffs like this somewhat limited-slip by packing them with heavy grease, but the proper solution is to upgrade to ball diffs.
Ball differentials don't have any gears inside; instead, they have a ring of BBs held between two clamped-together metal plates. Adjusting the clamping force gives you smoothly adjustable diff action, from loosey-goosey like a gear diff, to a suddenly-cornering's-difficult practically-locked setting at the other end of the dial.
The gear diffs are OK, but not if you want to win races on a less than perfectly smooth surface.
Building one of these kits is great, if you get a pleasing sense of satisfaction from constructing...

...an assembly, and then...
...adding more parts to it, and then...
...hooking it up with another assembly...
...and then another, as you get closer and closer to something that actually looks like a car.
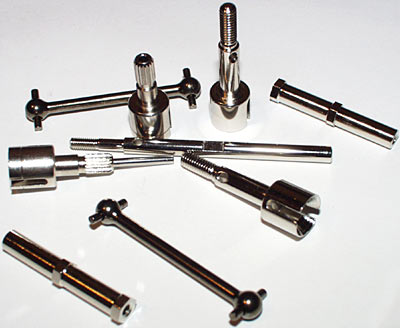
If you like shiny stuff, Tamiya have you covered.
All of the reflective parts are not chrome-plated cheese; they're steel, and they're solid. You won't have to upgrade them if you upgrade the motor.
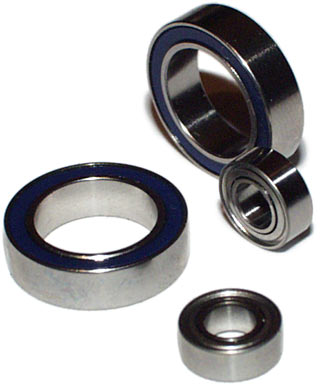
Behold! Bearings!
These are the two types of bearing that come with the kit. There are four of the big 1510s (15mm outside diameter, 10mm hole), which support the differentials, and the little 840s support the spur gear shaft. You'll get a bit more speed and a lot more durability if you upgrade the crummy plastic bushings...

...which sit in the hub carriers and support the wheels, with more bearings.
You can also get ballraced belt tensioners, which don't make a huge amount of difference, and ballraced steering bellcrank supports, which are even less useful. OK, when the metal bushings on the steering and the belt guides wear, things get sloppy, and they do have more friction than do bearings. But a huge difference it ain't.
Engineering types may be wondering about the definitions being used, here. In normal engineering parlance, a "bearing" is just any part of a machine in which some other part turns or slides. Most of the world's bearings are solid pieces of metal.
The crankshaft of a car, for instance, is supported by solid metal bearings at either end. It doesn't seize or wear out, because there's film of oil between the metal surfaces, and they don't actually touch. But model car bearing points are little tiny things that can't work that way.
So cheap model cars use dry solid bearings, also known as "bushings", which are made of some reasonably-low-friction material like nylon, or something rather hard like sintered bronze, which can be impregnated with lubricant and so lasts longer than a plastic bushing. But which still wears out, in time.
More expensive models use ballraced bearings, with two concentric metal rings with little hard balls trapped between them, and shields on either side to keep out dust. They last much longer than bushings and have lower friction.
If you want full bearings in this TA04, you need to add another 12. If you just want wheel bearings, all you need are eight 1150s, which do not have to be special expensive blister-packed Tamiya-brand ones.
Suspension
Lower A-arms, adjustable upper links, shocks connecting central towers to the lower arms. Many mounting points, many tweaks possible. Car nuts know what I'm talking about, everybody else can just look at the pictures.

The link rods for suspension and steering aren't the turnbuckle type. Turnbuckles have a left-handed thread on one end and a right-handed thread on the other, so you can crank the middle of the rod to change the linkage length, without having to remove the ends from the parts to which they are anchored.
These rods are ordinary right-hand-all-the-way units, which are easier to put together in the first place but can't be adjusted unless you detach at least one end.
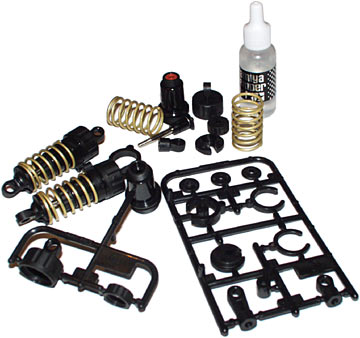
Dampers and damper bits.
Tamiya have a habit of including friction dampers, instead of proper oil-filled ones, in their cheaper kits. Friction dampers are basically just a greased screw head sliding up and down inside a rubber tube. They provide more suspension damping than a similar volume of fresh air, but that's about all you can say in their favour.
Proper suspension is one of the things that makes a big difference between the behaviour of proper R/C cars and the kiddy-toy variety, which generally just have bare springs if they have anything at all; the TA04 has four proper oil-filled coil-over shocks. But you have, of course, to assemble them.
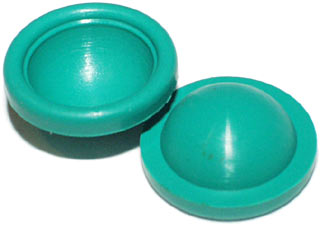
The dampers are sealed with these rubber caps, which separate the air space in the top from the oil in the body of the damper, and stop the oil from foaming. When a damper's built correctly, you can compress the thing with no spring on it, and have nothing but internal pressure push the shaft all the way back out again when you release it.
Not that there's a lot of compression to be had from the dampers if you build them according to the instructions; they have two travel limiting rings around the shaft to lower the car's ride height. This sucker sits a scant eight millimetres above the road, kids.
Since there are no travel limiters on the actual suspension arms, you can raise the car by just fitting longer dampers. The stock ones will do, if you build them without the limiter rings. If you want to make a dual-purpose on-road and rally car, the simple way to do it is to buy and build another set of dampers, assemble another set of wheels with chunky-tread tyres on them, and swap when needed. It only takes a couple of minutes.
A rallying Ferrari looks a bit odd, of course, but you can also get a rally car body - of which more in a moment - and look the part.
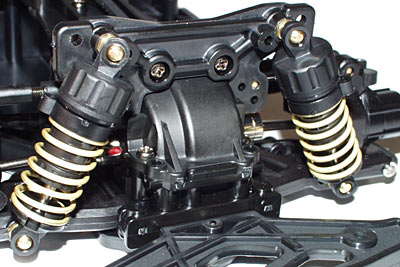
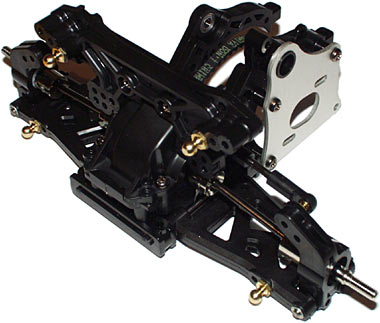
The assembled front suspension. Those brass ball joints make it trivial to swap shocks, and with the shocks disconnected, it's easy to take the tops off the gearboxes and get at the diffs. Nice.
Drivetrain
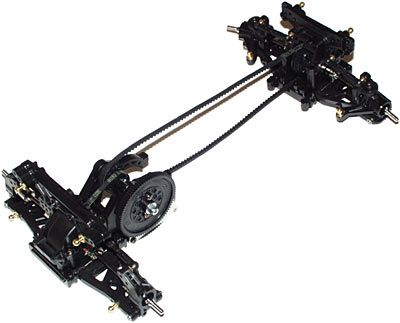
As you may have noticed in some of the above pics, this car uses a toothed belt drive system.
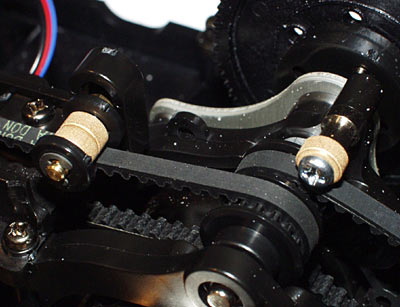
Towards the end of the chassis construction, you install these belt guides to keep everything in line.
Belt drive is the most popular system for 4WD 1/10th scale electric cars; shaft-drive cars are usually lower performance. With some notable exceptions, mind you, like the Team Associated TC3 and Tamiya's own TB-01 - and its hopped-up cousin, the TB Evolution.
Belt drive generally beats shaft drive for a couple of reasons. You need fewer drivetrain components, for a start. You can do a lot of speed step-down from the fast-spinning topshaft to the slow-spinning axles in one step with a belt, and you can deliver drive to the front differential without having to put it through two sets of shaft-drive bevel gears.
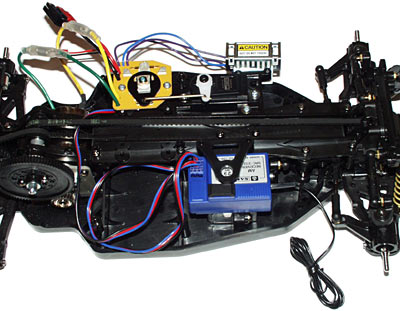
The TA04 twin-belt drive works pretty much like everyone else's; a little pinion gear on the motor turns the big spur gear, and pulleys on the spur gear shaft drive belts that go straight to pulleys on the front and rear differentials. There's just the one gear-to-gear contact point, and it's right off the motor, at the lowest-torque, highest-speed point on the transmission.
For comparison, consider Tamiya's first belt-drive car, the older TA03 chassis. That one's only got one belt. So the motor (front-mounted, on the original TA03 models) drives a counter gear, which drives a topshaft with a pulley and another gear on it; that gear drives the front differential, and the pulley on the topshelf drives a belt to the rear topshaft, which has a gear on it that drives the rear differential. That's four gear-to-gear contact points, two of them at the highest-torque points in the transmission. OK, there's only one belt. But still.
Belts are also more forgiving than gears.
Ordinary brush-type electric motors, like the ones used in practically all electric R/C cars (brushless motors like the ones from Aveox are not cheap), deliver maximum torque when they're stalled. So when your car's stuck up against something, or something's fouled and jammed the transmission, and you don't notice and just nail the throttle, a gear-drive car can easily strip one or more gears.
Better R/C racing cars have a "slipper clutch" on their spur gear to help with this problem, and also to prevent wheelspin. With belt drive, though, torque overload just makes the belt slip over the pulley teeth. Which isn't good for the belt, but which doesn't kill it then and there. Even severely worn belts can keep working surprisingly well.
Oh, by the way, you're meant to use some special "anti-wear grease" on the ends of the drive dogbones. This stuff is silver, very sticky, and utterly does not resemble food...
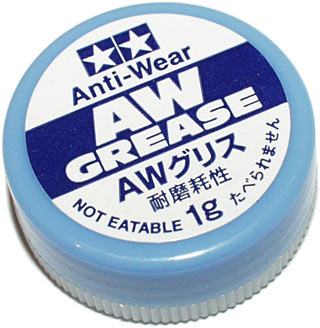
...so it's a good thing Tamiya put "NOT EATABLE" on the outside of the little container, eh?
Threadlock
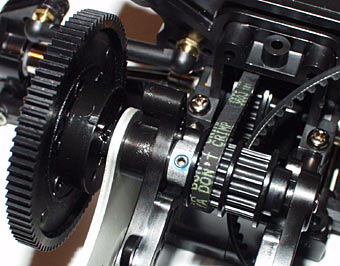
The instructions say you don't need threadlock to build this kit, but it's still wise to use it here and there. The blue ring around the set screw engaging the topshaft in this picture is Loctite 242; any similar removable-grade anaerobic threadlock will do.
This stuff sets hard when it's not exposed to the air, and holds screws threaded into metal parts firmly in place. This is important for things like this set screw and the one that holds the pinion gear on, because set screws suck. They back off, they gouge shafts, they let go. Threadlock them and they're... well, they're still not good, but they'll do.
There's no need to use any kind of threadlock on the Tamiya kit where screws thread into plastic. And don't get threadlock that isn't removable grade. "Permanent" threadlocks are not misleadingly named.
Wheels and tyres
Most standard R/C kit tyres are made of hard rubber, for durability when little Johnny zaps around on the sharp gravel out in the street. On-road cars also commonly come with tyres featuring some sort of butch-looking tread pattern, which gives them a bit of grip in the dirt.
Tamiya have not provided this sort of standard tyre.
They have provided soft-compound low-profile gumball slicks.
OK, if you threw them at a window, they'd bounce off, not stick. But they are proper on-road racing tyres, not kid-safe tough-wheels.
Which is not to say they're not solid, mind you.
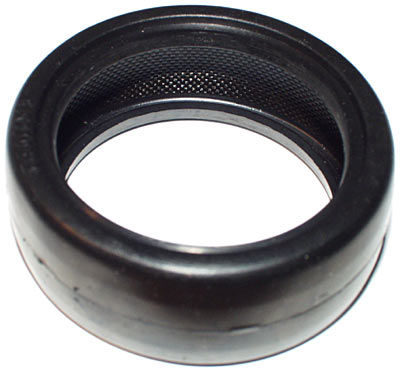
You may notice a certain cross-hatchedness about the inside of the above-pictured tyre (click the image for the bigger version, to see it better).
That's not cosmetic.
This is a belted tyre, not just a moulded lump of rubber.
It's about as stretchable as a leather jacket.
Certain among you may, at this juncture, care to say "phwoar".
You know who you are.
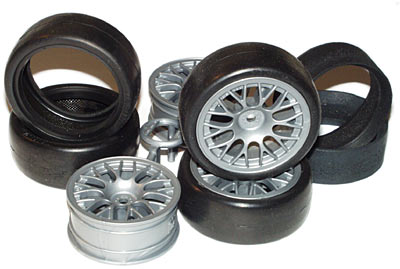
Wheels and wheel bits.
The thinner round black things are the contoured foam inserts for the tyres. The inserts support the tyres from the inside and make them behave more like proper pneumatic tyres. Old-style foam inserts are just foam doughnuts with a rectangular cross-section, and fit imperfectly into the tyre; they're an especially bad fit for "liquorice strap" ultra-low-profile tyres like the ones that come with this TA04. The contoured inserts neatly fill the area between tyre and rim, and so assembling the wheels is easy.
Once you've assembled the wheels, by the way, you ought to run a bead of tyre cement around the rim, to stop the rim rotating inside the tyre when things wear a bit, or when you upgrade your motor. You can do a neater job by pulling the edge of the tyre back and dabbing cement around the rim.
And, if you do this with cyanoacrylate ("superglue"), you can have all the fun of sticking tyres to each other, yourself and the workbench, while also, every now and then, letting the rim snap back and squirting glue in your face.
Sedan tyres, regrettably, are small enough that glue-related mishaps are likely to be quite underwhelming. Allow me to highly recommend doing the same thing with model monster truck tyres, to anybody who feels they just don't have enough little dots of plastic welded to their body.
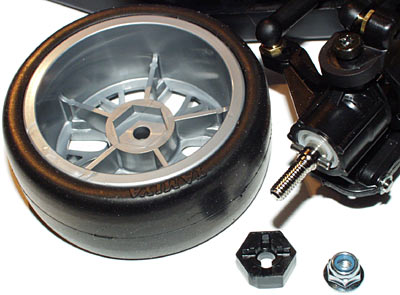
The TA04 uses Tamiya's standard wheel attachment system; a pin through the axle that engages a hexagonal adapter that fits into the wheel. It works well enough - although, of course, scads of after-market alternatives exist - but it's a good idea to cut up some music wire into emergency replacement pins.
Electronics
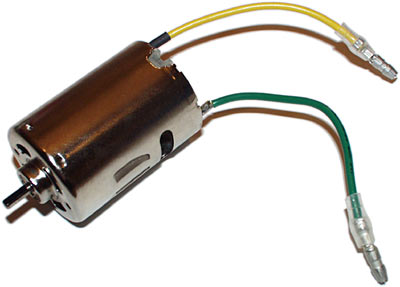
The Tamiya Ferrari's stock motor is as stock as they come. It's a standard Mabuchi RS-540 type, as seen in a large proportion of the world's cordless drills.
Practically all electric model cars use a motor with a can of the same width as the 540, but there are literally hundreds of different motor types available, all of which can be screwed straight into any car that can take a 540.
The standard 540 has 27 turns of wire going around each segment of its armature, cheap ferrite magnets, bushings supporting each end of the shaft, and fairly small though surprisingly durable brushes. When the brushes or bushings wear out, very dedicated people can pry open the sealed endbell and repair the motor. But most people just buy another one for a few bucks.
Most of the more expensive motors are fully rebuildable (the ones that are sealed are made that way to stop stock class racers from cheating by sneaking funkier parts into apparently standard motors), and have fewer turns of heavier wire, more powerful magnets, bearings, and bigger brushes.
The stock 540's fine for a beginner, though. People who buy a better motor along with their first proper R/C car have a tendency to park their car down a storm drain at Warp 9.8. It's not a bad idea to start with something less grunty.
Besides, if you get a much hotter motor than stock, you may zot your stock speed controller.
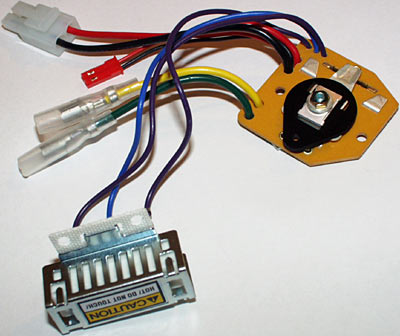
Mechanical speed controllers (MSCs) are technologically somewhat interesting, and they're also dirt cheap to make. Which is why you still see the things in practically every electric R/C kit, including this one.
MSCs use a triple-tapped, low value, high wattage wirewound resistor, which a servo-activated wiper-arm arrangement can put in series with the motor. That reduces the voltage the motor sees, and also reduces its speed. But considerable power is wasted as heat by the resistor, and you can't drive at really low speeds - what you get is something like one-third speed, two-thirds speed, and full power.
One-third speed is still faster than many little toy R/C cars can manage, which makes MSC-ed cars unsuitable as indoor toys.
The resistor in the Tamiya kit has a 0.2 ohm resistance between either end terminal and the middle terminal, or 0.4 ohms from one end to the other, which is on par for these things. There's a bit more resistance from the skinny wires to and from the resistor, and from the low-rent spade lug contacts.
With the wiper in the middle position, no power flows to the motor. With the wiper one-third forward or back, the battery's connected to the motor through the whole length of the resistor. With the wiper two-thirds forward or back, the motor's connected to the battery again, but now through one or the other half of the resistor, not the whole thing.
In two-thirds mode, there's less resistance, the motor sees more voltage, more current flows, and the car goes faster - but the resistor dissipates rather more than twice as much heat, and uses only half of its windings to do it. So it's the two-thirds setting that's actually meanest to the resistor.
At the full forward or full reverse settings, the battery's connected directly to the motor, and the resistor gets to cool down.
If you put a more powerful motor in an R/C car, you can overheat and destroy the resistor - higher power motors have less impedance of their own and allow more current to flow, and the resistor dissipates proportionally more heat.
If the resistor blows, the intermediate speed settings do nothing at all and you end up with a binary throttle - full on, or nothing. The wiper contacts and the wires that go to the resistor also can't deal with high currents, but various cash-strapped modellers have nonetheless used MSCs with motors far hotter than they're meant to handle. This can, commonly, mean reattaching the speed controller wires after over-current melts their solder. It's quite impressive.
The solution to this problem is to drop some cash on an electronic speed controller (ESC), which replaces the throttle servo and MSC with a single solid state unit.
ESCs regulate motor power by pulse width modulation - rapidly pulsing full battery voltage to the motor, but changing the ratio of on-time to off-time depending on the throttle setting. Good ESCs have a very fast pulse rate and so don't hurt motors, and they let you drive a very fast electric R/C car very slowly, if you like.
Racing ESCs have no reverse; you're not allowed to reverse in races, because it's likely to result in someone else suffering for your poor steering. "Sport" ESCs often do have reverse, but it makes them more expensive for a given spec level. Some reversible ESCs let you lock out reverse for racing.
A reversible ESC that can handle pretty much any motor you can cram into a car like the Tamiya Ferrari will set you back maybe $AU260; a lower-rated one that can handle milder motors that a sensible person would want to run in this car is only about $AU100.
Another thing that ESCs can do, but mechanical controllers can't, is brake.
Electric R/C cars brake through their entire transmission, by the simple strategy of disconnecting the power from the motor, and shorting its leads together. A brush motor with shorted leads works as a generator, and the electricity it generates flows in the right direction to make it turn the opposite way to the way it happens to be turning. So the faster it's turning, the harder it suddenly wants to turn the other way, and it stops in short order.
You can see this effect with any little brush-type hobby motor; with no power going to the motor, spin the shaft by hand, and see how long the motor keeps spinning. Then stick a paper clip across the terminals and spin it again; it'll stop spinning much faster.
Brake current flows are primarily limited by the resistance of the link between the two motor terminals, and can be very high in model cars. This is very cruel to things like cheap MSC terminals, so they don't have brake. To stop a model car with a mechanical controller, you either give it zero throttle and let it roll to a halt, or just give it some juice in the opposite direction and spin dem wheels the other way.
This, also, is bad for the speed controller and not totally kind to the transmission and tyres.
But hey, drive it like it's stolen, folks.
Mechanical controllers, including this Tamiya one, also have the very simplest kind of Battery Eliminator Circuit (BEC) connector coming out of them. You plug this cable into your radio receiver to power it, and the servos it drives. The BEC is just a straight tap from the battery input, so it delivers full battery voltage - 7.2 volts - to the receiver.
Classically, receivers and servos are meant to run from six volts, but they're happy enough from significantly more or less. At 7.2 volts, you get faster servo action, too. All current basic receivers can work with a BEC.
If you don't use the BEC, you can use four AA cells in a little holder, or four or five rechargeables, to power the receiver. This doesn't give you significantly longer run times, because the receiver draws much less power than the motor, but there's a reason to do it; it lets you keep radio control even when your drive battery's too flat to run the receiver.
Remember, MSCs keep working when your battery's too flat to power the receiver. So if the throttle's open, and the battery's flat enough that you can't tell the receiver to centre the throttle servo and stop the car, the speed controller wiper will just sit there in the full-power position. Then, the last of the battery power will continue to propel the car, and it'll keep steering however it was steering when the receiver conked out. Typically, that means it'll be headed towards a wall, tree, long drop, lake or major road.
Anything that puts the speed control wiper in a given position will result in the same effect as if you'd pushed the throttle that far, which means that MSC-ed cars can and do scream off at the speed of heat in response to all sorts of peculiar stimuli. It is wise to physically unplug the battery whenever you don't want the car to be "armed".
R/C "gas cars" - which almost all actually run from a methanol/nitromethane mixture - use a servo for throttle control as well, and can thus suffer from much the same problem as MSC-ed electrics. But gas cars have a dedicated battery pack for the receiver, and they can't go anywhere if you haven't actually started the engine. An electric car with an MSC and the battery connected doesn't even need a receiver in it; bump the MSC wiper and the car, she goes.

A standard Tamiya servo saver, built onto the steering servo.
Servo savers are springy things that limit the torque the steering servo can be subjected to when your masterly driving puts the car into the wall, bashing the steering hard against a servo that's pushing the other way. Without a servo saver, doing this can butcher your servo gears. With one, you're pretty safe.
The stock plastic saver's OK. If you don't manage to break it, there's little reason to upgrade. If you've installed some hyper-torque metal gear monster-servo that can lift a professional wrestler off the ground, a super-stiff servo saver (or just a solid arm) may give you somewhat better steering. Really, though, there's not much in it.
The only change I made to the standard electronics was to swap the Tamiya battery connector for higher-rated Anderson Power Products Powerpole connectors, because those are what I use on my battery packs.
A lot of modellers refer to Anderson connectors by some other name - commonly "Sermos", but also various resellers' brand names. They're all actually made by Anderson, but the Sermos variety have thicker silver plating on the copper contacts and tougher plastic for the housings.
Low loss connectors make a difference for R/C applications. When 0.2 ohms of in-line resistance from a mechanical speed controller gives you two-thirds-speed mode, the resistance of a cheap stock battery connector can slow you down, too.
Stock cheap connectors have enough resistance that people who use them with hotter motors occasionally find their battery plug welded into one lump. So if you don't know how to solder, now is a good time to learn - or to get the special crimping tool that you're supposed to use to attach Anderson connectors. Or your friendly neighbourhood model shop can, of course, upgrade connectors for you.
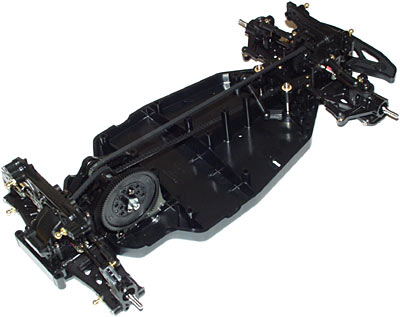
Finishing the chassis
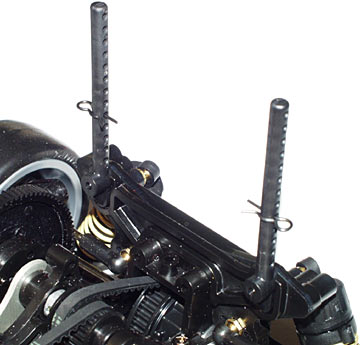
The flexible body mount posts, with many holes that let you mount bodies of different shapes, at whatever height you like.
For scale looks, you should trim the posts so only as much as you need is left, but if you want body interchangeability, you can leave them long and ugly.
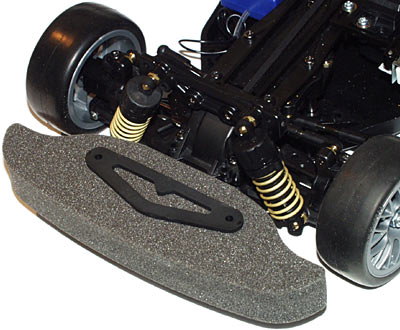
The foam front bumper. This matters. Trust me.
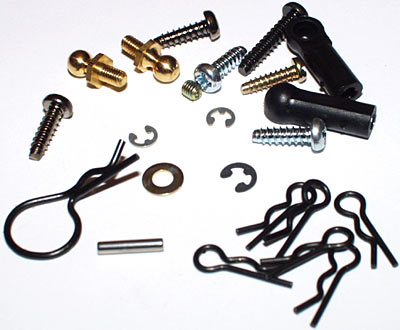
Most R/C models come with more little bits than you need, so you don't have to worry if you lose a couple of fasteners and such. This is very sensible; body clips regularly rotate into unreachable dimensions during races, and E-clips are good at popping off the shaft they're meant to stay on and flying away at a hundred metres per second. They seem to gain energy every time they bounce off something. If we could only harness this revolutionary power source.
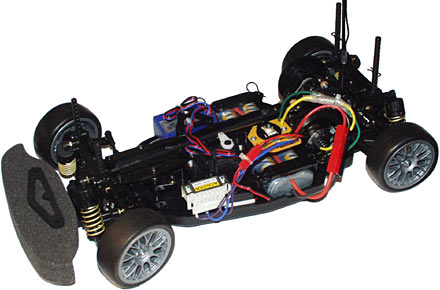
All done.
Well, not all done, really. You've still got to do the body. Which can take about as long as building the whole of the rest of the car, or which can take no time at all, depending on how lazy you are and how much ugliness you can stand.
On with the show.
Bodywork
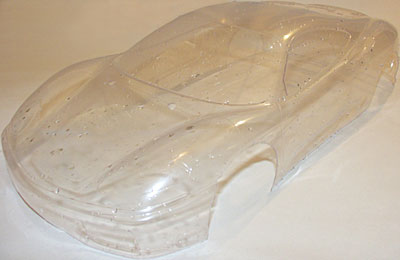
Like all serious R/C racers, the Ferrari's body is a shell made of super-tough polycarbonate - the plastic often known by the General Electric trademark for it, Lexan. Polycarbonate's amazingly tough stuff, and essentially gives the whole top side of an R/C car one big bouncy bumper.
These quick-change polycarbonate bodies make it easy to turn your Ferrari into a Lamborghini, or an Audi, or a Holden Commodore for that matter; you just need to find another body with much the same width and wheelbase, and for 10th scale cars there are umpteen choices.
Tamiya themselves offer a variety of bodies to suit the TA-04; you can get Nissan Skyline GT-R, Honda NSX, Mercedes CLK-GTR and Ford Escort WRC bodies, and the first three come in several different-liveried variants.
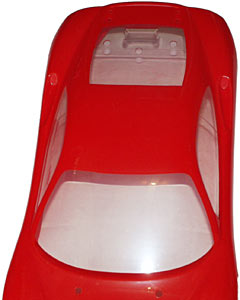
The body comes fresh from the vacuum forming machine, with a big moulding flange around the base and the wheel wells filled in. You have to cut it out before you can paint it.
Cutting out bodies is about the least fun part of putting together this sort of model, if you ask me. If all you have are ordinary straight scissors, it's practically impossible to get the wheel wells right. Some bodies come with pre-stamped wheel well arches; this one doesn't.
You can get around this problem by buying special curved body-cutting scissors from the same place that sold you the model, or you can go really upmarket and use a Dremel (or similar high speed hand-held rotary tool) with a sanding drum attachment.
Cut all of the straight or slightly curved lines with scissors, hog out most of the wheel well material with ugly straight cuts, then use the Dremel at low speed to carve the last of the plastic out, down to the cutting line.
It's just as possible to foul up a body with a Dremel as it is with straight scissors, of course, but used properly it gives you a lovely result, faster. And covers you with polycarbonate dust, too, which has to be a plus.
If you do foul up the body and gash the wheel wells or blindly overcut somewhere else, it won't make any difference to the performance of the car. If you want a pretty body, buy another one; leave the messed-up one clear or just paint it one solid colour with no stickers, and use it as your bash-around body.
The body, trimmed and washed and drying out, before I mask and paint it.
You scrub out the inside of the body to remove mould release gunk, fingerprints and so on, and help the paint stick. Because you paint these bodies on the inside. That way, battle damage doesn't flake the paint.
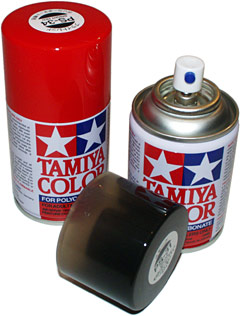
The special paint you use, which costs more than $AU10 per tiny good-for-just-one-body spraycan, bonds with polycarbonate and is flexible, too. It's surprising how much abuse it can stand.
You paint the body with several light coats, so the paint doesn't run. And it may be a small spray can, but it's still a spray can, so do your painting somewhere well-ventilated, OK?
Of course, to stop the mosquitoes from getting in, I kept the door of the workshop closed while I painted. But I'm fine, as my friend Isaac Asimov here will confirm. As soon as he stops playing with the sasquatch.
You don't have to worry about overspray on the outside of the body, because it's covered with a peel-off vinyl film to protect it. But if you don't want the whole body one colour - if, for instance, you want the windows to be the standard-issue "smoke" colour with de rigeur red bodywork - you need to mask the windows before you paint.

The kit comes with masking stickers for the window areas; you cut out the stickers and carefully apply them to the inside of the body.
Traditionally, while doing this, you unstick and restick the masks a few times, curse, and then seriously consider just doing the whole body one colour and having done with it.
Once the window areas and the rear engine-cover area are masked, you apply the red, then peel off the stickers and do the window colour.
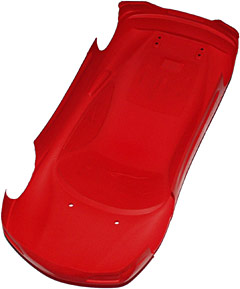
The red paint coats, done.
Incidentally, if you cut open a used-up Tamiya paint can, you can salvage from it two perfectly serviceable glass marbles.
When you're building model cars at four in the morning, you tend to learn these sorts of things.
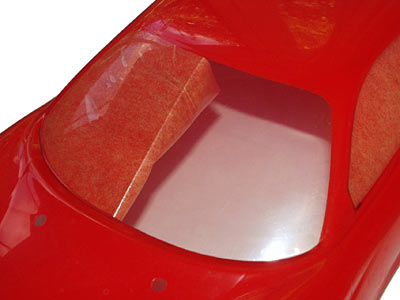
The window masks are much easier to remove than they are to stick on...
... and they reveal beautifully paint-free windows, ready for a few coats of Smoke. And then the painting's done.
These colours are purely advisory, of course; if you want a green Ferrari with purple flames down the side and a pink tongue sticking out of the air dam, you can have one. And you can leave the windows unpainted, to show off the works, or you can paint them jet black, or any other colour you like.
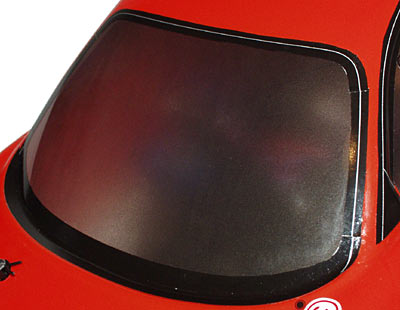
The standard window tint's purpose, besides making the body look more scale, is to obscure the decidedly non-scale details of the chassis with a tasteful frosted-glass effect.
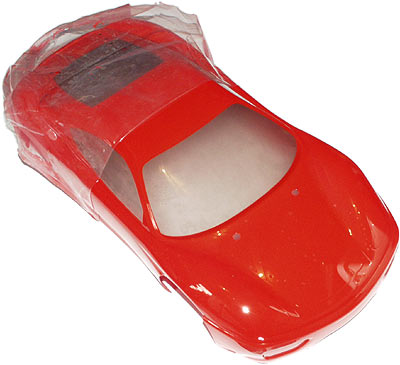
Now you can peel off the protective vinyl, revealing a gleaming showroom shine with no paint splatter.
Time to move on to the detailing.
Decals, decals, decals...
Tamiya's less sporty cars are famous for super-scale detail, with lots of plastic add-ons for the body, or a whole moulded polystyrene body for that matter.
That sort of stuff is just dumb for a racing car. You'll knock off wing mirrors and windscreen wipers and so on in the first five crashes. Which is why this car's body detailing is all just decals.
Decals are, I suspect, part of a plot to make the world's modellers more manually dextrous, on the average, by driving the clumsy ones to suicide.
You cut the self-adhesive decals out from the sheet they come on with a hobby knife, you stick them where the instructions say they go, you get them misaligned, the corners fail to stick after moving the decal around, window-frames that are meant to touch each other don't, et cetera.
You can make decalling somewhat less fraught by mixing up a few drops of dishwashing liquid in a few cups of water and spraying the result liberally all over the area where the decal goes, and all over the sticky side of the decal itself. That lets you float the decal around until you've got it where you want it to be, whereupon you push it down to actually touch the body. Smooth it out from the middle so there are no bubbles, and dry it with a hair dryer - or, very carefully, with a proper heat gun. Heat lets you more easily stretch decals over curved bodywork, too.
After doing about a million more decals, you're done.
Corners that don't stick will cause the whole decal to peel off in short order if the car's body's used for anything but display. You can tack the corners down with a tiny dot of glue (flexible silicone adhesive is good, cyanoacrylate is tolerable) applied with a toothpick.
I chickened out on the decals, and only attached the actual scale-detail ones - window-frames, badges, grilles and so on. I justify this laziness on the grounds that the owner of this vehicle is, in my opinion, rich enough that he doesn't need to advertise the makers of go-fast gear on his car in order to afford it, and bright enough that he doesn't need big "360" stickers on his car to remind him what it is.
I left off the minuscule scale decals you can put on the wheels (!), but I did stick on the tiny side turn indicators and Pininfarina badges.
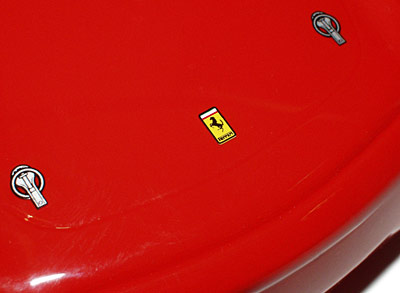
Some decals, of course, absolutely must be there, if you bother with any at all. The Prancing Horse has been experimentally proven to let you cut through traffic in Rome more easily than an ambulance, so it's clearly a genuine go-faster talisman.
Der ving
The real Modena Challenge doesn't have a rear wing, but the Tamiya version comes with one which you can install if you like.
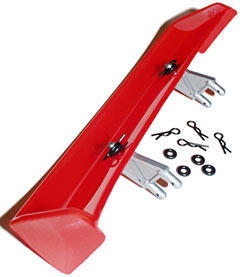
Wings on model cars actually can make a difference to the handling, and this is a perfectly good one - moulded from thicker polycarbonate than the body, with a pair of two-piece struts that let you pick a high or low angle, and O-ring buffered body-pin mounts that make damage less likely in crashes, and also let you add and remove the wing without tools.

Very butch.
The wing's a bit brighter red than the rest of the car because of the darkening effect of the smoke undercoat, which didn't get sprayed on the wing. It's not a big difference, though, and you could always undercoat the wing as well, if you liked.
If you don't want to use the wing, there are two blank red decals provided, to cover the mounting holes and make the car look right.
And that, boys and girls, is it for putting the car together. Charge battery, put body on chassis, hit the track.
Driving it
With a weedy Mabuchi 540 pushing it along, pretty much any 4WD R/C touring car will be easy enough to drive. You'll have enough power to break traction all over the place if you nail full power and full steering in reverse - gear diffs help here, because their high slip lets the inside wheels unload - but in normal driving it'll go where you point it and, on a grippy track, you'll barely even have to slow down for corners.
Model F1 cars, with their super-simple direct drive RWD transmissions and practically no suspension, go darn fast with just a 540. 4WD cars have a lot more transmission drag, more compliant suspension and narrower tyres, so they can't help but be slower and sloppier than the F1s on a dead flat track.
On anything at all bumpy, though, the F1s swap ends at random moments, just like the real thing. 4WDs don't.
In stock trim, the low-slung TA04 handled as well as any similar car with the same power I've seen. Tamiya's plastic dampers, unlike pretty much everyone else's plastic dampers, work well when new and keep working well, too; the car's sure-footed on carpet, concrete or asphalt.
If you're going to bash the car around, remove at least the smaller travel limiter from the shocks and, perhaps, mount the body one hole higher; that'll reduce the body-scrape factor and stop you from getting hung up on minor bumps and potholes.
If you want to race, though, the stock setup's a fine starting point.
Drive the Ferrari into grass or sand and it'll bog as instantly as the real thing; that's not where it's meant to be. There are R/C trucks, if you want to go garden-bashing.
Anywhere flat and, preferably, clean, this car can eat for lunch.
Time for some sticker shock.
Pricing
Adding up all of the hidden costs - radio, battery, charger, et cetera - a novice modeller that doesn't have any of that stuff already will be up for around $AU250 on top of the price of this car. Which ain't cheap.
The purchase price, in fact, is the Tamiya Ferrari's chief problem. It's got a decent basic spec level, but it costs $AU553 - or $US250, ex shipping, from the discount mail order places. Australians are advised not to buy large bulky boxes from overseas, as you don't end up saving much and local hobby shops won't want to know you if you have a problem, which you probably will.
The real Modena Challenge is a race-tweaked version of the standard 360 Modena. Even the standard Modena will set back an Australian buyer some $AU340,000, assuming the dealer judges you worthy of the vehicle.
So, by comparison, the Tamiya's free.
At $AU553, though, there's some stiff competition from other similar toys. Including, oddly, another one in the TA04 line.
The TA04 Pro chassis-only kit (Tamiya's page for which is here) isn't much more expensive than the Ferrari version. The Pro edition costs less than $AU575 and doesn't come with a motor, speed controller or body, but that's OK; it's aimed at racers.
Racers don't like using fancy Tamiya bodies, which sell for about $AU80 by themselves, when they can pay half as much for a less detailed but perfectly good American-made body which they won't feel so guilty about thrashing and crashing all over the place. And racers also have no interest whatsoever in closed-endbell Mabuchi motors or mechanical speed controllers.
Stuff racers do want, though, the TA04 Pro has, in spades. An aramid fibre drive belt, ball diffs front and rear, three spur gears of different sizes, full bearings, front and rear anti-roll bars, and a more rigid chassis plate as well. All of this stuff you can get as options for the Ferrari version of the TA04, but it'll cost you.
There are a few similarly specified cars a bit below the TA04's price point. The excellent HPI RS4 Pro 2, for instance, is the same sort of chassis-only, ready-upgraded deal as the TA04 Pro, and can be had for well under $AU500. It's older than the TA04, but it's got carbon fibre ball-raced anodised aluminium everything.
The price difference isn't huge, though, and you can get Tamiya parts pretty much everywhere. In Australia, the USA and most other countries that export television shows, it's also easy enough to get parts for various other popular brands including HPI. But people in other nations may be safer sticking with Tamiya.
If I were buying one of these cars, though, it'd be either the RS4 Pro 2 or the TA04 Pro, not the Ferrari. I don't care about getting a pretty body, I don't want an MSC or Mabuchi 540, and bushings - any bushings - offend me. Your mileage may vary.
Overall
Given the price, this car isn't a great choice for a beginner who doesn't intend to do any racing. There are any number of bash-around on- and off-road cars, including for instance various Tamiyas based on the simple shaft-drive TL01 chassis, which look as cool as this car and cost a lot less. And which can be hopped up into half-way capable racers, too.
If you've got the money, though, and you want the fun of building a swish looking toy that goes, stops and turns startlingly well even in stock form, check this sucker out. I like it.
Tamiya's page for the Ferrari 360 Modena Challenge
Buy one!
Readers from Australia or New Zealand can purchase all kinds of R/C toys, including the Tamiya TA04 Ferrari, from
Wings 'N' Things Hobbyworld.
(if you're NOT from Australia or New Zealand, you're probably not going to like the shipping
costs...)
If you mention Dan's Data when you buy a Tamiya Ferrari from a Wings 'N' Things store here in Sydney, Australia, they'll give you a free can of polycarbonate paint to go with it!

