Gamerz Stuff Badge Lite
Review date: 6 March 2002.Last modified 03-Dec-2011.
If your computer doesn't look like something that ought to be marking out a runway at night, then you're probably not much of a case modder.
If you decide to dress up the computer you use for, um, Microsoft Office, you don't have to make the PC equivalent of a Holden Sandman with Conan airbrushing and purple underbody neon. But a lot of people do. Lots of lights are the norm. And who am I to argue; the computer I'm writing this on (this one) has a side window and a red light in it.
If you're looking for a neat accent for your modified case - or just a point of interest on an otherwise stock box - a glowing case badge isn't a bad idea. Well, as long as it says something interesting, anyway; there's not a lot of point to lighting up a "Yum Cha Computers" label.
Accordingly, people pursuing this goal are likely to need to make their own badge, as well as find a way to light it up.
Gamerz Stuff, whose other products I've reviewed here and here, have addressed this problem well with their Badge Lite kit.
You can buy the Badge Lite from the Everglide store, here, along with Gamerz Stuff's other products. Badge Lites cost $US11.95 plus shipping, and you can choose red, yellow or blue illumination. They sent me a blue one.
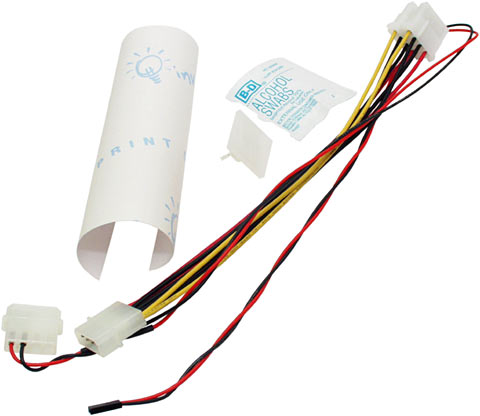
For your money, you get one light emitting diode (LED) lit badge module, one generous two foot power cable for said module terminating in a standard four pin Power Supply Unit (PSU) cable receptacle (with only two pins installed, because that's all it needs), one four-pin Y cable that lets you install the Badge Lite even if you're out of PSU plugs, one alcohol wipe for cleaning the spot where you install the thing, and one 5.5 by 4.25 inch piece of self-adhesive white paper. The paper is DIY badge material; you can draw or ink-jet print the badge design of your dreams on it, if you don't have a badge handy already.
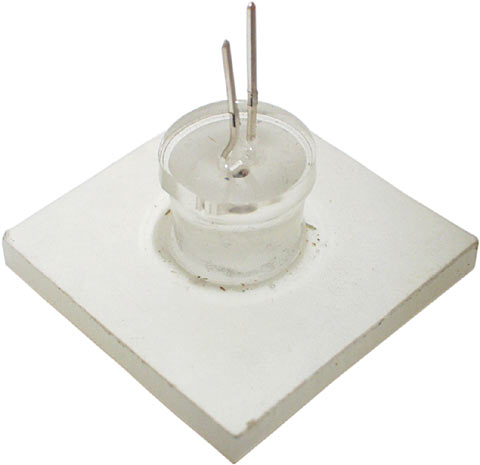
The light module's simple enough - a 10mm LED with its top flattened off, bonded to a one inch square of milky white acrylic. The front of the light module comes with brown protective paper on it, and the back of the acrylic has more peel-off paper, this time with a self-adhesive coating underneath. You put a half-inch hole in whatever you want to install the Badge Lite in, you peel off the paper over the sticky stuff, and you press the light in place. No nuts, bolts or spot welds are needed.
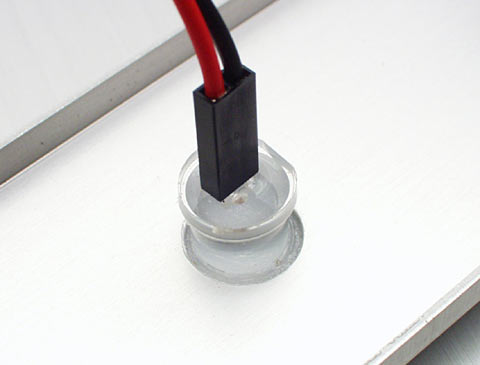
The lamp connects to its power lead with a simple two pin socket, which neatly fits the standard legs sticking out of the bottom of the LED. The positive leg is longer than the negative one, so it's easy to get the connector the right way around. If you manage to get it wrong, nothing will be harmed; your Badge Lite just won't Lite.
The power lead has a current limiting resistor built into it, to allow the LED to run from 12 volts from a PC PSU. This also, by the way, means you could graft the power lead into an automotive wiring loom and use the thing to light something up in your car, if you liked. No resistor change necessary.

Here's the bare lamp running from 12 volts. It's quite a lot brighter in the middle than at the edges, but the translucent plastic makes the light adequately diffuse.
From 12 volts, by the way, the Badge Lite draws about 25 milliamps (mA) through its 330 ohm resistor. This means two things. One, it's an utterly trivial load for even a weedy PC PSU; there are 40 Badge Lites to the amp. And two, the LED's not being overdriven and should therefore last a very, very long time.
Most high intensity LEDs are rated for 20mA operation, and will be happy enough up to about 30mA. At 25mA, if the usual LED life estimates are correct, the Badge Lite seems likely to have rather more than half of its initial brightness left after ten straight years of continuous operation.
I think that's adequate run time for a $US12 product, don't you?
Before you install the Badge Lite, you of course need a badge to light. If you've got a suitable standard PC badge, you should be fine; the Badge Lite design should work with all kinds of normal clear-domed-front PC badges, whether they've got plain paper backing or the fancier aluminium kind. Aluminium badges don't let any light straight through from back to front, but the Badge Lite lamp can light them from the edges.
I decided to take the do-it-yourself path and try printing a badge design on the supplied sticky paper.
The paper that comes with the kit is much bigger than the standard one inch square PC badge, but that's because pre-cut badge-paper would be fiddly to draw on and impossible to print on. You make your design, then you cut it out.
Gamerz Stuff warn against trying to print more than one badge on the paper, and point out, correctly, that you should be able to just go and get some more of this stuff from any decent stationery store. If, however, you set up your print so that badge number 1 goes towards the left edge of the paper, you can then just turn the paper around and do another print. This gives you the chance to try different paper-type settings; you should do a test print first on a piece of ordinary paper cut to size, but that won't tell you anything about how your printer's ink will behave on the sticky paper. Printing twice also, of course, lets you have a couple of goes at cutting the badges out neatly.
![]()
For my badge, I picked an appropriately cheery logo (printing it is cheaper than buying the action figure), made an unnecessarily high resolution file containing it, and started printer-fiddling.
I did the double-print thing and tried a couple of paper settings, but both of my prints had a distinct stripey quality when looked at closely. The printer had assumed that the ink would spread out on the paper, but it didn't; the sticky paper holds the ink from my Epson Stylus 1270 (reviewed here) just fine, but I would probably have got a more solid black if I told the printer I had higher resolution capability paper. No matter; I touched up the print a bit with a black marker.
Gamerz Stuff's printing instructions tell you that once you've cut out your sticky badge you should handle it only by the edges, lest you spoil its stickiness. Since I do not have telekinetic powers, I'm afraid I had to touch the sticky stuff as I positioned the badge on the front of the lamp. It turned out fine, though.
Rather than knock a hole through the front panel of my Lian Li case, I decided to install the Badge Lite on a 5.25 inch bay cover. This way, it's easy to transfer it to another case.
Making the hole was simple enough; the thin aluminium of a Lian Li bay cover is easy to drill. Most PC front panels are plastic; that's even easier.
When doing this, I suggest you finish the hole with a tapered reamer, rather than actually assault your case with a half inch drill bit, if you've even got one. Big drills like to make polygonal holes in thin metal.
With the hole reamed to size and de-burred, the lamp just dropped in; its sticky back holds it more than firmly enough.
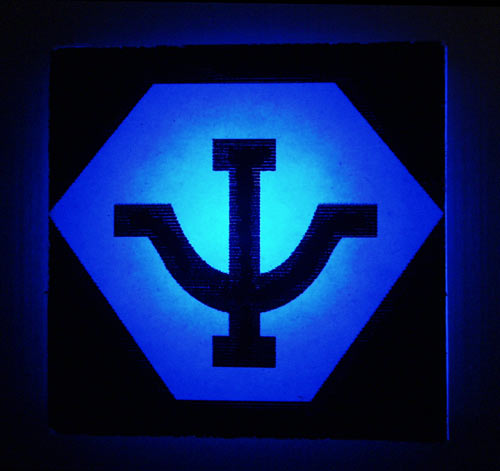
In this smaller close-up of the freshly installed glowing badge, it looks fine. Click the picture for the larger version, though, and you can see the stripey edges of the print. You've got to look closely to see this in real life, though; remember, the badge is only one inch square.
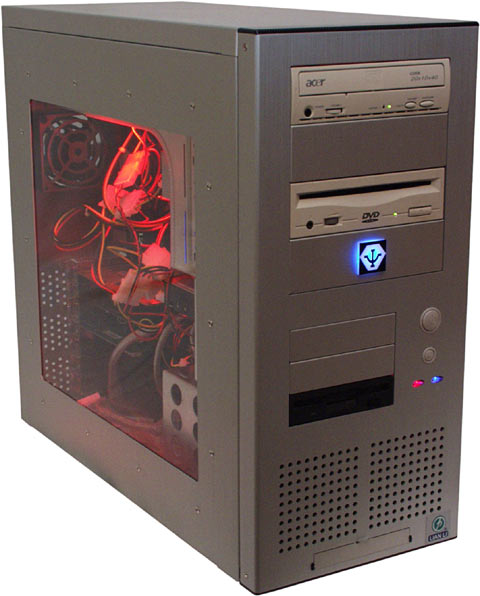
The end result. The standard power light in this PC-65USB case is actually brighter than the Badge Lite, but it doesn't have a diffuser - it shoots a blue penlight beam across the room. The glow of the Badge Lite, though, is still perfectly visible in normal room lighting. In anything short of direct sunlight, actually.
Overall
Sticking an LED behind a PC badge isn't exactly a patentable idea, but doing the job yourself from scratch wouldn't turn out to be any cheaper than buying a Badge Lite kit, if you value your time at all.
The Gamerz Stuff kit isn't the work of five minutes to install, but there's no soldering, no LED-choosing, no plug-buying, no LED-sanding, no gluing, and no plastic-trimming required. You'll have to do all of that stuff if you want to make a badge light like this from scratch. With this kit costing only $US11.95 plus shipping, why bother?
The Badge Lite is a totally unnecessary product. It does nothing useful at all. And I rather like it.
Recommended.

