Noontec V9-T HD media player and dual-tuner PVR
by Dan and Michael VorstermansPublication date: 15 April 2010. Last modified 03-Dec-2011.
Here in Australia, we have the dubious honour of being among the most prolific downloaders of movie and TV shows, beating out even the USA. Whether or not you think this is legally and morally acceptable, there is clearly a lot of interest in content-on-demand. And sure enough, there are companies stepping up to deliver the solutions that cater to that demand, regardless of the outcome of the court cases.
For some, Microsoft's Windows Media Center installed on a standard PC makes for a pretty good TV watching/recording experience, and you can install third-party software to get it to download and file-serve as well. However, the technical expertise needed to get it all working reliably tends to be pretty high, so you'll be forced to become more familiar with the Windows registry, codec packs, and the command line than you may have wanted to. Also, it's hard to integrate a PC into a bedroom without unacceptable noise and heat levels.
I currently use a WMC PC as my main TV machine, but the noise meant running video, audio, and remote/keyboard cables through walls so the PC could be located away from the room in which the TV is actually watched. Not really an option if you're renting.
There have been a number of playback-only media devices on the market for a couple of years, but ones that combine TV recording in Australia's unique DVB format, as well as BitTorrent downloading and file serving, are just coming into their own now.
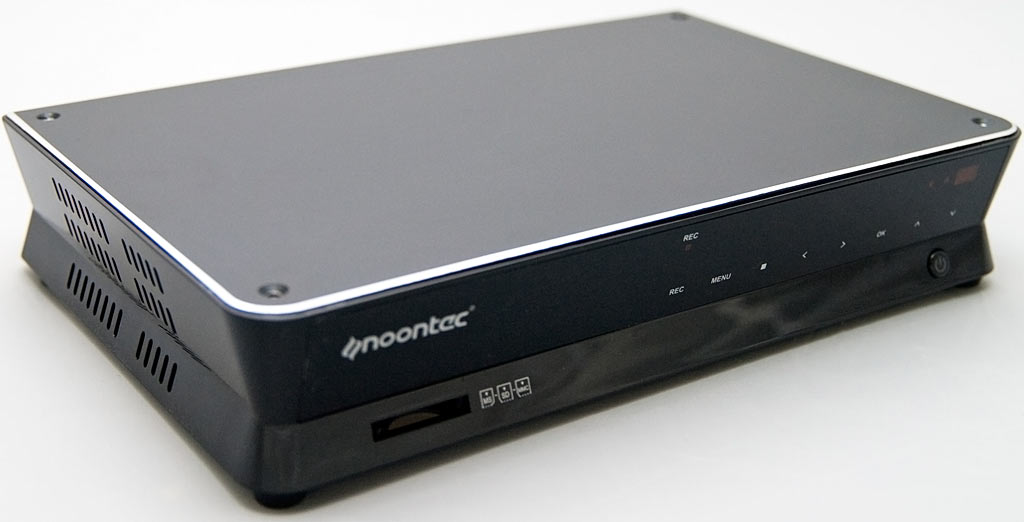
Enter the Noontec V9-T, the latest TV add-on to hit our shores. Catering for both the Channel BT crowd and the regular TV watchers, this one little box is supposed to record free-to-air digital TV on two tuners at once, as well as provide playback and NAS-like file-server functions for downloaded content, at a price point well below other alternatives.
NOTE: The V9-T is for Australian digital TV, and will not work with the different DTV formats used in other countries. There's a plain non-T "V9" listed on the Noontec site as well, but the lack of a T indicates that the plain V9 actually has no tuner at all, and is therefore not the same sort of device. (Presumably it'll be quite a lot cheaper.)
The V9-T is imported to Australia without a hard drive, so you can specify how big a drive you put in it. Up to 2Tb is supported, and a V9-T with a "1Tb" drive (formatted capacity about 931 gigabytes) costs less than $AU405, which is not bad value compared to a PC. Here in Australia, $400 would buy you a motherboard, Intel CPU and stick of RAM, but no drives, case, operating system, or TV-tuner cards.
How much TV you can record per unit of drive space depends on the data rate of the show you're watching, because PVRs like the Noontec all just dump the MPEG-encoded data stream directly to disk, and every combination of resolution and soundtrack gives a different data rate. Several hundred gigabytes of disk should give you quite a lot of recording space, though; Standard Definition video should only take up three to four gigabytes per hour, so a 930-ish-gigabyte drive will give you at least 230 hours, and maybe more than 300 hours, of SD TV.
HD is more variable, ranging from around five to as much as 15Gb/hour. A "1Tb" drive will still be good for at least sixty hours of 15Gb/h recording, though, and at 5Gb/h it'll give more than 180 hours.
If this isn't enough for you, you can of course install a bigger drive. The V9 also makes it easy to move files to and from external devices and computers on the network, so you can move TV you want to keep off the internal drive.
What's the big deal?
The V9-T has a feature list as long as your arm, just like umpteen other PVR boxes, several of which are available with tuners that work here in Australia. These devices have bubbled up from the bottom of the market while the big names failed to provide the Australian market with anything that works as well as, to pick the one biggest name, TiVo in the USA.
TiVo took a mere nine years to make it to Australia, and despite its $AU700 price (slightly more, if you pay in instalments!), it won't play video files off your PC, or USB devices, or even let you easily skip ads. Because all of that would annoy the TV networks, two of which own the Australian TiVo outfit.
(There is, to be fair, at least no ongoing subscription fee for the TiVo program guide in Australia.)
UPDATE: After this page went up, a reader pointed out that you actually can use a TiVo to view video and pictures from a computer using TiVo Desktop, the basic version of which is a free download for US users. You can only connect to one PC, thanks to the usual Copy Control Crap, but it should be adequate for many users. Here in Australia, though, the free version of TiVo Desktop isn't available; you have to pay $AU99 for the "Home Networking Package", even if all you want is the basic features. (User reviews are not entirely positive about the system's functionality, either.)
The Australian pay-TV companies offer their own PVRs too. They aren't exactly packed with features either, and are no use to you if you don't subscribe to cable or satellite TV. And if you take the ad-skipping, live-TV-pausing and time-shifting features of a PVR and combine them with Australian free-to-air networks now often broadcasting foreign shows with very little delay, free-to-air digital TV becomes a quite attractive alternative to pay TV. Add the ability to play video files from computers and removable storage devices and pay TV starts to look like a mug's bet.
This does depend on decent PVRs being locally available, though. It took a while for the cheap 'n' cheerful Hong Kong brigade to come up with anything more exciting than set-top boxes, but in the last few years they've definitely filled the Decent PVR Gap in Australia. Copyright is, as far as they are concerned, a matter for the PVR user to worry about, not the PVR manufacturer. And no media corporations have much leverage with companies like Noontec or Homecast.
Hence, free and easy recording, and playing, and transferring, of whatever you want.
Well, in theory.
The funny-branded-PVR market isn't just about features and price.
Some features just aren't very important - your purchasing decision, for instance, probably does not depend on whether the built-in image slideshow feature has a Ken Burns effect. (Note that the V9-T does have this feature! Background music, too!)
And just because something's on the spec sheet doesn't mean it's easy to use, or bug-free. Affordable full-function PVRs aren't a brand new product any more, but you've still got to resign yourself - especially in a niche market like Australia; our whole country has about the population of New York State - to interface bugs, buttons on the remote that don't do anything, occasional firmware updates for minor functions like making the Ethernet socket actually do something, et cetera. Cheap PVRs, as a class, still aren't suitable for use by Great-Aunt Lily, unless Lil used to cut code in COBOL in the Sixties.
So the question is not just how many features one of these things has, for how few dollars. It's how many features actually work properly.
On with the show!
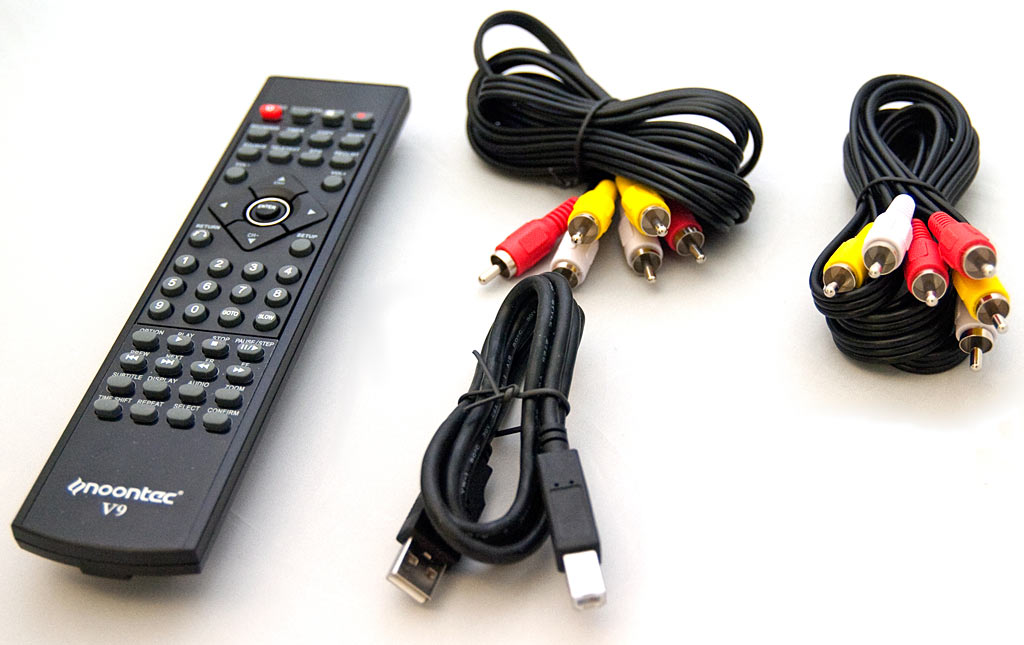
The rest of the Noontec box contains the IR remote, a video/audio RCA cable, a USB cable, a tiny CD (more on that later), a manual in Chinglish and other languages which may or may not also be Chinglified, and an Australian-standards-approved external power adapter with a number of interchangeable foreign plugs, as well as the Australian type.
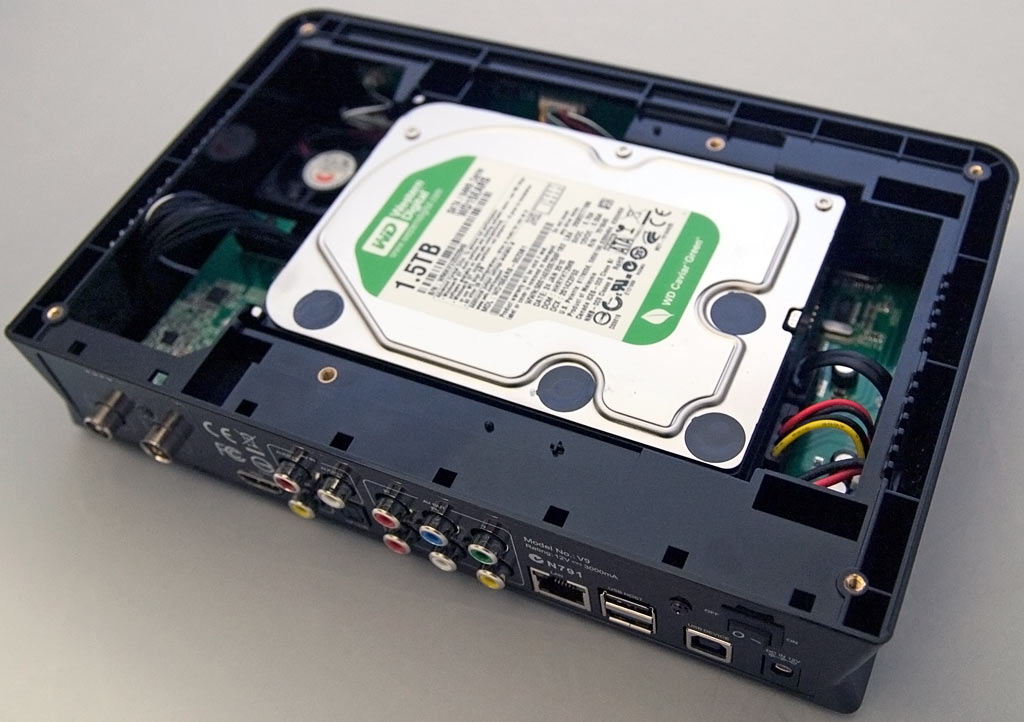
There's room in the V9's case for a standard 3.5inch SATA drive, and there are separate cables for the drive's power and data. (So you could probably put a spare SATA laptop drive in it, if you wanted, provided you mounted it so it wouldn't rattle around or short out.)
A slower 5400RPM "Green" drive is ideal for a V9, as the maximum real-world transfer speed from the unit will never exceed the maximum 30Mb/sec over USB2, and 12Mb/sec or less over the network.
There's a tiny 50mm fan included in the bottom of the V9-T for exhaust (just audible in a silent room), and the top is a slab of machined metal that should give it reasonable path to radiate heat away.
The V9-T's front panel has a series of printed functions that are actually capacitive soft-touch buttons, and it makes a confirmation beep sound when you press them. A button on the right changes colour to let you know whether it's on or sleeping, and a red LED on the left comes on when the box is recording a show.
There's also a memory-card slot on the bottom left of the front panel, which accepts Memory Stick or SD/MMC cards.
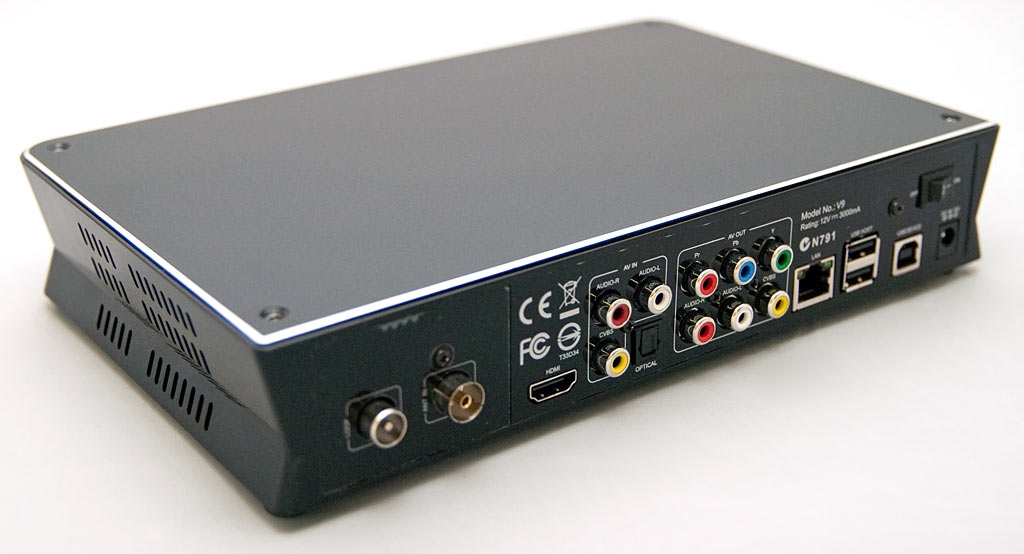
The ideal way to connect this to a TV would be via an HDMI cable, provided your theatre setup uses the TV's speakers, although there are ports on the back for separate component video (red/green/blue), composite video RCA, as well as separate stereo RCA audio and optical 5.1 audio if you want to use a separate AV amplifier. The HDMI output is capable of up to 1080p, which should cover most recent TVs.
There's also a pair of USB A ports, for connecting an optional USB wireless network adapter, Flash drives and external DVD/hard drives to the V9. There's also a USB B port, so the V9 can be connected to a PC as a Mass Storage Device using the included cable, which would be handy if you have an existing video collection to move over.
Rounding out the rest of the ports on the back are a 10/100 RJ45 Ethernet jack, and TV antenna input/output jacks, which allow you to pass through your TV signal.
I tested the V9-T with both an old 160Gb Maxtor drive, and a newer 1.5Tb WD WD15EARS Caviar Green drive, with just less than 1400 actually-usable gigabytes of capacity.
On booting up the V9 for the first time, you're greeted with a Format screen:
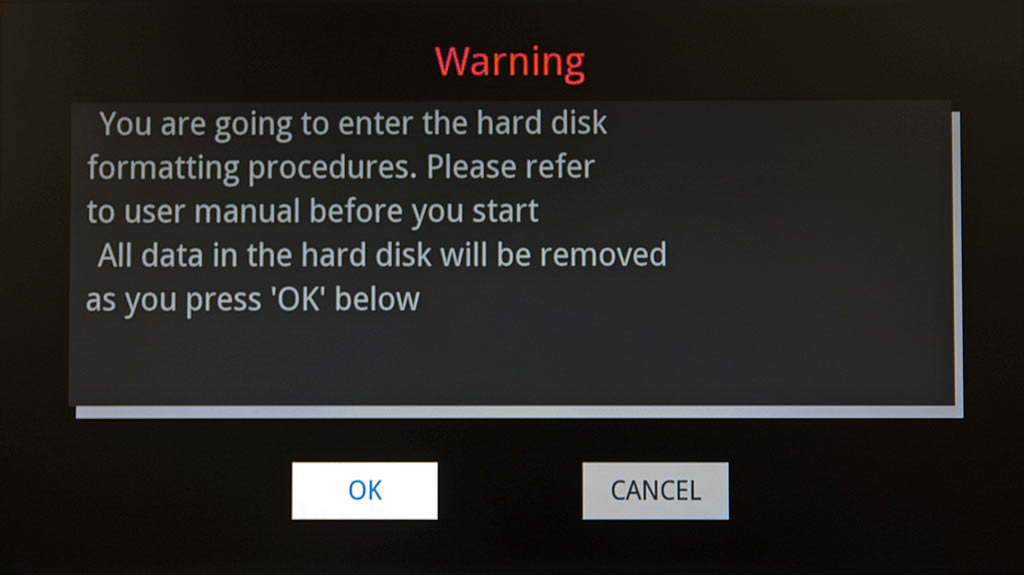
It lets you bypass this if the drive is already formatted, but it's best to let it lead you through the process of installing the default folder layout and the optional BitTorrent and Samba server files.
The tiny CD in the Noontec box contains a RAR archive with 4 files inside, and you have to put these on a USB thumb drive for the V9 to read them from during the format process - something that's mentioned in passing in the manual (PDF). But I suspect the manual is wrong, because it asks for the files to be in the root of the thumb drive, when it actually wants the folder containing the files to be in the root.
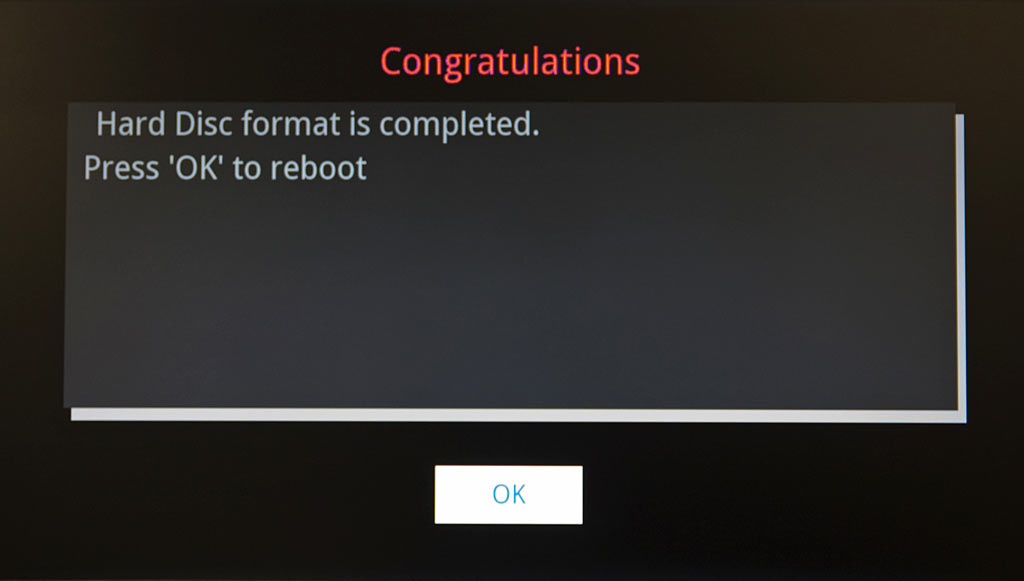
This process is necessary, as the hard drive gets used as the install space for these services. Since the drive is not pre-installed, the setup files can only be loaded onto it by the end user.
Once it's done this, which takes about 30 seconds, you get to reboot:
...and then you are greeted with the default main menu.

You don't need to navigate back to here each time you want to do something, though, as most of the regularly-used menu items have their own button on the remote.

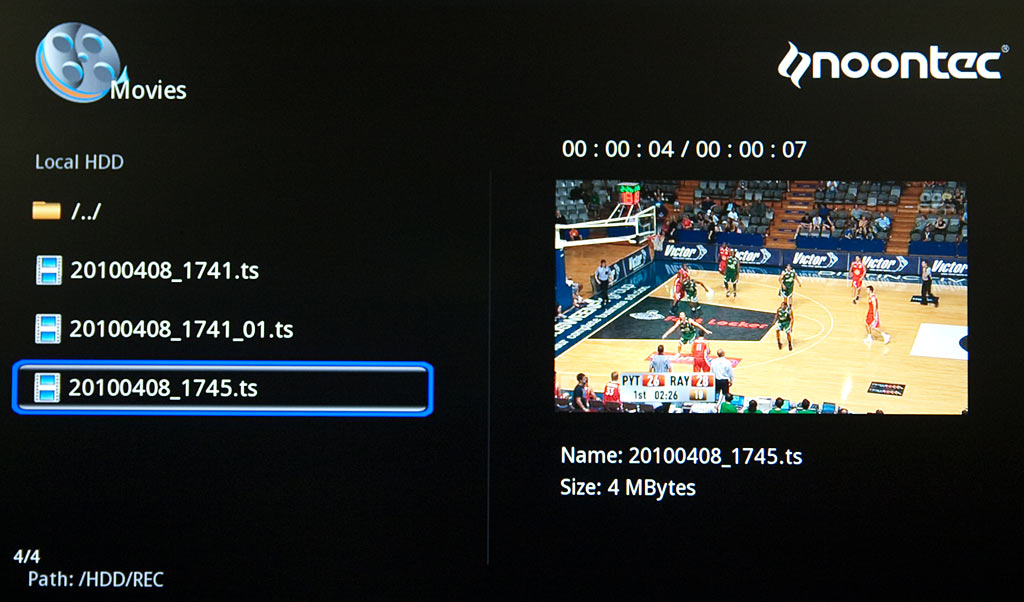
"Browser" is the V9-T's built-in file navigation system for connected drives. You use the remote to choose the source, then the folder you want to play your stuff from. It displays filenames only - no icons or screenshots.
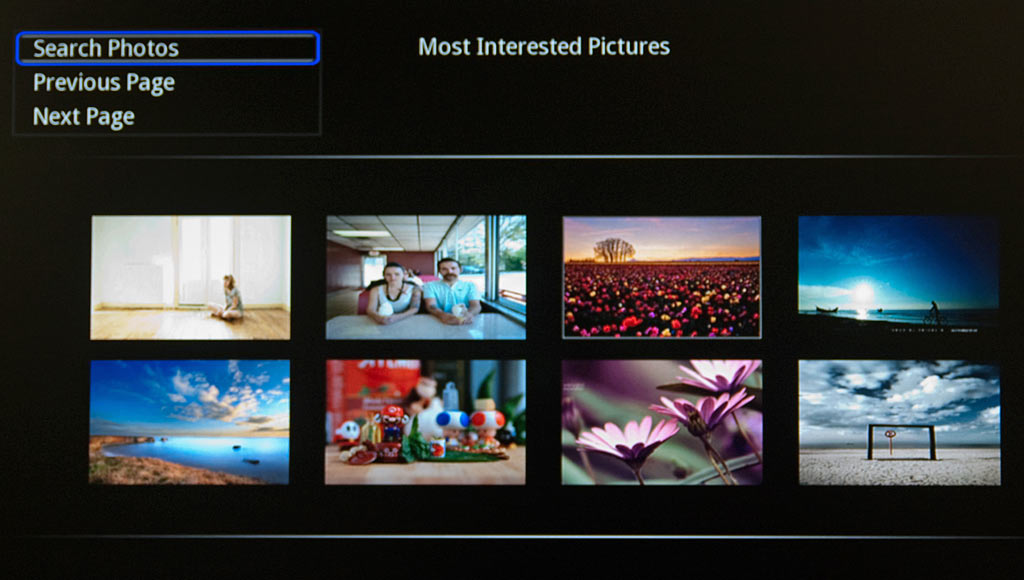
The front-mounted card reader supports SD/MMC/MS memory cards, and you can plug USB drives of all sorts in at the rear, and access them via the USB Device menu. Plug a memory card or USB drive loaded with files into the Noontec box, and you can watch/play them via a few button presses on the remote. The V9-T can play an exhaustive range of current file types - audio, video, and still pictures. Check here to see if your favourite codec is in the current list.
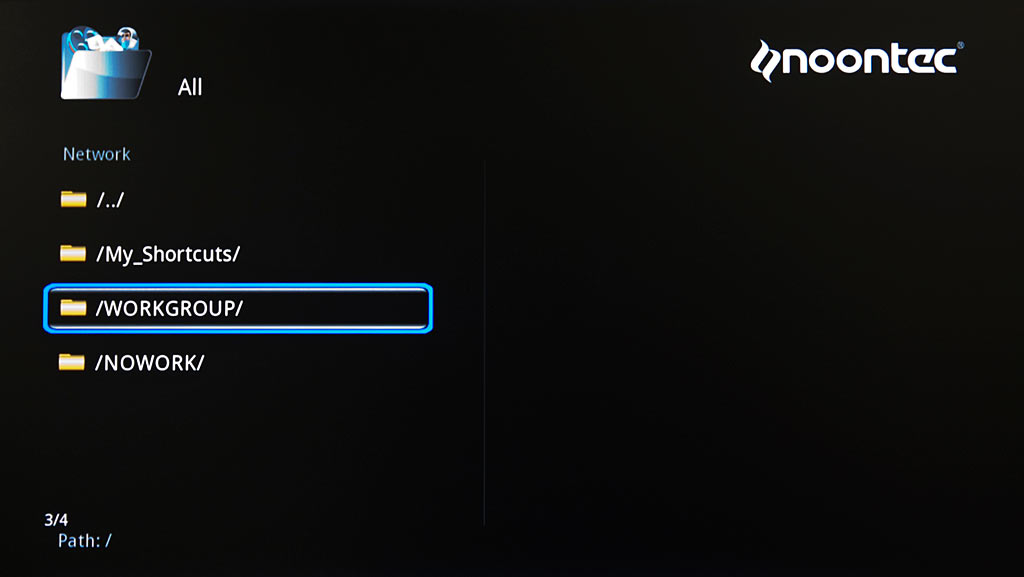
Assuming you've also connected the V9-T to a 10/100 network, you can browse files shared on local PCs in the Network screen, and the V9 can see these shared files and play them directly.
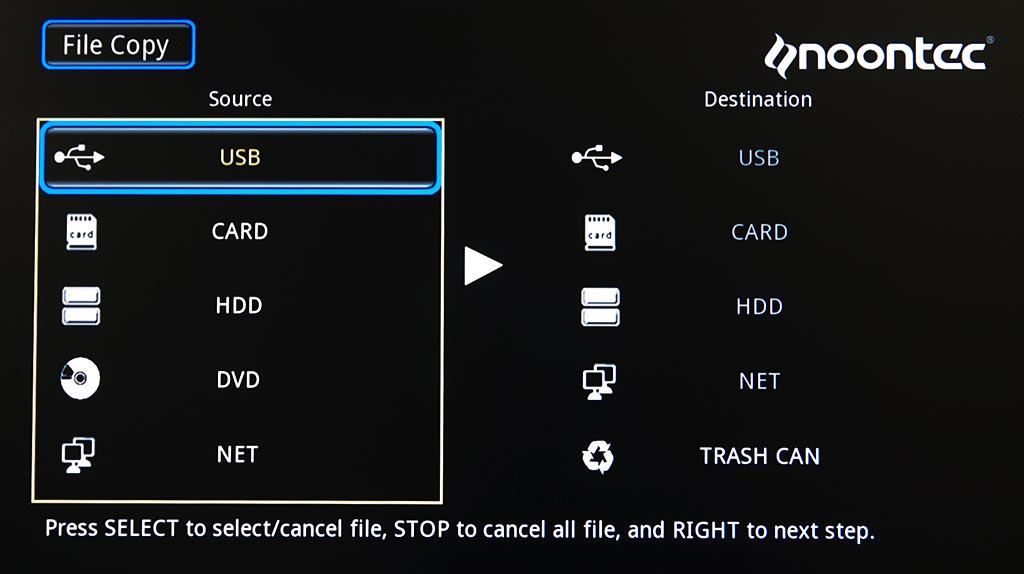
You can manage copying of files to and from the unit to elsewhere with the File-copy menu from the main page:
Selecting TV/AV-in brings up the TV-watching screen, which will continue to play once you move to other menus. Since no channels were tuned, though, I had to dive back out and into the setup menu to select the country and channel scan.
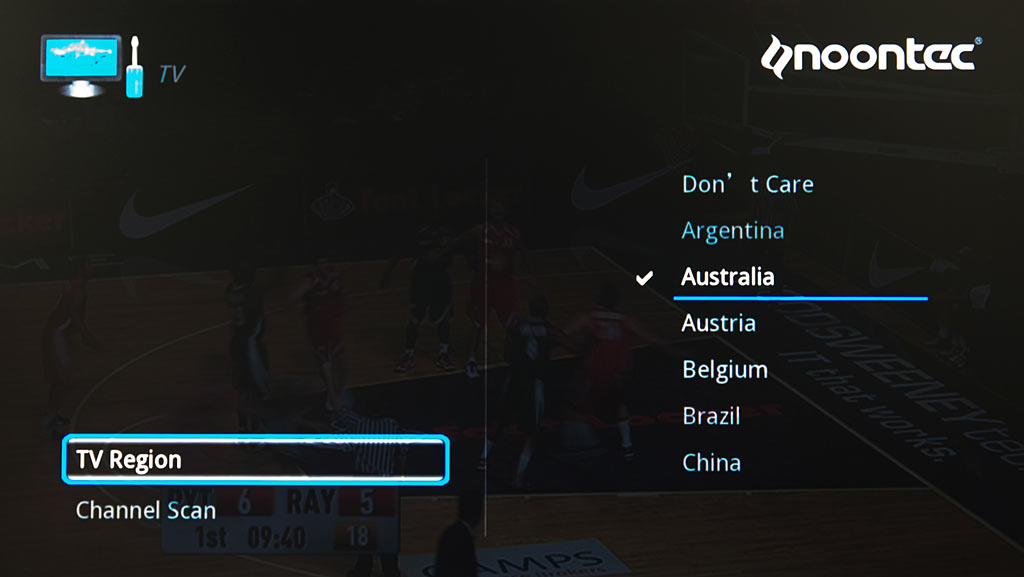
Since then, I've found the easiest way to scan the channels once-off is to use the "reset defaults" option, as this will start a wizard that steps through the country/channel setup all in one go.
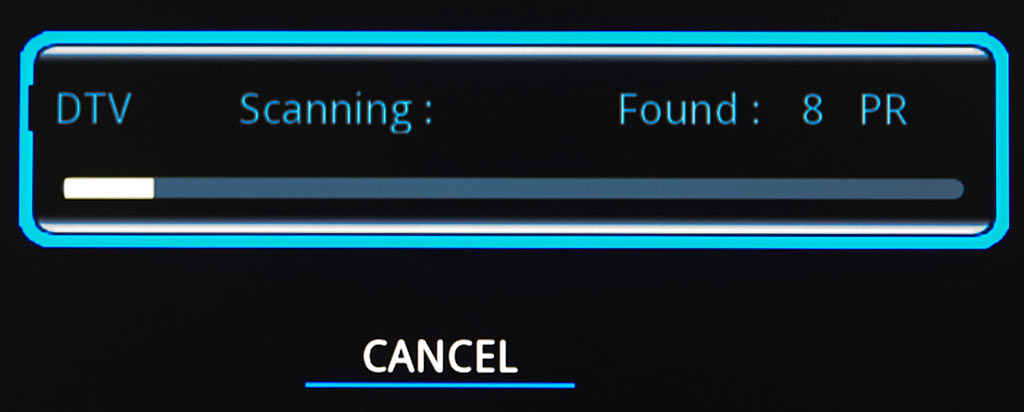
After you choose the country, it takes about a minute to scan all the available channels, which for me was around 30 or so. It included the HD versions of the local free-to-air channels as well as the SD, and switched between them pretty much instantly.
One of the benefits DVB digital TV has over analogue TV is that the stations can now broadcast not just subtitles, but also data for a TV guide, along with the programs:

Being from the generation that never buys a weekly TV guide or newspaper, one thing I can't live without is an integrated program guide, or EPG, and the remote has a helpfully-labelled EPG button that brings one up (as against another button labelled "Guide", that appears to do nothing):
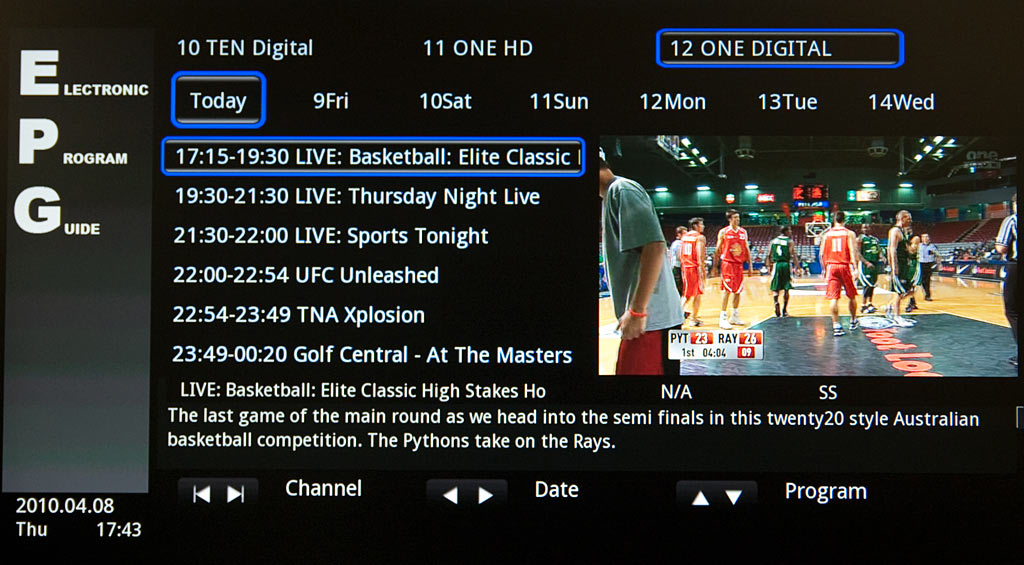
This program info comes from the TV stations themselves, and along with a live-view of the selected channel, I found that you could use this screen to set a scheduled recording by selecting a show and pressing the Option button on the remote. Recordings are then viewable in a separate screen on the main menu, called "Rec List":
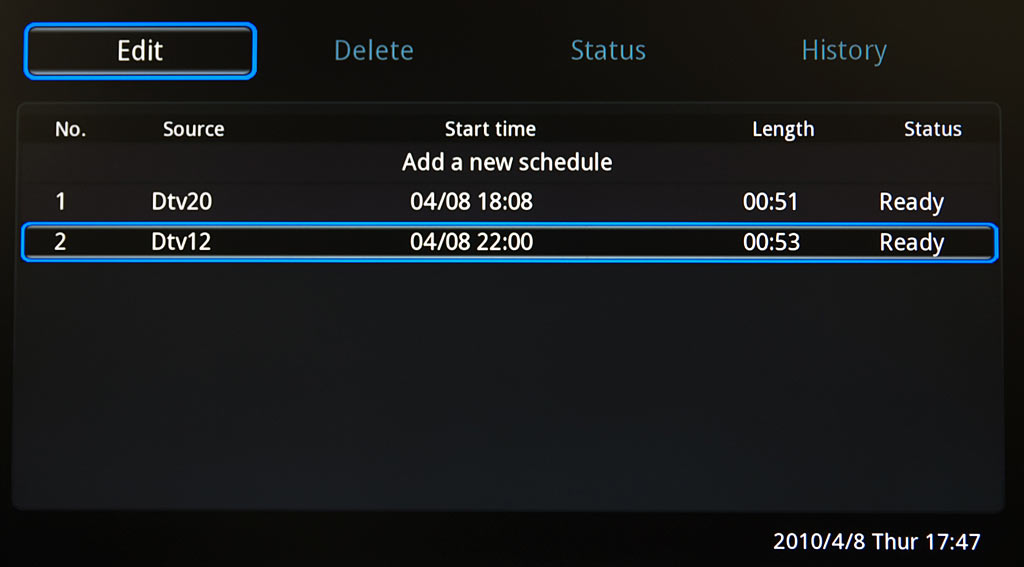
You can use this page to drill down to individual recordings to set some very specific conditions for each:
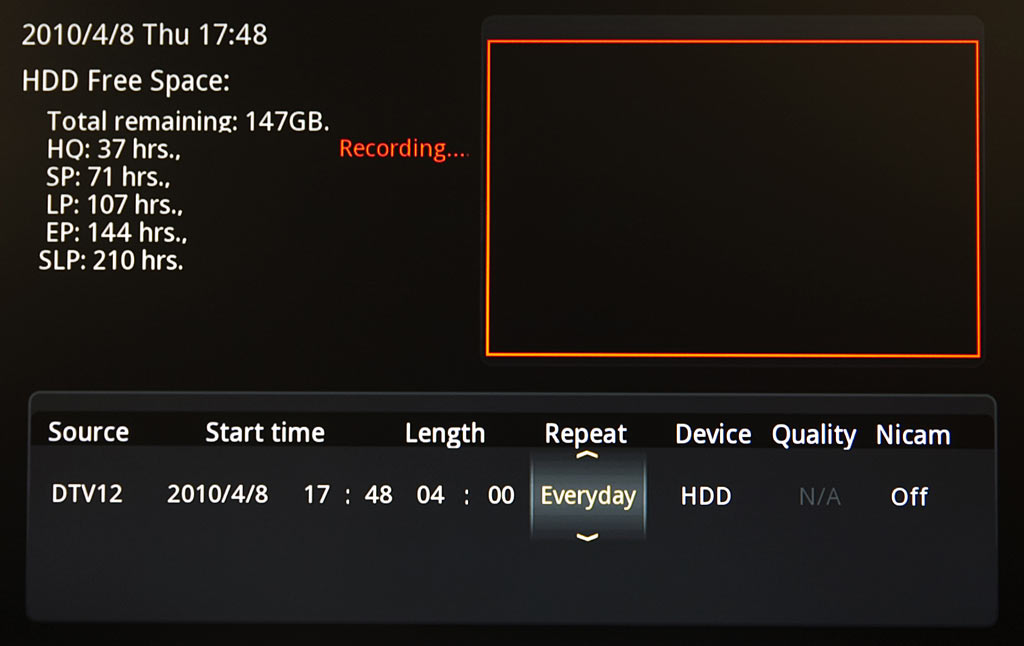
This page uses an iPhone-esque rolling selection box for each option, and lets you specify repeats, or even which day of the week a show might be recorded - useful if your show is on at the same time each week. The V9 gets its system time over the air as well, so it should always be in sync with the local time for your broadcast area. This won't save you from having your recordings messed up by reality shows that unaccountably run late for the 300th straight time, but you can expand record times to cover lateness, or earliness for that matter.
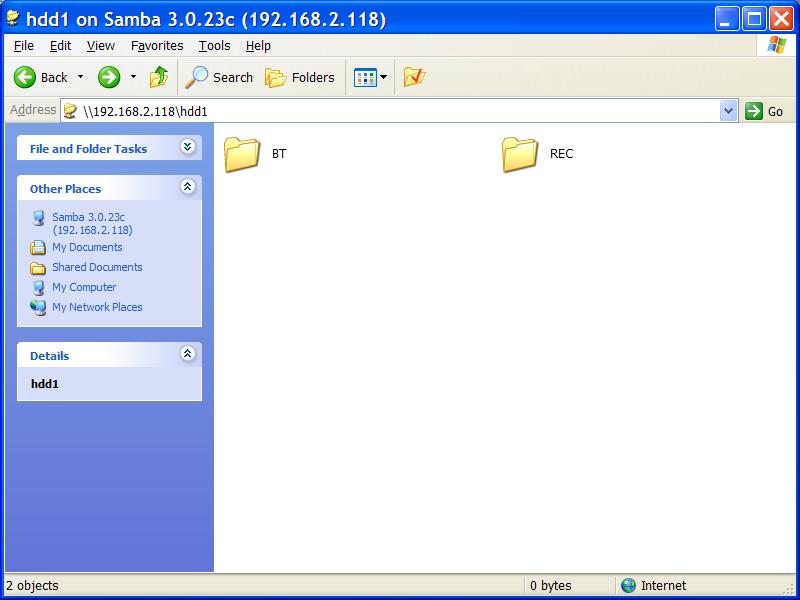
Saved recordings are placed in a default folder called "REC" on the internal drive for local playback, and you can get to them, via the network, using the V9-T's Samba server - handy if you want to watch recordings on another PC elsewhere in your home. Unlike Windows MCE, these recordings don't get tagged with the name and show details, so you have to deal with file names based on the date and time.
(The abovementioned expanded record times mean auto-tagging digital-video-recorder systems often get the name wrong, anyway. If you start recording in the 29th minute of The Simpsons, that's what the recording is likely to be called.)
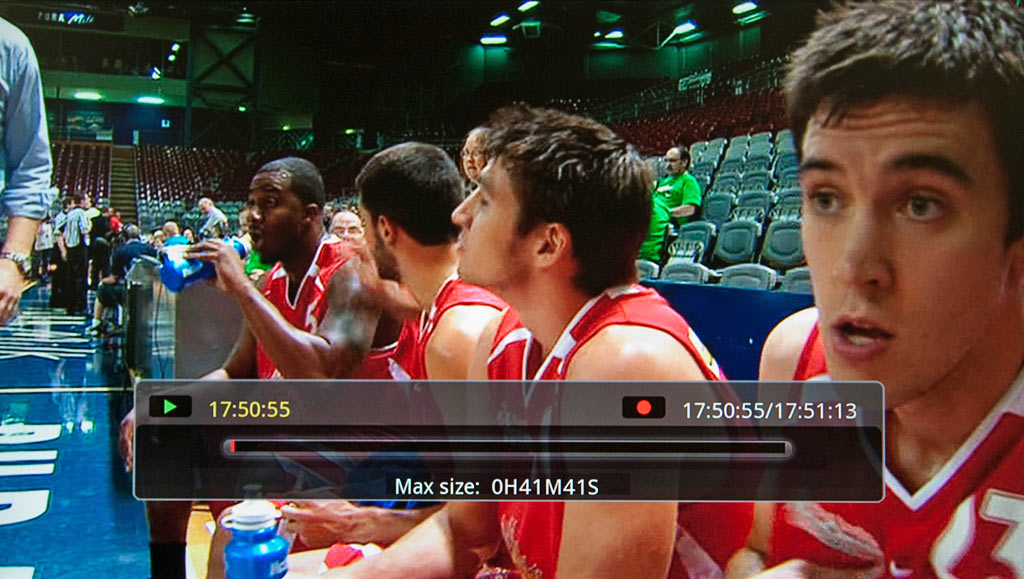
I tested the capabilities of the twin tuners by hitting the record button and then changing the channel, and hitting the record button again. Both channels were now being recorded, and I could still go back to the main menu and use the V9 to browse and play other media. It wouldn't let me change the channels any further until I specifically chose to stop one of the recordings, so it's difficult to accidentally interrupt something you really want to record.
If you want to step away for a few minutes from a live TV program, there's the number one selling point for every PVR, a pause-live-TV button on the remote. Press this, the program gets paused, and the progress bar below starts to creep along. Once you are ready to start watching again, just press play. There are fast-forward and skip buttons on the remote to move forward in the recording faster than real time.
On top of the TV functionality, there's some additional Web services built in under the Internet Services page, such as YouTube video browsing, RSS feed readers from CNN and BBC World, and photo browsing from Flickr and Picasa:
Finally, I had a play with the BT and Samba services mentioned earlier. The V9 basically has a mini Web server that gives you a Web page to add and manage torrents. You get to this page by typing your V9's IP address in a PC's Web browser, so that PC needs to be able to get to port 80 on the IP address of the V9 via your network. There's no real configuration of these services in the V9's own menu, beyond specifying a password to control access to the V9's server:
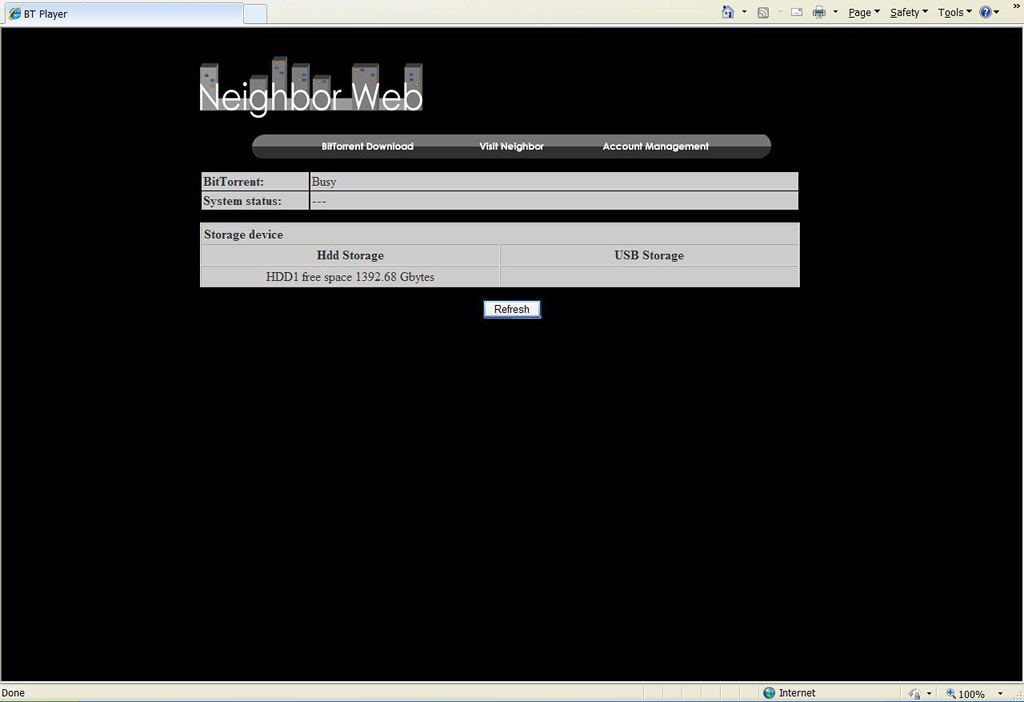
The initial page lets you see the status of the storage available to the V9, and when you click the storage types, it launches your local PC's file browser with a link to the network share on the V9 (seamlessly provided by Samba), ready for you to copy/paste between the PC and the V9.
The BitTorrent client included has a fairly straightforward interface, with minimal controls to load, stop, delete, queue, and start torrents:
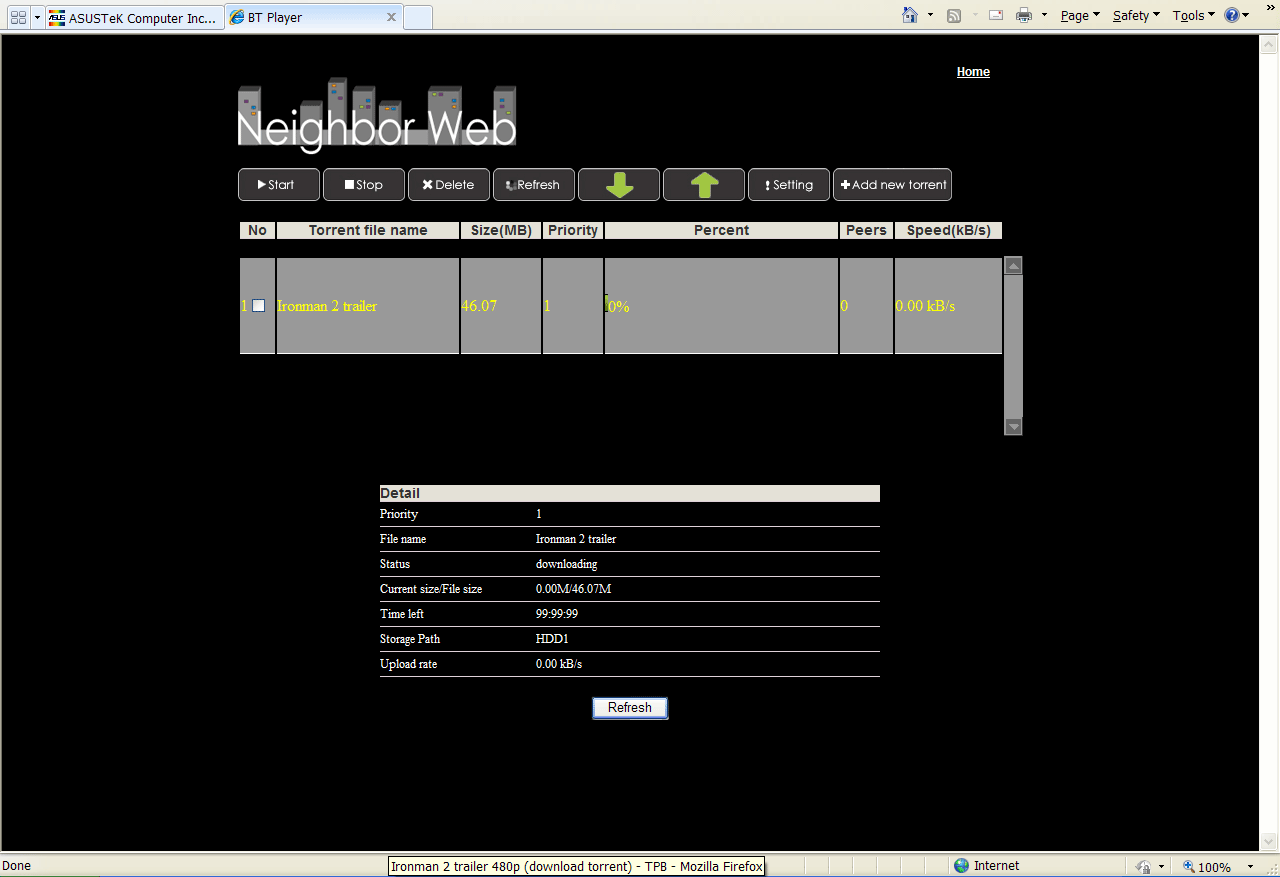
You can upload torrent files from your local PC that you have saved earlier. You can't load magnet links or URLs of .torrent files, though.

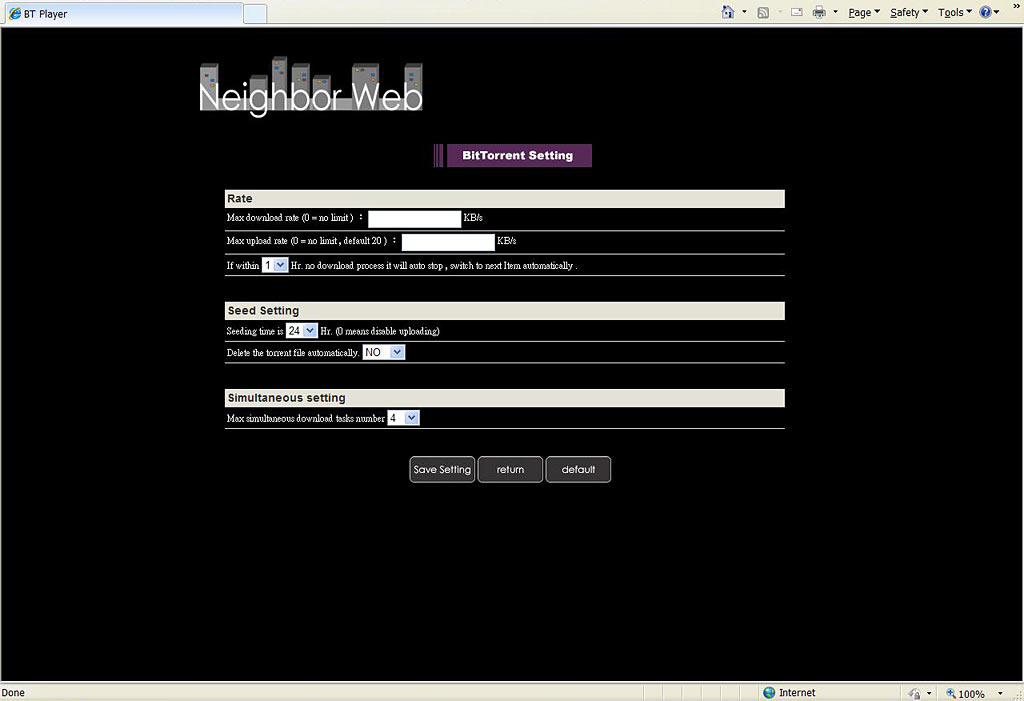
There's settings for the torrent client in the browser, to manage the amount of bandwidth it will use, as well as controlling seeding and the number of simultaneous downloads.
Given the cost of bandwidth in Australia, and the very few choices we have for unlimited Internet plans, you will want to monitor the progress of your files, and how much they've downloaded, to avoid your Internet connection becoming throttled when your quota gets exhausted.
(Australian broadband customers who've chosen an ISP that advertises on late-night TV, and/or decided that there can't be anything wrong with just going with whatever Telstra plan seems to cost the least per month, are likely to be treated to extra-special features like metered uploads as well as downloads, and hilariously high excess usage fees, of $AU100 per gigabyte or more. Torrent-capable network appliances like the V9 are an extra special little land-mine for people who have one of these rip-off Internet accounts. Every computer in the house can be turned off, and a forgotten episode of Two and a Half Men uploading on your torrent box can still be peacefully costing you a thousand bucks a day, or more. Fortunately, it's not hard to find a plan that doesn't meter uploads, and has speed-throttling instead of excess download charges.)
About the only basic feature missing from the V9's BitTorrent client, which people with a nervous disposition might want, is an option to encrypt the file transfers.
Finished files get saved in a default folder called "BT" on the internal drive - you should be able to use the Browser to play them directly on the V9 once they are done, if the files you download are ready-to-play. (If they're zipped or RARed, you'll have to use your PC to browse to the V9, and unzip/unRAR them first.)
You can also use the Samba-provided share to copy downloaded files to other computers on your network, or play them over the network, e.g. on a laptop in bed. I'd like to be able to use the V9 entirely without a PC, but the current state of the firmware doesn't make this possible if you want to torrent and deal with zipped files.
Overall
On the plus side, the Noontec V9-T gives you dual-channel TV reception and the standard recording/time-shifting features built in, and it's all quite simple to set up.
(Note that we haven't tested the V9-T's tuners in marginal reception areas. If digital TV reception is lousy where you live, there's no guarantee that any particular PVR will work properly, even if you drop some more dollars on an antenna that requires rigging swiped from a ship-of-the-line. See if your neighbours have had to go through three different brands of set-top box before they found one that could get all channels. If any old $30 STB works where you live, any old PVR ought to, too.)
The V9 also lets you play lots of existing video and audio on your TV without needing to drag a whole PC into your living room. And if someone rocks up with a digital camera full of holiday snaps, you can just pop its memory card into the V9 to show them off. (Well, as long as they're JPEGs, not RAWs.) The V9-T also lets you play your MP3 (and OGG, and WMA, and AAC, and FLAC...) music collection easily on your TV or stereo without needing a PC to be there.
The on-screen interface is intuitive enough that anyone who picks up the remote should be able to figure out how to play the content you've already put on the V9. The look and feel of the unit gives the impression that this is a second- or third-generation product with a reasonable bit of attention given to its industrial design. And according to the importer who handed me this review sample, the factory tests each unit by playing content for around five hours before packaging them up. So dead-on-arrival problems shouldn't be an issue for them.
On the minus side, today's super-fast product cycles mean the V9 was a twinkle in the designer's eye less than six months ago, so there are a few quirks. The manual's English has a translated-by-Google feel, and the meaning is occasionally hard to determine. The IR remote's design is likely borrowed from some earlier unit, as some buttons do nothing, or don't work as you'd expect. Some of the on-screen menu items have misspelled words (c'mon, "torrent" can get along with only one "t", can't it?) and incorrect punctuation that show the V9's non-English-speaking design origins. There's also no S-Video output at all, so if you have an older TV, be aware that you'll be stuck with thoroughly unexciting composite video if you don't have HDMI or RGB (not YPbPr) component input. And, finally, you do still need to have a PC on hand, if you want to properly use the V9's BitTorrent functions.
I don't like to recommend Windows Media Center PCs to friends and neighbours, as the ongoing support required becomes painful when they can't, or just don't, learn to maintain the PC's software. But for them, and other people who think a PC is not something that should be in their TV room, the V9-T is a very good alternative.
Aus PC Market sell the V9-T empty, or in three V9-plus-hard-drive packages.
The V9-T without a drive is $AU308 including delivery to anywhere in Australia.
If you're an Australian shopper who's already got a spare 3.5-inch SATA drive sitting around,
you can
click here to order an empty V9-T.
(When this review first went up, an empty V9-T was only $AU269.50. The price of the empty has
since gone up, but the dollars-per-gigabyte prices for bundle packages with a V9-T and a large
hard drive are only slightly higher.)
With a 500Gb Seagate hard drive, good for between about 31 and 155 hours of recorded TV depending on data rate, the V9-T is $AU361.90 delivered. Aussie shoppers can click here to order that package, but...
With a 1000Gb Western Digital 5400RPM "green" hard drive, good for between about 62 and 310 hours of recorded TV depending on data rate, the V9-T is $AU404.80 delivered. So you may be thinking you should order that one, but...
With a 1500Gb Western Digital 5400RPM "green" hard drive, good for between
about 93 and 465 hours of recorded TV depending on data rate, the V9-T is $AU423.50 delivered.
That's only $61.60 more than the 500Gb package, and less than $20 more than the 1000Gb
one.
So unless you're really strapped for cash, you should probably just
order the 1500Gb combo pack!
The V9-T can accept hard drives of up to 2Tb capacity. You can order it with any 3.5-inch SATA drive you like. Go ahead, put a 600Gb VelociRaptor in it and see if it overheats, I dare you.
Just click the "assemble" box in the Aus PC Market checkout page to remind them to put your drive inside your V9-T.
This review was co-written by Michael Vorstermans, who works at Aus PC Market,
who sell this product.
That's not as bad as it
sounds.

