Lian Li PC-60 computer case
Review date: 30 August 2000. Last modified 03-Dec-2011.
Want a sharp looking PC? Well, that's a shame.
Oh, there are various big brand name manufacturers that make sleek and stylish Wintel pseudo-Net PCs, but these machines are just basic business boxes, generally close to unexpandable, replete with non-standard components, and crummy value for money.
Sensible companies buy one of them to sit on the receptionist's desk, and give everyone else the usual boring beige things, which can be serviced by the regular IS guys and don't need to have a special hexagonal power supply flown in from Ganymede.
There are plenty of other companies that make whole computers, or just cases into which you can put your own components, with "whimsical" designs. "Whimsical" is code for "ought to have a Fisher-Price badge somewhere". These machines might look great in an office with bean bags in the foyer and Lego tables for burned-out programmers, but in a Fortune 500 environment they look like a revolving bow tie on a Zegna suit.
Once you delete the other "stylish" cases that are really just ordinary steel boxes with plastic air dams attached (I mention one such here), you can find yourself with not many options.
Current Macs all look stunning, but they're no good if you want a Wintel office, as most people do. And if you manage to find a sharp looking brand-name machine with good specs and some expandability, you'll pay through the nose.
What frugal corporate buyers - and small business and home users that just want a gee-whiz looking computer - need is a normal ATX computer case that looks like a million dollars. Something that takes standard components and can thus be built up into a computer of whatever specification you like. Do it yourself; have your local clone assembler do it for you. Either way, you ought to save a bundle, and end up with nice standard machines.
Finding such cases, though, can be a problem, particularly here in Australia. Cases are a pain to ship (big and heavy), and they often come with Power Supply Units (PSUs) pre-installed. This is all very well if that particular PSU has electricity authority approval in your country, but if it doesn't, the importer needs to get it approved - but they'll probably just put the whole project in the Too Annoying basket and keep selling boring beige things.
So I'm very happy to say that, even in Australia, you can get Lian Li cases.
Whether you're a wild-eyed LAN gamer with an urge to impress your mates or a serious corporate bulk buyer wanting to make an office that looks like RAND Corporation, Lian Li make the cases you want.
Ta-da!
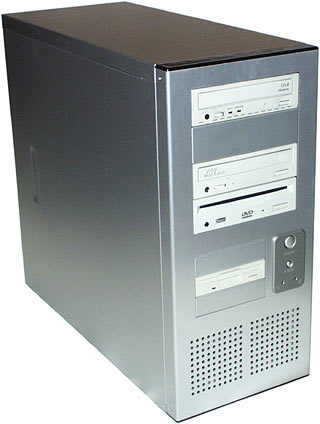
The Lian Li PC-60 is, like their other current cases, made of aluminium. Unlike the others, though, it's got a plain brushed silver finish.
It's 210 by 440 by 485mm (8.25 by 17.75 by 19.25 inches), which puts it in the "big midi-tower" size category. Most midi-tower cases are smaller than the PC-60, but not by all that much. It's a long way from full tower size.
Take the case out of its box and it weighs only 5.9 kilograms.
That's without a Power Supply Unit, though. Most cases have a PSU included as standard.
This one just has a gaping hole in the back by default, which could explain why we're seeing it in Australia. With a PSU, the average decent midi-tower case weighs about 8.5kg. Full towers are more like 13kg.
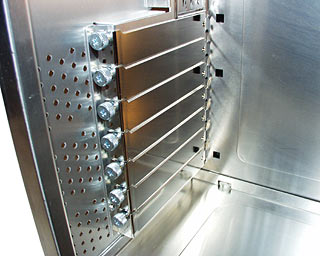
The PC-60 may be midi-tower sized, but it's got an impressive number of drive bays. There are four 5.25 inch bays, all of which have a front panel cutout (they're "external" bays), and there are six 3.5 inch bays, three external, three internal.
Internal bays are only good for hard drives; external bays can be used for anything, as you just pop the cutout cover off if you need access to the drive, or leave it on if you don't.
This compares well with many full tower cases, which commonly have something like eight 3.5 inch bays and five 5.25 inch ones, with various combinations of internal and external.
Most midi-tower cases only offer something like four 3.5 inch bays and three 5.25 inch. This is OK for most computers, but no good for power users with drives out what, I am reliably informed, is correctly referred to as "the wazooty".
Lots of Taiwanese cases seem to have been designed by people who felt compelled to Make A Statement with whatever bits of case didn't have their shape dictated by budget and function. So they've got huge plastic light spreaders in front of their LEDs, giant squishy buttons, and big chunky mouldings all over the front panel.
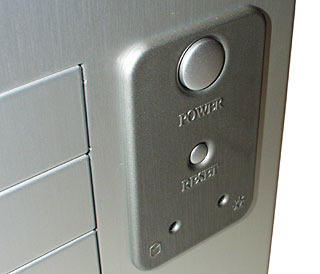
The PC-60 has simple round silver buttons, the reset button is not prominent enough to be accidentally pressed by a toe, and the power and hard drive LEDs are decently small.
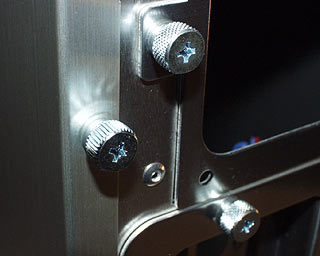
Instead of the standard combination hex/Phillips head screws that hold most cases together, the PC-60 has these Phillips-slotted thumbscrews all over the place. You still need a screwdriver to work on it properly, but not for simple jobs like taking off the side panels.
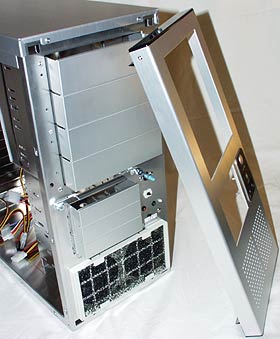
The side panels have an unremarkable slide-off design; the top panel's fixed in place. Slide off the sides...
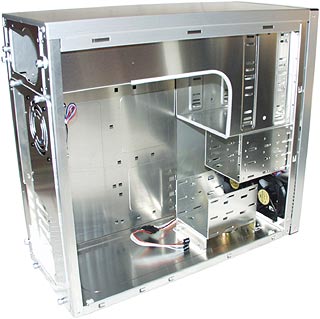
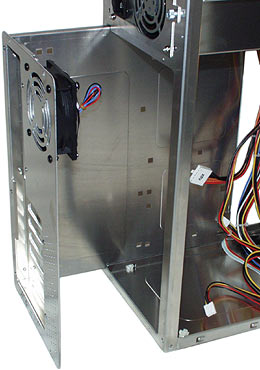
...and the shiny interior of the case is revealed.
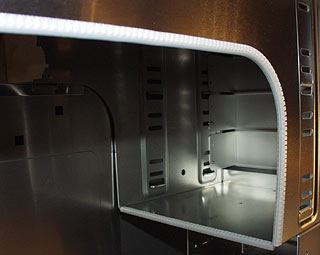
The PC-60 isn't completely without sharp-ish edges inside, but it's got none of the knife-like nastiness of many cheap cases. This possibly-hazardous curved edge at the top of the case is covered with plastic bushing strip.
Cooling
Stacked computers need airflow. Most of them don't get much of it, but they still need it.
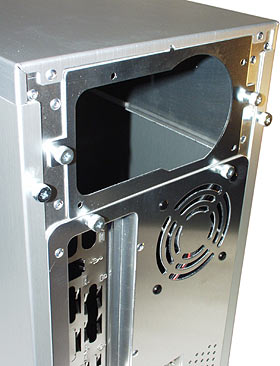
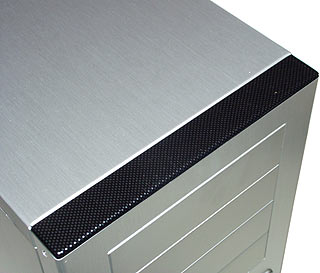
The Lian Li comes standard with three extra fan locations - two in the front, one in the back. All three extra fan locations have an 80mm 12 volt fan pre-mounted, and the intake fans on the front have a washable dust filter.
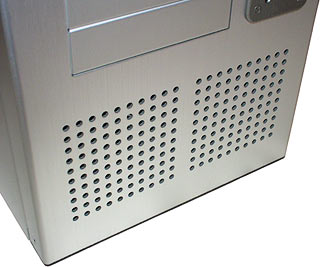
The front fans lurk behind a nattily perforated grille, which lets them breathe passably well.
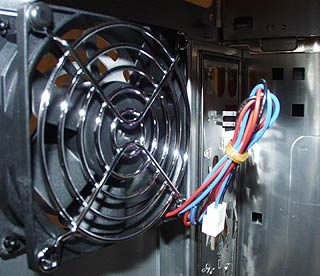
The rear fan is a three-wire, speed-reporting type, which you can plug into pretty much all recent motherboards - they usually have at least two three-pin fan connectors, one for the CPU cooler fan and one for a case fan.
If you don't have a three-wire connector free, it's easy to adapt a three-wire fan to run from an ordinary power connector - the motherboard just can't keep an eye on the fan speed then.
The front two fans are also three-wire types, but they run from a plain Molex-plug passthrough lead, so the third wire's not used. The reason for this is partly because many motherboards don't have connectors for more than two fans, and partly because the case uses a little bit of custom hardware to let you change the speed of the front fans. Of which more in a moment.
The front panel is retained, very sensibly, by four simple plastic clips. A lot of cases have clips and hard-to-reach screws as well; this one doesn't. And yet the front panel does not rattle. Screwed-on front panels are retained that way because they don't fit very well. The PC-60 does not have that problem.
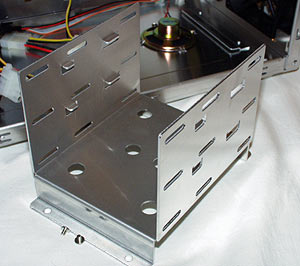
Remove the panel, and you get access to the middle 3.5 inch drive cage.
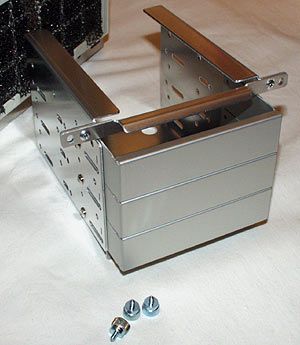
This cage is held in place by another three thumbscrews. The panel hole is just wide enough for you to get the cage back in once you've put a drive or three in it. It jammed the first time I tried to replace it, because I'd forgotten to tighten down my floppy drive retaining screws!
And the front panel blanks, which you remove if you're mounting a floppy or Zip or other 3.5 inch removable drive, aren't the usual pop-out plastic jobbies. These are de rigeur in other cases, and are generally backed by a stamped metal plate that's held in place by shreds of metal deliberately missed by the stamping die.
These plates need to be wiggled endlessly to and fro, or smashed out of the case with a big screwdriver. Which job is, in my experience, sometimes impossible without making a number of observations about the parentage of said bit of metal.
The Lian Li 3.5 and 5.25 inch blanks are classy bent aluminium plate units, to match the rest of the case, and are retained with standard floppy/CD-ROM drive mounting screws. Nice.

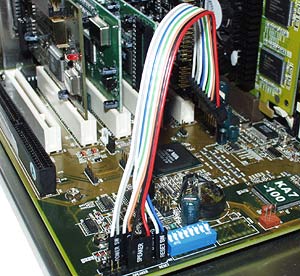
This little switch lets you set the speed of the front two fans, so you don't need to have them howling if there's nothing in the bay in front of them.
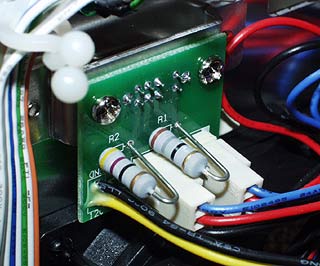
The fan speed control employs time-honoured Couple Of Big Resistors technology. At minimum speed, the fans get about 7.5 volts, for about 40% of full power. Mid speed's about 9.8V, for two-thirds power, and full speed is the 12V you'd expect - probably a little more, from most power supplies, when they're not fully loaded.
Running the fans slowly reduces the noise they produce greatly, and should also extend their bearing life. They don't have a proud "Ball Bearing" note on their sticker, so they're probably bog standard sleeve bearing units.
These are usually theoretically good for a life of 30,000 to 60,000 hours (three and a half to seven years of continuous use) at full speed, but, in my experience, are quite prone to dropping dead rather earlier. Run 'em slow and they'll fail later, and make less of a racket when they do.
This is a significant issue for corporate operators with floors full of computers. Cooling fan bearing failures on multi-fan cases like this aren't likely to do any harm to anything, but a buzzing $5 fan bearing will cause a support callout every time.
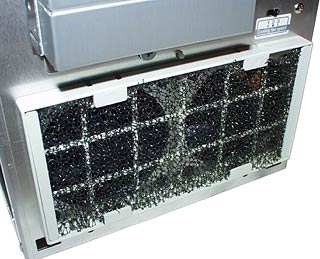
The speed control switch is just above the fan filter. The filter's made of standard coarse-cell foam, which won't impede airflow much but which catches dust quite well. It's easy to remove the filter for cleaning.
The plastic pieces at the top and bottom of the front panel look like carbon fibre. They're not. It's just a printed and clear-coated finish, so I'm afraid you don't actually get the superior structural strength of this advanced composite material in these critical not-load-bearing-at-all areas.
The finish is very good, though. I think carbon fibre as decoration is a bit silly, but at least this really does look like carbon fibre, and not some dorky sticker on the side of a low-riding Suzuki Swift GTi.
Sticker shock
OK, so it's pretty, and has a heap of features. But it ain't cheap.
A normal midi-tower case will only set you back about $AU130 for a nice one with 1mm steel and rolled edges so it doesn't slice you to ribbons when you're working on it. And that includes a 250 watt power supply, which is a $AU60 item all by itself.
The PC-60's $AU363, delivered. And that's without a power supply.
The black version of this case, the PC-12, sells for only $AU286 delivered. So you'd think it'd be a better buy, wouldn't you? After all, black goes with everything.
But the black Lian Li case has the problem of all black cases. Black may look great, but black interrupted with beige looks lousy, and pretty much all off-the-shelf floppy and CD-ROM and other removable drives have beige front panels.
It's not exactly rocket science to get the front bezel off pretty much any drive and paint it black, but you've got to start asking yourself whether you might perhaps need to go to some kind of support group for your computer aesthetics problem.
The silver Lian Li case, on the other hand, doesn't look too awful with beige bezels showing on the front panel. And heck, you can paint 'em silver, if you want.
Trying it out
Appearances aside, any old case will do if you just need a basic computer without unusual numbers of drives, super-hot components or other oddities. The PSUs that come with dirt cheap cases are sometimes dodgy, but they often work fine for years. And who cares if the case is made out of crummy thin steel with sharp edges and not one right angle in the whole thing, if you're never going to have to work on it?
The Lian Li case is not targeting this anything'll-do market segment. It's so expensive because it's meant to be, as Lian Li say among the other not especially amusing Chinglish statements on the side of the PC-60 box, "Design for high performance PC system".
All righty then; I've got one of those. Let's see if it fits, shall we?
My primary motivation in repotting the contents of my current number 1 PC into the Lian Li case was, of course, so that I could have a computer that looked approximately as cool as Shaft.
My secondary motivation was to see whether the small-ish but multi-bayed PC-60 could actually deal with having most of those bays filled without turning into a nightmare to work on.
Lots of consumer tower cases have bays like Imelda Marcos had shoes, but force you to run cables through holes in stiffening cross-members, make you jam drive-backs into common IDE connector locations, and contain interdimensional vortices which consume screws that fell off the driver while you were quivering your way to fixing the awkward side of that fourth hard drive.
In various ways, they are far from optimal if you actually want to use all of the space available.
The PC I transferred into the Lian Li is, in essence, the Sunshine Home for Lost Drives. It's got five hard drives, an IDE CD-ROM, an IDE DVD-ROM, and a SCSI CD writer. You can read about why it's got five hard drives in it here.
It's also got lots of cards, a toasty warm overclocked Athlon CPU, and I'm not certain whether my partridge and pear tree are in there too, but I know I can't find them anywhere else.
Decanting a computer
The PC-60 comes with the usual little bag of screws and other hardware, which is stuck to the side of the bottom drive cage with, so far as I can determine, E-Z-Shred, Nev-R-Budge brand Annoying Tape, specially formulated to waste five minutes of the day of a person attempting to make the case pretty for photographic purposes.
Ahem.
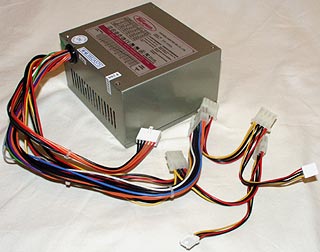
Step one was to give the PC-60 a PSU. I could have just transplanted the 300 watt supply I was already using, but I decided to take a step up, and chose a Topower 350 watt supply. The 350 has more grunt than the 300W PSUs that most people use for stacked machines, but not as much as the hard-to-find 400W supplies.
A decent 300W supply's really perfectly adequate for almost any ordinary PC, no matter how many drives you've crammed into it; 350W just gives you some extra headroom. This PSU costs less than $AU110.
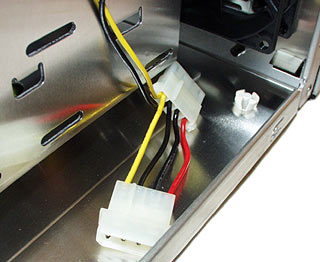
The only downside of the Topower PSU is that it's only got four four-pin Molex power connectors coming out of it, and a pair of the smaller floppy drive connectors.
This is a bit weird, as higher-power PSUs are likely to be used by people with more than four-drives-plus-a-floppy-or-two to power. But no matter. The soldering-impaired can easily buy Molex Y-adaptors for a few bucks each from electronics stores, and them as know the hot end of an iron isn't the part you hold can trivially make a Molex Christmas tree with as many connectors as is necessary.
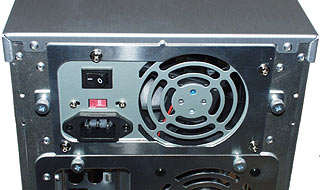
Installing the PSU in the PC-60 is dead easy. You don't have to push it up against the back of the case from the inside, because there's a special mounting plate that screws to the PSU...
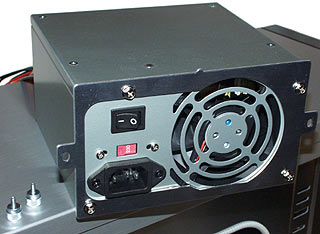
...then lets you insert the PSU assembly from the outside of the case, and secure it with thumbscrews:
Motherboard mounting
Like a lot of better cases, the PC-60 has a slide-out motherboard tray. It lets you slide the motherboard, complete with CPU and cards and RAM, out for servicing.
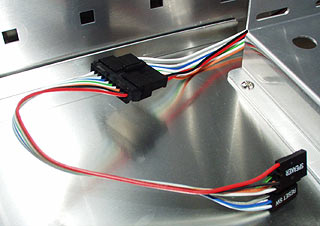
Unlike a lot of better cases, the PC-60 also has a connector in the middle of its motherboard hookup cable bundle, so you can slide the motherboard tray out without having to unplug all of the fiddly little LED and switch leads.

The motherboard standoffs pop through square holes in the tray and clip in place. It's possible to squeeze them in without using pliers, but it's somewhat painful.
The advantage of the clip-through standoffs, as opposed to the usual threaded hexagonal brass screw-in jobbies, is that clip-in standoffs can't come loose on the other side when you're trying to remove a screw, and possibly damage the motherboard as you unwittingly attempt to unscrew the standoff through the board.
A lot of cases these days have back panel slot covers that are retained by a bit of bent metal, and work perfectly well. You pop 'em out with a screwdriver. Cheap cases have die-cut stamped metal covers, which have to be removed in much the same way as the similar stamped metal drive bay covers.
After removal, the edges of the mangled covers may prove useful should your local penitentiary run short of razor-wire.
The Lian Li has mirror finish steel slot covers, retained with more thumbscrews. Yummy.
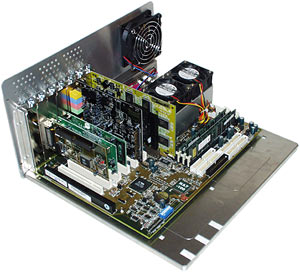
In no more time than it takes that nice young man Igor to nip down to the village and fetch one a brain, one can have all of the bits of one's computer with the highest value per gram installed on the tray.
The case connector cable's two-part design makes hooking up the LEDs and switches about as simple as it can be, since you can do it out in the open without fossicking around when you've already put the motherboard in the case.
Drive time
A couple of ordinary screws retain the lower 3.5 inch drive cage. Take it out, and you reveal the speaker. Which, by the way, has some holes to shout through on the bottom of the case, so it's not completely muffled.
But this bay's a trap. Install a drive in its bottom bay, and the drive will foul the screwdriver when you try to put the cage back in the case.
It's easy to access the cage without removing it, anyway; there's easy screwdriver access to all three possible mounting screw locations on each side.
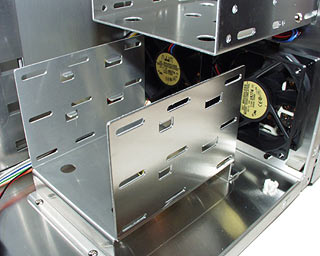
These lower bays are the ones to choose for your hottest drives, since they're right in front of the twin intake fans. There's also an unusually large gap between the drives, so the front fans can get a decent breeze going all around them.
The higher 3.5 inch bays have normal spacing between the drives - in other words, not much. This is not good for warm-running 7200RPM drives, and is frankly awful for 10,000RPM speedsters.
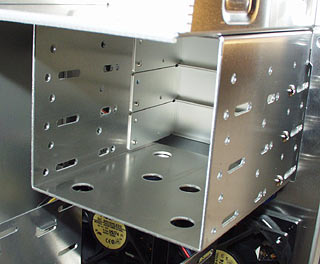
The 5.25 inch bays have normal spacing, too, but they lack the usual shelf supports that make it easy to slide drives in and out. It's still not exactly tricky to line drives up, but it's a bit odd given the otherwise excellent quality of the PC-60.
Finishing up
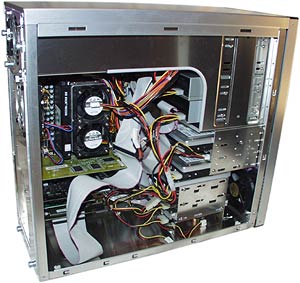
A nip here, a tuck there, and voila - a complete pig's breakfast.
The discerning hacker may elect to attempt to corral his or her cables into something a bit more aesthetically pleasing and a bit less airflow-impeding. Or he or she may decide, as I tend to do, to stick with the au naturel fertiliser-bomb-in-a-wire-factory look.
Routing the cables wasn't too hard; I found it more annoying to plug all of this stuff in in my old tower case. Drive bays are closer to the motherboard drive connectors in a smaller case, and there's no cross-member with a small hole in it that you need to pass loads of power connectors through in one direction, and loads of drive cables through in the other.
Overall, and bearing in mind that most buyers won't be cramming nine drives into it, I judge the PC-60 to be a big success. Everything moves smoothly, everything fits nicely.
If you're used to cases you have to wiggle cards around in to make them fit, and that need a mallet to get the side panels off, and that have mis-tapped screw holes in which screws stick tightly enough that the Queen's First Gurkha Impact Wrench Regiment is called for, the PC-60 is something of a revelation. This thing costs a lot of money for a reason.
Ugly the above component collection may look, but I'll have you know it booted perfectly, first time. I hadn't swapped any drives around and thus ended up with switched drive letters; I hadn't forgotten to plug in the power to anything; I hadn't swapped cards to new slots on the motherboard and given Windows a nasty attack of hardware redetection. I hadn't even plugged the case LED connectors in backwards. So there.
After replacing the side panels (and I didn't even have to sit on the computer like an overfilled suitcase while I fastened them), the machine looks fine.
Beige drives on a silver front panel may horrify certain aesthetes out there; they're welcome to paint the drive bezels, or just build no-floppy, no-CD machines for their austere Bauhaus office. Set the front fans to minimum speed and the background Albinoni will remain perfectly audible.
Overall
It's unfair to call this the Rolls-Royce of cases. It's more like the upmarket Honda. But since most people are making do with the 1974 Toyota Corona of cases, the step up is likely to be rather dramatic.
$AU500-odd for a case with a power supply is a lot to spend, but it's not that much, compared with the $AU3000-odd price of a current model high-spec PC.
The Lian Li doesn't do anything, practically speaking, that a big casters-on-the-bottom server case won't. But you can't use giant server cases for home and office PCs. Well, you can, but it's like commuting to work in a dump truck.
The Lian Li gives you big ugly case features in a small elegant case. It's light, it's strong, it's very well made.
I'm keeping this one.
Buy a Lian Li case!
You'll probably find you can't buy a PC-60 any
more. That's OK, though, because you
can buy the improved PC-60USB, which
I review here, and several
other variants.
People in Australia or New Zealand can purchase
the PC-60 and other Lian Li cases from
Aus PC Market.
Click here!
(if you're NOT
from Australia or New Zealand, Aus PC Market
won't deliver to you. If you're in the USA,
try a price search at
DealTime!)

